7 C H A P T E R Scenario: Remote-Access VPN Configuration A remote-access Virtual Private Network (VPN) enables you to provide secure access to off-site users. ASDM enables you to configure the adaptive security appliance to create secure connections, or tunnels, across the Internet. Figure 7-1 shows an adaptive security appliance configured to accept requests from and establish secure connections with VPN clients over the Internet. Figure 7-1 Network Layout for Remote Access VPN Scenario DNS Server 10.
Chapter 7 Scenario: Remote-Access VPN Configuration Implementing the Remote-Access Scenario Implementing the Remote-Access Scenario The following sections provide instructions for configuring the adaptive security appliance in a remote-access deployment, using example parameters from the remote-access scenario illustrated in Figure 7-1.
Chapter 7 Scenario: Remote-Access VPN Configuration Implementing the Remote-Access Scenario 10. Specify Address Translation Exception and Split Tunneling. 11. Verify the Remote-Access VPN Configuration. Configure the Adaptive Security Appliance for Remote-Access VPN To begin the process for configuring a remote-access VPN, perform the following steps: Step 1 Launch ASDM by entering the factory default IP address in the address field of a web browser: https://192.168.1.1/admin/.
Chapter 7 Scenario: Remote-Access VPN Configuration Implementing the Remote-Access Scenario Step 3 In Step 1 of the VPN Wizard, perform the following steps: a. Click the Remote Access VPN option. b. From the drop-down list, click outside as the enabled interface for the incoming VPN tunnels. c. Click Next to continue.
Chapter 7 Scenario: Remote-Access VPN Configuration Implementing the Remote-Access Scenario Note Step 2 Although there is currently only one selection on this screen, it is set up so that other tunnel types can be enabled easily as they become available. Click Next to continue.
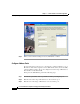
Chapter 7 Scenario: Remote-Access VPN Configuration Implementing the Remote-Access Scenario Step 2 Step 3 Specify the type of authentication that you want to use by performing one of the following steps: • To use static preshared keys for authentication, click Pre-Shared Key, and enter a key (such as "CisCo").
Chapter 7 Scenario: Remote-Access VPN Configuration Implementing the Remote-Access Scenario Step 3 Click Next to continue. Configure User Accounts (optional) If you have chosen to authenticate users with the local user database, create new user accounts. In Step 5 of the VPN Wizard, perform the following steps: Step 1 To add a new user, enter a username and password, then click Add.
Chapter 7 Scenario: Remote-Access VPN Configuration Implementing the Remote-Access Scenario Step 2 When you have finished adding new users, click Next to continue. Configure Address Pools For remote clients to gain access to your network, you must configure a pool of IP addresses that can be assigned to remote VPN clients as they are successfully connected. In this scenario, the pool is configured to use the range of IP addresses 209.165.201.1 to 209.166.201.20.
Chapter 7 Scenario: Remote-Access VPN Configuration Implementing the Remote-Access Scenario Step 4 From the drop-down list, enter the subnet mask or click a preconfigured value. Step 5 Click Next to continue. Configure Client Attributes To access your network, each remote access client needs basic network configuration information, such as which DNS and WINS servers to use and the default domain name.
Chapter 7 Scenario: Remote-Access VPN Configuration Implementing the Remote-Access Scenario In Step 7 of the VPN Wizard, perform the following steps: Step 1 Enter the network configuration information to be used by remote clients. Step 2 Click Next to continue. Configure the IKE Policy IKE is a negotiation protocol that includes an encryption method to protect data and ensure privacy; it is also an authentication method to ensure the identity of the peers.
Chapter 7 Scenario: Remote-Access VPN Configuration Implementing the Remote-Access Scenario To specify the IKE policy, perform the following steps: Step 1 Click the Encryption (DES/3DES/AES), authentication algorithms (MD5/SHA), and the Diffie-Hellman group (1/2/5/7) used by the adaptive security appliance during an IKE security association. Step 2 Click Next to continue.
Chapter 7 Scenario: Remote-Access VPN Configuration Implementing the Remote-Access Scenario Step 2 Click Next to continue. Specify Address Translation Exception and Split Tunneling The adaptive security appliance uses Network Address Translation (NAT) to prevent internal IP addresses from being exposed externally. You can make exceptions to this network protection by identifying local hosts and networks that should be exposed to authenticated remote users.
Chapter 7 Scenario: Remote-Access VPN Configuration Implementing the Remote-Access Scenario In Step 10 of the VPN Wizard, perform the following steps: Step 1 Specify hosts, groups and networks that should be in the list of internal resources made accessible to authenticated remote users. To add or remove hosts, groups and networks dynamically from the Selected panel, click Add or Delete, as appropriate. Note Step 2 Enable split tunneling by clicking the radio button at the bottom of the screen.
Chapter 7 Scenario: Remote-Access VPN Configuration Implementing the Remote-Access Scenario Verify the Remote-Access VPN Configuration Review the configuration attributes for the VPN tunnel you just created. The displayed configuration should be similar to the following: If you are satisfied with the configuration, click Finish to complete the Wizard and apply the configuration changes to the adaptive security appliance.
Chapter 7 Scenario: Remote-Access VPN Configuration What to Do Next What to Do Next If you are deploying the adaptive security appliance solely in a remote-access VPN environment, you have completed the initial configuration. In addition, you may want to consider performing some of the following steps: To Do This ... See ...
Chapter 7 Scenario: Remote-Access VPN Configuration What to Do Next Cisco ASA 5500 Series Adaptive Security Appliance Getting Started Guide 7-16 78-17372-01