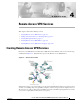
C H A P T E R 4 Remote Access VPN Services This chapter contains the following sections: • Creating Remote Access VPN Services, page 4-1 • Adding AAA Server Devices to Your Repository, page 4-2 • Creating Encryption Policies, page 4-5 • Creating Remote Access VPN Policies, page 4-5 • Creating Remote Access VPN Service Requests, page 4-25 Creating Remote Access VPN Services Remote Access VPN tunnels are initiated by a VPN Client and terminated at the secure network edge, as illustrated in Figure
Chapter 4 Remote Access VPN Services Adding AAA Server Devices to Your Repository Note Before creating an ISC security policy or service request, it is necessary to populate the ISC repository with the target devices in your network, collect the initial device configuration files, designate customers and customer sites, and define each device as a CPE. CPE devices are the devices at each end of the VPN tunnel.
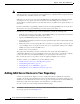
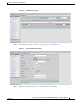
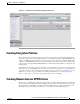
Chapter 4 Remote Access VPN Services Adding AAA Server Devices to Your Repository Figure 4-2 Step 2 Click Create. The Create AAA Server page appears as shown in Figure 4-3. Figure 4-3 Step 3 The AAA Servers Page The Create AAA Server Page Follow the instructions in Table 4-1 to enter the AAA server attributes. Cisco IP Solution Center Integrated VPN Management Suite Security User Guide, 3.
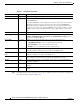
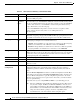
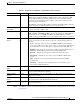
Chapter 4 Remote Access VPN Services Adding AAA Server Devices to Your Repository Table 4-1 Create AAA Server Fields Field Name Type Instructions Name text box Enter a name for the AAA server. Owner Select button Specify whether the policy is global by clicking Global, or customer owned by clicking Customer. If you select Customer, you are required to specify the owner. Choose the customer with which you want to associate the AAA server. To do this, click Customer > Select.
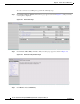
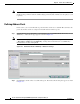
Chapter 4 Remote Access VPN Services Creating Encryption Policies Figure 4-4 The AAA Servers Page After Adding A New Server Creating Encryption Policies The encryption policy defines the security parameters for protecting data traveling through the VPN tunnels. It consists of one or more IKE proposals, one or more IPsec proposals, and global attributes.
Chapter 4 Remote Access VPN Services Creating Remote Access VPN Policies To create a remote access VPN policy, perform the following steps: Step 1 Click Service Design > Policies. The Policies page appears as shown in Figure 4-5, with previously created policies displayed. Figure 4-5 Step 2 Click Create > IPsec Policy. The IPsec Policy Creation page appears as shown in Figure 4-6. Figure 4-6 Step 3 The Policies Page The IPsec Policy Creation Page Click Remote Access VPN Policy.
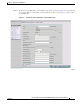
Chapter 4 Remote Access VPN Services Creating Remote Access VPN Policies Step 4 The Remote Access VPN Policy – General Editor page appears as shown in Figure 4-7. Look at the list of steps in the table of contents (TOC) on the left of the page. These are the steps for creating a remote access VPN policy. Figure 4-7 Step 5 The Remote Access VPN Policy – General Editor Page Follow the instructions in Table 4-2 to enter values for the Remote Access VPN Policy – General Editor.
Chapter 4 Remote Access VPN Services Creating Remote Access VPN Policies Table 4-2 Remote Access VPN Policy – General Editor Fields Field Name Type Instructions Name text box Enter a name for the policy. However, the name cannot contain spaces because it is used as the VPN group name. Owner radio button and Select button Click Customer > Select and choose the customer for which the remote access VPN is intended. When you click Customer > Select, the Customer for IPsec Policy dialog box appears.
Chapter 4 Remote Access VPN Services Creating Remote Access VPN Policies Table 4-2 Remote Access VPN Policy – General Editor Fields (continued) Field Name Type Instructions NAT Traversal checkbox Also called NAT transparency. NAT traversal enables IPsec VPN tunnels to span multiple Network Address Translation (NAT) and Port Address Translation (PAT) domains.
Chapter 4 Remote Access VPN Services Creating Remote Access VPN Policies Note You can click Finish on any of the Remote Access VPN Policy pages. When you click Finish, the unedited policy parameters take the default settings provided by ISC, and ISC saves the policy to your repository. Defining Address Pools In this section, you create the IP address pools that remote clients use to establish IPsec tunnels to the private site. Remote clients are assigned an inside IP address from these pools.
Chapter 4 Remote Access VPN Services Creating Remote Access VPN Policies Figure 4-9 Step 3 Address Pools Dialog Box Follow the instructions in Table 4-3 to enter values in the address pool fields. Table 4-3 Address Pools Fields Field Name Type Instructions Starting Address text box Enter the starting address of the IP address pool. Ending Address text box Enter the ending address of the IP address pool. The address pool range must be within a single subnet.
Chapter 4 Remote Access VPN Services Creating Remote Access VPN Policies Step 6 Click Next to continue to the Split Tunneling Network page as shown in Figure 4-11 in the “Defining Split Tunneling Networks (Optional)” section on page 4-12. Defining Split Tunneling Networks (Optional) You can enable or disable split tunneling for remote users.
Chapter 4 Remote Access VPN Services Creating Remote Access VPN Policies Table 4-4 Split Tunneling Fields Field Name Type Instructions Split Tunneling Policy drop-down list Select one of the following methods for split tunneling: • Everything – This option sends all traffic, both VPN-bound traffic and Internet-bound traffic, through the VPN tunnel to the CPE device. If you select Everything there are no further values enter, as shown in Figure 4-14.
Chapter 4 Remote Access VPN Services Creating Remote Access VPN Policies Figure 4-14 The Everything Option for Split Tunneling Step 3 Click Next to continue to the User List page as described in the “Defining the Remote Access User List (Optional)” section on page 4-14. Defining the Remote Access User List (Optional) In this section, you can enter one or more user profiles to store locally on the CPE device (as opposed to storing the user profiles on a AAA Server).
Chapter 4 Remote Access VPN Services Creating Remote Access VPN Policies Figure 4-15 The Remote Access VPN Policy – User List Page Step 2 Click Create. The User Creation dialog box appears as shown in Figure 4-16. Figure 4-16 User List Dialog Box Step 3 Follow the instructions in Table 4-5 to enter values in the User List dialog box fields. Table 4-5 User List Dialog Box Fields Field Name Type Instructions User ID text box Enter the user name to add to the user list.
Chapter 4 Remote Access VPN Services Creating Remote Access VPN Policies Defining Cisco IOS Software-Specific Parameters In the Remote Access VPN Policy – Cisco IOS Editor page, you can select the values for the SA idle timeout as well as enable Reverse Route Injection (RRI). It is recommended that you select both the RRI and RRI peer options. In remote access, RRI is used to inject the host route into the routing table for the IP address that was allocated out of the remote access address pool.
Chapter 4 Remote Access VPN Services Creating Remote Access VPN Policies Table 4-6 Cisco IOS Editor Fields Field Name Type Instructions Reverse Route Injection checkbox Check to enable reverse route injection (RRI). RRI injects the host route into the routing table for the IP address that was allocated out of the remote access address pool. (RRI uses the host address as the route destination in the route entry of the routing table.
Chapter 4 Remote Access VPN Services Creating Remote Access VPN Policies Figure 4-18 The Remote Access VPN Policy – PIX Firewall Editor Page Step 2 Use the instructions in Table 4-7 to enter values for the PIX Firewall-specific parameters. Table 4-7 PIX Firewall Editor Fields Field Name Type Instructions Idle Timeout text box Enter the inactivity timeout for the VPN client. The default is 1800 seconds.
Chapter 4 Remote Access VPN Services Creating Remote Access VPN Policies Figure 4-19 The Remote Access VPN Policy – VPN 3000 Editor Page Step 2 Follow the instructions in Table 4-8 to enter VPN 3000-specific parameters. Table 4-8 VPN 300 Editor Fields Field Name Type Instructions Simultaneous Logins text box Enter the number of simultaneous logins for this group. Min Password Length text box Enter the minimum password length for users in this group.
Chapter 4 Remote Access VPN Services Creating Remote Access VPN Policies Table 4-8 VPN 300 Editor Fields (continued) Field Name Type Instructions Allow IPsec Through NAT checkbox The Allow IPsec through NAT option lets you use the Cisco VPN Client to connect to the VPN Concentrator via UDP through a firewall or router that is running NAT. Enabling this feature creates runtime filter rules that forward UDP traffic for the configured port even if other filter rules on the interface drop UDP traffic.
Chapter 4 Remote Access VPN Services Creating Remote Access VPN Policies Step 2 Follow the instructions in Table 4-9 to enter values for each day of the week. Table 4-9 Remote Access VPN Policy – Access Hours Fields Field Name Type Instructions Name text box Enter a name to identify the access hours assigned to this group. Control drop-down list There are two control options: • during – Allow access during the hours in the specified range (default).
Chapter 4 Remote Access VPN Services Creating Remote Access VPN Policies Figure 4-21 The Remote Access VPN Policy – VPN 3000 L2TP Page Step 2 Follow the instructions in Table 4-10 to select options for VPN 3000 L2TP tunneling. Table 4-10 Remote Access VPN Policy – VPN 3000 L2TP Editor Fields Field Name Type Instructions Use Client Address checkbox Check the box if you want to accept and use an IP address received from the client.
Chapter 4 Remote Access VPN Services Creating Remote Access VPN Policies Table 4-10 Remote Access VPN Policy – VPN 3000 L2TP Editor Fields (continued) Field Name Type Instructions MSCHAPv1 checkbox Check the box to use Microsoft Challenge-Handshake Authentication Protocol version 1 (MSCHAPv1), or uncheck the box to disable use of this protocol.
Chapter 4 Remote Access VPN Services Creating Remote Access VPN Policies Figure 4-23 The Policies Page with Policy Status Displayed Step 4 Continue on to the “Creating Remote Access VPN Service Requests” section on page 4-25. Cisco IP Solution Center Integrated VPN Management Suite Security User Guide, 3.
Chapter 4 Remote Access VPN Services Creating Remote Access VPN Service Requests Creating Remote Access VPN Service Requests Once the remote access policy is created, perform the following steps to create a remote access service request: Step 1 Click Home > Service Inventory > Inventory and Connection Manager > Service Requests. The Service Requests page appears as shown in Figure 4-24. Figure 4-24 The Service Requests Page Step 2 Click Create > IPsec RA.
Chapter 4 Remote Access VPN Services Creating Remote Access VPN Service Requests Figure 4-25 IPsec Remote Access Service Editor Page Step 3 Follow the instructions in Table 4-11 to enter values for the IPsec Remote Access Service Editor fields. Table 4-11 IPsec Remote Access Service Editor Fields Field Name Type Instructions VPN Select button Click Select. Choose the VPN you defined for your remote access policy. Click OK.
Chapter 4 Remote Access VPN Services Creating Remote Access VPN Service Requests Table 4-11 IPsec Remote Access Service Editor Fields (continued) Field Name Type Instructions Remote Access Policies list Specify the remote access policy to use in this service request by clicking Select. The Policy for Remote Access Service page appears as shown in Figure 4-26. Choose the policy and click Select. You can select multiple remote access policies.
Chapter 4 Remote Access VPN Services Creating Remote Access VPN Service Requests Figure 4-28 The IPsec Remote Access Service Editor Page with VPN and Policy Selected Step 4 On the main IPsec Remote Access Service Editor page, click the Select button in the CPEs row. The CPEs Associated with Remote Access Service dialog box appears as shown in Figure 4-29.
Chapter 4 Remote Access VPN Services Creating Remote Access VPN Service Requests Figure 4-30 The IPsec Remote Access Service Editor Page with CPEs Selected Step 6 (Optional) Click Add Templates to add a template to the service request. For features not supported by ISC, a template can be added to the service request and ISC will download the additional configuration information contained in the template to the CPE device.
Chapter 4 Remote Access VPN Services Creating Remote Access VPN Service Requests Figure 4-32 The Template DataFile Chooser Page Step 8 The templates are in the left column and the associated data files are on the right. Choose a folder of templates or a single template by highlighting it. The page updates and displays the associated templates on the right side of the page.
Chapter 4 Remote Access VPN Services Creating Remote Access VPN Service Requests Figure 4-33 Add/Remove Templates Dialog Box with Template Added Step 11 For each template, chose the appropriate fields as described in Table 4-12.
Chapter 4 Remote Access VPN Services Creating Remote Access VPN Service Requests Cisco IP Solution Center Integrated VPN Management Suite Security User Guide, 3.