
Network Card User Manual
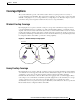
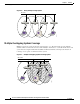
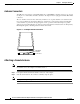
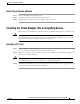
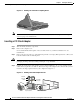
Table Of Contents
- Cisco Aironet Wireless LAN Client Adapters Installation and Configuration Guide for MS-DOS
- Contents
- Preface
- Audience
- Purpose
- Organization
- Conventions
- Related Publications
- Obtaining Documentation
- Obtaining Technical Assistance
- Introduction to the Wireless LAN Adapters
- Parts of the Client Adapter
- Radio Ranges
- Data Transparency and Protocols
- System Configurations
- Coverage Options
- Safety Information
- Unpacking the Client Adapter
- Inserting the Client Adapter into a Computing Device
- Removing the Client Adapter
- Driver Overview
- Windows for Workgroups 3.11 NDIS2 Installation
- DOS NDIS2 Installation
- ODI Driver Installation
- Additional Requirements and Features
- Driver Keywords and Settings
- Site Survey and Link Test
- Loading New Firmware Versions
- DOS Utilities
- Accessing the Latest Troubleshooting Information
- Interpreting the Indicator LEDs
- Technical Specifications
- Channel Sets
- Maximum Power Levels and Antenna Gains
- Manufacturers Federal Communication Commission Declaration of Conformity Statement
- Department of Communications – Canada
- European Community, Switzerland, Norway, Iceland, and Liechtenstein
- Declaration of Conformity for RF Exposure
- Guidelines for Operating Cisco Aironet Wireless LAN Client Adapters in Japan
- Explosive Device Proximity Warning
- Lightning Activity Warning
- Installation Warning
- Circuit Breaker (15A) Warning

2-7
Cisco Aironet Wireless LAN Client Adapters Installation and Configuration Guide for MS-DOS
OL-1744-02
Chapter 2 Installing the Hardware
Removing the Client Adapter
Step 5 Tilt the adapter to allow the antenna connector and LEDs to slip through the opening in the CPU back
panel.
Step 6 Press the client adapter into the empty slot until the connector is firmly seated.
Caution Do not force the adapter into the expansion slot as this could damage both the adapter and the slot.
If the adapter does not insert easily, remove the adapter and reinsert it.
Step 7 Reinstall the screw on the CPU back panel, and replace the computer cover.
Step 8 Attach the 2-dBi antenna to the adapter’s antenna connector until it is finger-tight. Do not overtighten.
Step 9 For optimal reception, position the antenna so that it is straight up.
Step 10 Boot up your computer.
Note Because PCI adapters are installed inside desktop computers, you should have little reason to remove
the adapter. However, instructions are provided in the “Removing the Client Adapter” section on
page 7-7 in case you ever need to remove your PCI client adapter.
Removing the Client Adapter
Follow the instructions in this section whenever you need to remove the client adapter from your
computer.
Removing a PC Card
To remove a PC card after it is successfully installed and configured (such as when your laptop is to be
transported), pull the card directly out of the PC card slot. The client adapter is “hot swappable” and can
be inserted and ejected at any time after you have installed the driver.
Removing a PCI Client Adapter
Because a PCI adapters are installed inside desktop computers, which are not designed for portable use,
you should have little reason to remove the adapter. Follow these steps in case you ever need to remove
your PCI client adapter.
Step 1 Completely shut down your computer.
Note When the computer is turned off by using the power switch, there still might be power supplied to
the motherboard. To ensure that your computer is completely shut down, unplug the computer’s
power cord from its power source.
Step 2 Disconnect the client adapter’s antenna.
Step 3 Remove the computer cover.