C H A P T E R 3 Installing the Driver, Client Utility, and Client Adapter This chapter provides installation and configuration instructions for the driver, client utilities, and the client adapter.
Chapter 3 Installing the Driver, Client Utility, and Client Adapter System Requirements System Requirements The instructions in this section can be used only with the following: • Cisco Aironet Wireless LAN Adapters – 340, 350, and 4800 series client adapters – PC Cards and PCI client adapters • Apple Macintosh computers running the Mac OS 9.x or Mac OS X (version 10.1.
Chapter 3 Installing the Driver, Client Utility, and Client Adapter Installing the Driver and Client Utility For Mac OS X, you should install the client adapter into your PowerBook or PowerMac before installing the driver and client utility. Follow the instructions in the “Inserting the Client Adapter into a Computing Device” section on page 3-8 to insert the client adapter into your PowerBook or PowerMac.
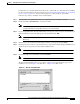
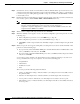
Chapter 3 Installing the Driver, Client Utility, and Client Adapter Installing the Driver and Client Utility Figure 3-2 Step 7 When the Cisco WLAN Install screen appears, perform the following operations: a. Expand the Mac OS software component list by clicking the right triangle on the left of the Mac OS name. Note b. Step 8 Both the PCI and PC Card drivers are normally installed by the installer.
Chapter 3 Installing the Driver, Client Utility, and Client Adapter Installing the Driver and Client Utility For Mac OS X, follow the instructions in the Initial Configuration Settings for Mac OS X section. Initial Configuration Settings for Mac OS X When your Macintosh completes the power-up process following a successful install, the client adapter setup assistant activates.
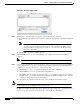
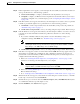
Chapter 3 Installing the Driver, Client Utility, and Client Adapter Installing the Driver and Client Utility Step 6 On the Power screen, read the screen information, click the Transmit Power up and down arrows, and select the desired client adapter transmit power level. To help minimize cell overlaps, you should strive to use the lowest power setting that supports full coverage of your wireless cell. Click Next to continue to the Security screen.
Chapter 3 Installing the Driver, Client Utility, and Client Adapter Installing the Driver and Client Utility Step 11 Step 12 Step 13 If the Congratulations screen appears, your client adapter has successfully associated and sent data to an access point. Perform one of the following operations: a. Click Network Settings to configure your Macintosh network parameters. Go to Step 15. b. Click Quit to configure your Macintosh network parameters at a later time.
Chapter 3 Installing the Driver, Client Utility, and Client Adapter Inserting the Client Adapter into a Computing Device Step 18 Perform one of the following operations: • If you are connected to a DHCP server, select Using DHCP in the Configure drop-down box and type your computer’s unique client name in the DHCP Client ID field. If required by your wireless network, enter the IP addresses for the domain name servers (obtained from your system administrator).
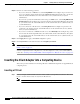
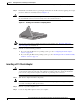
Chapter 3 Installing the Driver, Client Utility, and Client Adapter Inserting the Client Adapter into a Computing Device Step 2 Caution Hold the PC card with the Cisco logo facing up and insert it into the PC card slot, applying just enough pressure to make sure it is fully seated (see Figure 3-3). Do not force the PC card into your computer’s PC card slot. Forcing it will damage both the card and the slot. If the PC card does not insert easily, remove the card and reinsert it.
Chapter 3 Installing the Driver, Client Utility, and Client Adapter Configuring the Client Adapter Step 4 Examine the client adapter and ensure the antenna is not attached to the card. The antenna connector and the LEDs face out of your computer and are visible when you put the cover back on. The bottom edge of the adapter is the connector you will insert into the PCI expansion slot. Step 5 Tilt the adapter to allow the antenna connector and LEDs to slip through the opening in the computer back panel.
Chapter 3 Installing the Driver, Client Utility, and Client Adapter Configuring the Client Adapter Step 7 Select Control Panels > TCP/IP. The TCP/IP window appears. Step 8 Select Cisco Wireless LAN Adapter in the Connect via drop-down box. Step 9 Perform one of the following: • If you are connected to a DHCP server, select Using DHCP Server in the Configure drop-down box and type your computer’s unique client name in the DHCP Client ID field.
Chapter 3 Installing the Driver, Client Utility, and Client Adapter Configuring the Client Adapter Basic Configuration on Mac OS X During the installation process, the setup assistant is typically used to configure the client adapter and the Mac OS X network options. This section describes the process used to set and verify basic configuration options when the setup assistant is not used.
Chapter 3 Installing the Driver, Client Utility, and Client Adapter Configuring the Client Adapter Step 3 Click the Network Type up or down arrows and select one of the following options: • If your computer connects to an access point or to the Cisco Aironet 340 Series Base Station, select Computer to Access Point. • If your computer connects to another computer in a peer-to-peer (ad hoc) network, select Computer to Computer.
Chapter 3 Installing the Driver, Client Utility, and Client Adapter Configuring the Client Adapter Step 3 When the client utility screen appears, check the status line on the bottom of the screen. The status line should indicate that the radio is associated to an access point, the access point name, and the IP address. The status line should be similar to: Radio is associated AP:’AP340-3836b7’ IP: 10.0.0.1.