
user manual

4-11
Cisco Aironet 1200 Series Access Point Software Configuration Guide
OL-2159-05
Chapter 4 Configuring VLANs
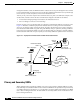
A Wireless VLAN Deployment Example
Using the Configuration Screens
Using the example outlined above, this section describes how to use the configuration screens to
configure VLANs on your access point.
To create and enable VLANs on your access point you must complete the following procedures:
1. Obtain and record the VLAN ID and setup information for the switch to which your access point
will communicate.
2. Create and configure the VLANs on your access point.
3. Create and configure the SSIDs to which the VLANs will associate.
4. Enable VLAN (802.1Q) tagging.
5. Identify the native VLAN.
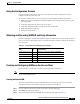
Obtaining and Recording VLAN ID and Setup Information
See your organization’s network administrator to obtain the information you need to create VLANs on
your access point. For this example, Table 4-2 lists the information required to configure the VLANs on
the access point.
Creating and Configuring VLANs on the Access Point
For this example, you will create 5 VLANs using the information in Table 3-2.
Note To avoid error messages in the event log, do not enable the VLANs until you have finished creating them
and associated SSIDs to them.
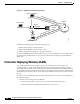
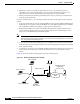
Creating the Native VLAN
You must create and identify a native VLAN before the access point can connect to the trunk and
communicate with the switch. Follow these steps to create the native VLAN.
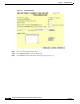
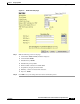
Step 1 Use your web browser to browse to the access point’s summary status page.
Step 2 Click Setup. The Setup page appears.
Step 3 In the Associations section, click VLAN. The VLAN Setup page appears (Figure 4-6).
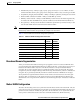
Table 4-2 Configuration for VLAN Deployment Example
SSID
VLAN
ID Security Policy
Infrastructure VLAN 1 IEEE 802.1x with Static WEP + TKIP/MIC
Full-time 2 IEEE 802.1x with Dynamic WEP + TKIP/MIC
Part-time 3 IEEE 802.1x with Dynamic WEP + TKIP/MIC
Guest 5 Open with no WEP
Maintenance 4 Open with WEP + MAC authentication