
user manual


2-4
Cisco Aironet 1200 Series Access Point Software Configuration Guide
OL-2159-05
Chapter 2 Using the Management Interfaces
Using the Command-Line Interface
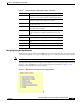
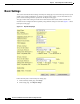
The Network Map window appears when you click Network Map in the Map window. You use the
Network Map window to open a new browser window displaying information for any device on your
wireless network. Figure 2-2 shows the Network Map window.
Figure 2-2 The Network Map Window
Click the name of a wireless device to open a new browser window displaying a Station page listing the
access point’s local information for that device. Click Go beside the device name to open a new browser
window displaying that device’s home page, if available. Some devices, such as PC Card clients, might
not have home pages.
Click show clients to display all the wireless client devices on your network. The client names appear
under the access point or bridge with which they are associated. If clients are displayed, click hide
clients to display only non-client devices.
Using the Command-Line Interface
You can use a command-line interface (CLI) to configure your access point through a terminal emulation
program or a Telnet session instead of through your browser. This section provides instructions for
Microsoft’s HyperTerminal and for Telnet; other programs are similar.
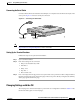
Preparing to Use a Terminal Emulator
To use a terminal emulator to open the CLI, you need to:
1. Connect a nine-pin, female DB-9 to RJ-45 serial cable to the RJ-45 serial port on the access point
and to the COM port on a computer.
Note Make sure you use the standard Cisco rollover cable, part number AIR-CONBAB1200, to
make the connection.
2. Set up a terminal emulator to communicate with the access point. Use the following settings for the
terminal emulator connection: 9600 baud, 8 data bits, no parity, 1 stop bit, and no flow control.
Use the Console/Telnet Setup page to adjust the console and Telnet connection settings. See the
“Console and Telnet Setup” section on page 11-4 for details on the Console/Telnet Setup page.