
user manual


13-36
Cisco Aironet 1200 Series Access Point Software Configuration Guide
OL-2159-05
Chapter 13 Diagnostics and Troubleshooting
Resetting to the Default Configuration
Step 3 Click Apply or OK to apply the setting. The access point reboots.
Resetting to the Default Configuration
If you forget the password that allows you to configure the access point, you might need to completely
reset the configuration. Follow the steps below to delete the current configuration and return all access
point settings to the factory defaults.
Note The following steps reset all configuration settings to factory defaults, including passwords, WEP keys,
the IP address, and the SSID. If you do not need to reset the entire configuration, use the Configuration
Reset buttons on the System Configuration Setup page in the web-browser interface. Consult
“Downloading, Uploading, and Resetting the Configuration” section on page 10-10 for more
information on the reset buttons in the web-browser interface.
Step 1 Connect a nine-pin, female DB-9 to RJ-45 serial cable to the RJ-45 serial port on the access point and
to the COM port on a computer.
Step 2 Open a terminal-emulation program on your computer.
Note These instructions describe HyperTeminal; other programs are similar.
Step 3 In the Connection Description window, enter a name and select an icon for the connection and click
OK.
Step 4 In the Connect To window, select the port to which the cable is connected and click OK.
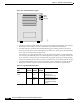
Step 5 In the Port Settings window, enter the following settings:
• 9600 baud,
• 8 data bits,
• No parity,
• 1 stop bit, and
• No flow control
Step 6 Click OK, and press Enter.
Step 7 When the Summary Status screen appears, reboot the access point by unplugging the power connector
and then plugging it back in.
Step 8 When the access point reboots and the Summary Status screen reappears, type :resetall, and press Enter.