
user manual


8-35
User Guide for Cisco Digital Media Manager 5.4.x
OL-15762-05
Chapter 8 Authentication and Federated Identity
Procedures
Step 2
Install Enhanced
Client or Proxy
(ECP), a SAML
profile plugin, if
you will make
API system calls
to OpenAM
1
.
a.
Log in to your Cisco.com user account.
b.
Go to http://cisco.com/cisco/software/release.html?mdfid=280171249&softwareid=
282100271&release=5.3&rellifecycle=&relind=AVAILABLE&reltype=all, navigate to the
download page for our implementation of ECP
2
, and then download it.
c.
Use Maven or another method to download release 1.2.14 of the open source logging
framework called log4j.
d.
Copy your downloaded ECP and log4j files to
/$OPENSSO_HOME/WEB-INF/lib
, .
e.
Restart your servlet container—for example, tomcat.
f.
In OpenAM Web, click Federation, and then click your IdP server instance—for
example, dmsIdp.
g.
Click Advanced.
h.
In the ECP Configuration area, set the IDP Session Mapper value to
com.cisco.dms.core.security.aaa.sso.saml2.ecp.idp.plugin.DmsIDPECPSessionMapper.
i.
Click Save.
Step 3
Export SP
metadata from
Cisco DMS.
Export metadata from each SP that will participate in your OpenAM CoT.
Tip
For Cisco DMS, see the “Export SP Metadata from DMM” topic.
Step 4
Import SP
metadata from
Cisco DMS.
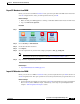
a.
Go to the console page and click Register Remote Service Provider.
b.
Check the File check box.
c.
Click Upload, and then navigate to the SP metadata that you exported from DMS-Admin and
saved as dms_sp_config.xml.
d.
Click Configure, and then click Federation.
e.
Make sure that dmsServiceProvider (SAMLv2 SP Remote) has a defined value.
Step 5
Make sure that
OpenAM is
configured to
issue the
Principal
attribute.
a.
In OpenAM Web, click Federation, and then click your IdP server instance—for
example, dmsIdp.
b.
Click Assertion Processing.
c.
In the Attribute Mapper area, set the Attribute Map value to UID=uid.
d.
Click Back.
e.
Click the SP entity instance for your DMM appliance.
The Assertion Content tab is selected automatically.
f.
In the Request/Response Signing area, check both of these check boxes:
•
Authentication Requests Signed
•
Assertions Signed
g.
Choose Access Control > / (Top Level Realm) > Authentication.
h.
Click All Core Settings.
i.
Make sure that the User Profile value is set to Required.
This will cause OpenAM to pass the user IDs of logged-in users to DMM and your other SPs.
j.
Click Save, and then click Back to Authentication.
k.
Log out of OpenAM Web.