
user manual


19-24
User Guide for Cisco Digital Media Manager 5.4.x
OL-15762-05
Chapter 19 Content Distribution and Delivery
Procedures
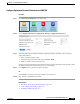
Step 5
Click Edit Application above the Applications table.
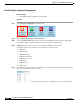
Step 6
As needed, edit the name or description for this deployment package.
Step 7
Choose the mount point for this deployment. You can choose only one.
•
Flash Storage (also known as usb_1) is the SD memory card installed inside a DMP.
•
USB (also known as usb_2) is an external USB hard drive or flash memory drive that is attached to
a DMP.
Tip To learn which external USB drives we support and have tested, see Cisco DMS compatibility information
on Cisco.com. http://www.cisco.com/en/US/products/ps6681/products_device_support_tables_list.html.
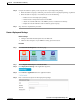
Step 8
Does this job consist of assets for an emergency notification?
•
If so, check the Emergency/Alarm check box.
•
If not, uncheck it.
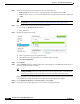
Step 9
(Optional) Would you like to repopulate this deployment package?
Repopulate and save it now.
a.
Click an application type in the Applications list.
b.
Check at least one saved application in the Available Applications table.
c.
Click Select Application.
Step 10
Click Submit.
Step 11
Use the Channels feature to schedule deployment of this package to your DMPs that should receive it.
Then, wait for the file transfer to finish.
Tip DMS-CD does not prevent you from using the Run Task feature to start transferring a DMS-CD deployment
package immediately. However, its immediacy defeats many of the most important benefits of using DMS-CD. We
recommend instead that you use the Channels feature to schedule all of your DMS-CD deployment packages.
Bandwidth capacity in your WAN determines how long you must wait. After the deployment is finished,
Cisco Digital Signs autogenerates the (Go To) URL action for this deployment package.
Step 12
Click (Go to) URL in the Application Types list.
Step 13
Check that a (Go to) URL application was derived from your deployment task.
If one was generated, its name will append the prefix “LOCAL--” to the name that you entered in Step 4.