Catalyst 6000 Family Network Analysis Module Installation and Configuration Note WS-X6380-NAM This publication describes how to install the Catalyst 6000 family Network Analysis Module (NAM) and how to configure the NAM using the Catalyst command-line interface (CLI), the NAM Traffic Analyzer application, or both. See the “Related Documentation” section on page 73 for more information about software configuration for the switch.
Overview • Related Documentation, page 73 • Obtaining Documentation, page 73 • Obtaining Technical Assistance, page 74 Overview This section describes the Catalyst 6000 family NAM, how it operates, and how to manage it, and includes these sections: • Understanding How the NAM Works, page 2 • Managing the NAM, page 3 • New NAM Features, page 3 • Front Panel Description, page 4 • Specifications, page 6 Understanding How the NAM Works The NAM monitors and analyzes network traffic for the Catal
Overview Managing the NAM The NAM Traffic Analyzer application provides access to the NAM data and voice traffic management and monitoring features through a web browser. To use the NAM Traffic Analyzer application, you first need to do some basic configuration tasks on the NAM using the CLI. You then can start the NAM Traffic Analyzer application with a single command.
Overview The licensed Application Response Time (ART) MIB, which is used to determine the source of the slowdowns in application performance. The ART MIB measures the response time on the network at the transport layer. • You must purchase an ART MIB license from Cisco Systems before enabling and using the ART MIB feature. Note The licensed voice-monitoring application. • You must purchase a separate software license to enable voice collection on the NAM.
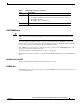
Overview Table 1 STATUS LED Description (continued) Color Description Orange Indicates one of three conditions: • • • Off The NAM is running through its boot and self-test diagnostic sequence. The NAM is disabled. The NAM is in the shutdown state. The NAM power is off. SHUTDOWN Button Caution Do not remove the NAM from the switch until the NAM has shut down completely and the STATUS LED is orange. You can damage the NAM if you remove it from the switch before it completely shuts down.
Safety Overview Specifications Table 2 describes the specifications for the NAM. Table 2 Specifications Specification Description Dimensions (H x W x D) 1.18 x 15.51 x 16.34 in. (30 x 394 x 415 mm) Weight Minimum: 3 lb (1.36 kg) Maximum: 5 lb (2.
Safety Overview Warning AttentionCe symbole d'avertissement indique un danger. Vous vous trouvez dans une situation pouvant causer des blessures ou des dommages corporels. Avant de travailler sur un équipement, soyez conscient des dangers posés par les circuits électriques et familiarisez-vous avec les procédures couramment utilisées pour éviter les accidents.
Software Requirements Warning ¡Advertencia!Este símbolo de aviso significa peligro. Existe riesgo para su integridad física. Antes de manipular cualquier equipo, considerar los riesgos que entraña la corriente eléctrica y familiarizarse con los procedimientos estándar de prevención de accidentes.
Hardware Requirements Hardware Requirements For Catalyst OS, any Catalyst 6000 or 6500 series switch with any supervisor module is supported using Supervisor Engine 1, 1A, or 2. For Cisco IOS, any Catalyst 6000 or 6500 series switch with a Supervisor Engine 1A (or Supervisor Engine 2) with an MSFC2 if it is running 12.1(11b)E. If the switch is running the older 12.1(8a)EX, a Supervisor Engine 2 with an MSFC2 is required.
Installing and Removing the NAM This section describes how to install and verify the operation of the NAM in the Catalyst 6000 family switches and contains the following sections: • Slot Assignments, page 10 • Verifying the Installation, page 14 • Removing the NAM, page 15 Slot Assignments The Catalyst 6006 and 6506 switch chassis have six slots, the Catalyst 6009 and 6509 switch chassis have nine slots, and the Catalyst 6513 switch chassis has thirteen slots. (See Figure 2.
Installing and Removing the NAM Figure 2 Slot Numbers on Catalyst 6000 Family Switches WS-X6K-SUP1 Supervisor engine Switch 100% T M G US EM M VE ET AT R ST TI ST SY AC PW RES 1 Load DTE/ DCE PORT 1 CONSOLE SUPERVISOR I 1% PCMCIA EJECT NK LI PCMCIA EJECT NK LI PORT 2 NK LI WS-X6K-SUP1 Redundant supervisor engine Switch 100% T M G US EM M VE ET AT R ST TI ST SY AC PW RES 2 Load DTE/ DCE PORT 1 CONSOLE SUPERVISOR I 1% PORT 2 NK LI WS-X6408 2 AT 3 4 5 6 7 LI LI LI
Installing and Removing the NAM Step 3 Warning If the desired slot is empty and is not covered by a switching-module filler plate, go to Step 5. Otherwise, loosen the captive installation screws (with a screwdriver if necessary) that secure the switching-module filler plate or the existing switching module in the desired slot.
Installing and Removing the NAM Caution Always use the ejector levers when installing or removing the NAM. A module that is partially seated in the backplane will cause the system to halt and subsequently crash. Step 8 Keep the NAM at a 90-degree orientation to the backplane (horizontal to the floor), and carefully slide the module into the slot until the notches on both ejector levers engage the chassis sides.
Installing and Removing the NAM Verifying the Installation These sections describe how to verify the installation of the NAM. • Cisco IOS Software, page 14 • Catalyst OS Software, page 14 Cisco IOS Software To verify that the switch acknowledges the new NAM and has brought it online, enter the show module command.
Installing and Removing the NAM Removing the NAM This section describes how to remove the NAM from the Catalyst 6000 family switch. Caution Warning Do not remove the NAM from the switch until the NAM has shut down completely and the STATUS LED is orange or off. You can damage the NAM if you remove it from the switch before it completely shuts down. During this procedure, wear grounding wrist straps to avoid ESD damage to the card.
Configuring the NAM Step 2 Verify that the NAM shuts down. Do not remove the NAM from the switch until the STATUS LED is off or orange. Step 3 Use a screwdriver to loosen the captive installation screws at the left and right sides of the NAM. Step 4 Grasp the left and right ejector levers. Simultaneously, pull the left lever to the left and the right lever to the right to release the NAM from the backplane connector.
Configuring the NAM Initial Configuration Before you can use the NAM for network analysis, you must log into the NAM root account and configure the following: • IP address • Subnet mask • IP broadcast address • IP host name • Default gateway • Domain name • If you are using a Domain Name Service (DNS), configure the DNS name server.
Configuring the NAM Step 10 Configure one or more IP addresses as DNS name servers by entering: root@localhost# ip nameserver ip-address [ip-address] Step 11 Verify the NAM configuration by entering: root@localhost# show ip Step 12 Configure the SNMP syslocation MIB variable by entering: root@localhost# snmp location location-string Note Step 13 The MIB variables in Step 13 and Step 14 must be valid DisplayString texts, each with a maximum length of 64 characters.
Configuring the NAM Cisco Network Analysis Module (WS-X6380-NAM) login: root Password: Network Analysis Module (WS-X6380-NAM) Console, 2.1(1) Copyright (C) 1999, 2000, 2001 Cisco Systems, Inc. WARNING! Default password has not been changed! root@localhost# ip address 172.20.52.29 255.255.255.224 root@localhost# ip broadcast 172.20.52.31 root@localhost# ip host nam1 root@localhost# ip gateway 172.69.2.132 root@localhost# ip domain cisco.com root@localhost# ip nameserver 171.62.2.
Configuring the NAM Using NetFlow Data Export as a Traffic Source To use NetFlow Data Export (NDE) as a traffic source for the NAM, enable the NetFlow Monitor option to allow the NAM to receive the NDE stream. The statistics are presented on reserved ifIndex.3000. NDE makes traffic statistics available for analysis by an external data collector. You can use NDE to monitor all Layer 3 switched and all routed IP unicast traffic.
Configuring the NAM IPWRITE_MTU_FAILED = 0 IPWRITE_ENCAPFIX_FAILED = 0 Router#show ip flow export Flow export is enabled Exporting flows to 172.20.27.
Configuring the NAM Using SPAN as a Traffic Source Note You can configure SPAN as a traffic source using both the CLI and the NAM Traffic Analyzer application. To direct SPAN traffic to the NAM for monitoring, configure port 1 on the NAM as the SPAN destination port. You cannot use ports on the NAM module as SPAN source ports. The NAM can analyze Ethernet VLAN traffic from Ethernet or Fast Ethernet SPAN source ports. You can also specify an Ethernet VLAN as the SPAN source.
Configuring the NAM Source VLANs: RX Only: None TX Only: None Both: None Destination Ports:None Filter VLANs: None Session 2 --------Source Ports: RX Only: None TX Only: None Both: None Source VLANs: RX Only: None TX Only: None Both: None Destination Ports:None Filter VLANs: None Router#conf t Enter configuration commands, one per line. End with CNTL/Z. Router(config)#monitor session 1 source vlan 1 both Note The SPAN destination for the NAM must always be port 1.
Configuring the NAM Catalyst OS Software These sections describe how to configure the NAM from the CLI: • Initial Configuration, page 24 • Configuring VLANs, page 27 • Using NetFlow Data Export as a Traffic Source, page 27 • Using SPAN as a Traffic Source, page 28 • Configuring the SNMP Agent, page 29 Initial Configuration Before you can use the NAM for network analysis, you must log into the NAM root account and configure the following: • IP address • Subnet mask • IP broadcast address •
Configuring the NAM Step 5 Configure the IP address and subnet mask by entering this command: root@localhost# ip address ip-address subnet-mask Step 6 Configure the IP broadcast address by entering this command: root@localhost# ip broadcast broadcast-address Step 7 Configure the IP host name used in the CLI prompt, show commands, and log messages by entering this command: root@localhost# ip host name Step 8 Configure the default gateway by entering this command: root@localhost# ip gateway default-ga
Configuring the NAM Step 17 Verify the SNMP access controls and settings by entering this command: root@localhost# show snmp After completing this configuration, you can use the NAM with a network-monitoring application, such as TrafficDirector or any other IETF-compliant RMON application. Note If you are using TrafficDirector, you must enter the community strings in TrafficDirector exactly as you enter them in the NAM.
Configuring the NAM sysDescr sysObjectID sysContact sysName sysLocation root@localhost# "Catalyst 6000 Network Management Module (WS-X6380-NAM)" 1.3.6.1.4.1.9.5.1.3.1.1.2.223 "Jane Doe, Cisco Systems, (408) 111-1111" "6k-NAM - Slot 2" "Cisco Lab, Building X, Floor 1" Configuring VLANs You do not need to configure a VLAN as the NAM management port because that port automatically synchronizes to the VLAN assigned to interface sc0 on the supervisor engine.
Configuring the NAM Community-Access ---------------read-only read-write read-write-all Community-String -------------------public private secret Trap-Rec-Address ---------------------------------------<...output truncated...> Note Trap-Rec-Community -------------------- If a NAM is installed, you do not need to specify an external data collector with a set mls nde collector_ip [udp_port_number] command as described in the Catalyst 6000 Family Software Configuration Guide.
Configuring the NAM Configuring the SNMP Agent Note If you are using the NAM Traffic Analyzer application, the information in this section is optional. You can configure the SNMP agent through the CLI or the NAM Traffic Analyzer application.
Configuring the NAM After completing this configuration, you can use the NAM with a network monitoring application such as TrafficDirector, NetScout nGenius Real-Time Monitor, or any other IETF-compliant RMON application. Note If you are using TrafficDirector, you must enter the community strings in TrafficDirector exactly as you enter them in the NAM. This example shows how to configure the NAM: Console> (enable) session 2 Trying NAM-2... Connected to NAM-2. Escape character is '^]'.
Configuring the NAM sysDescr sysObjectID sysContact sysName sysLocation root@localhost# "Catalyst 6000 Network Management Module (WS-X6380-NAM)" 1.3.6.1.4.1.9.5.1.3.1.1.2.223 "Jane Doe, Cisco Systems, (408) 111-1111" "6k-NAM - Slot 2" "Cisco Lab, Building X, Floor 1" Operating System-Independent Configuration The following sections describe the NAM configurations that are independent of the switch operating system.
Configuring the NAM Enable the vlanStats collection type by entering this command from the root account of the NAM: root@localhost# autostart vlanstats enable Disable the vlanStats collection type by entering this command from the root account of the NAM: root@localhost# autostart vlanstats disable After enabling or disabling one or more collection types, you must reboot the NAM before the configuration takes effect.
Configuring the NAM Configuring the HTTP Server To configure the HTTP server parameters for the NAM, perform these steps in privileged mode: Step 1 Configure the HTTP port by entering this command: root@localhost# ip http secure port 8080 The HTTP server is enabled now. You must restart the server to change HTTP port. Continue [y/n]? y The port number range is from 1 to 65535. Note Step 2 Web root and guest user names are different from the CLI root and guest users.
Configuring the NAM 1931 bytes transferred in 0.02 sec (107.96k/sec) Verifying cisco-nam-strong-crypto-patchK9-1.0-1.i386.rpm. Please wait... Package cisco-nam-strong-crypto-patchK9-1.0-1.i386.rpm verified. Applying /usr/local/nam/patch/workdir/cisco-nam-strong-crypto-patchK9-1.0-1.i386 .rpm. Please wait... ########################################### [100%] ########################################### [100%] Patch update completed successfully.
Configuring the NAM MBEGA1UECBMKU29tZS1TdGF0ZTEhMB8GA1UEChMYSW50ZXJuZXQgV2lkZ2l0cyBQ dHkgTHRkMR4wHAYDVQQDExVuYW1sYWItcGlrMy5jaXNjby5jb20wHhcNMDExMDMw MTAxMDI4WhcNMDIxMDMwMTAxMDI4WjBlMQswCQYDVQQGEwJBVTETMBEGA1UECBMK U29tZS1TdGF0ZTEhMB8GA1UEChMYSW50ZXJuZXQgV2lkZ2l0cyBQdHkgTHRkMR4w HAYDVQQDExVuYW1sYWItcGlrMy5jaXNjby5jb20wgZ8wDQYJKoZIhvcNAQEBBQAD gY0AMIGJAoGBANsO1T5ayA6pvkJad413V+N/ibvND0XRyXfFycTQRzeA8F4A+etV s0Iq0muFfiL9mDr/es9TkyfIM+T2F6+NE13DxJ53ZBbh7ndb6WOnzeHLKh9EDfSI cy2s775lCPCjfLcMsWQLWSU7XUbi/ExDpb9e
Configuring the NAM YmNAY2lzY28uY29tMIGfMA0GCSqGSIb3DQEBAQUAA4GNADCBiQKBgQC8+SR503gS ygkf6pnHuh0LelNf6LqJjzwFfjqjS8vpkFq/QVbwqTNDIggUfbvRAIRWEKVWhpRf rr+II2o/Xzb0RLpV2J2p3HGgoRrKC3nArIFFiSqXniEU+g2mPqsFNcOyxHNXIxEj iBQf80DxbmvWFOpunmOQ/pGuEysNfU/46wIDAQABoAAwDQYJKoZIhvcNAQEEBQAD gYEAVAX89pCAcRDOqPgaBEMQCmWD+wqZPnALovr7C81OLBYTgLLqdwPqoSjSYosE w/pFnIxWN1sJ7MC8+hjnJJLjoCwbyrEyvoiAvzpsGsnAZgWUVaUpR7jlNbf8x2A1 hAOH9KchS0TpSNy13OyhuAkv0pUcM2AJqB/93u4YvuHfNOA= -----END CERTIFICATE REQUEST----- Step 2 Install a
Configuring the NAM Before you can use the NAM for voice monitoring, you must log into the NAM root account and perform these steps in privileged mode: Step 1 Display the voice monitoring configuration by entering this command: root@localhost# show options ART mib: Enabled Voice monitoring: Disabled Step 2 Enable voice monitoring and verify the configuration by entering this command: root@localhost# voice monitoring enable root@localhost# show options ART mib: Enabled Voice monitoring: Enabled Step 3
Administering the NAM Administering the NAM How you administer the NAM on your switch depends on whether you are using the Cisco IOS software or the Catalyst OS software. There are also NAM administration tasks that are common to either switch operating system.
Administering the NAM Step 3 At the NAM login prompt, type root to log in as the root user or guest to log in as a guest user. login: root Step 4 At the password prompt, enter the password for the account. The default password for the root account is “root” and the default password for the guest account is “guest.” Password: After a successful login, the command line prompt appears as follows: Network Analysis Module (WS-X6380-NAM) Console, 2.1(1) Copyright (c) 1999, 2000, 2001 by cisco Systems, Inc.
Administering the NAM New UNIX password: Retype new UNIX password: passwd: all authentication tokens updated successfully If you forget or lose the password, you can enter the clear module password command from the CLI to restore the password for the root account to “root” and the guest account to “guest.
Administering the NAM Upgrading the NAM Software You can upgrade both the application software and the maintenance software. To upgrade the application software, see the “Upgrading the NAM Application Software” section on page 50. To upgrade the maintenance software, see the “Upgrading the NAM Maintenance Software” section on page 51.
Administering the NAM Note If the FTP server does not allow anonymous users, use the following syntax for the ftp-url value: ftp://user@host/absolute-path/filename. Enter your password when prompted. Step 6 Follow the screen prompts during the upgrade. Step 7 After completing the upgrade, log out of the NAM. Step 8 Reset the NAM by entering: Router#hw-mod mod 9 reset Device BOOT variable for reset = Warning:Device list is not verified.
Administering the NAM Network Analysis Module (WS-X6380-NAM) Console, 1.2(1a)m Copyright (c) 1999, 2000, 2001 by cisco Systems, Inc. root@hostname.cisco.com# upgrade ftp://root@hostname-ultra10/tftpboot/c6nam.1-2-1.bin.gz Password for root@hostname-ultra10: 500 'SIZE c6nam.1-2-1.bin.gz':command not understood. ftp://root@danlee-ultra10/tftpboot/c6nam.1-2-1.bin.gz (unknown size) [|] 39103K 40041798 bytes transferred in 34.57 sec (1131.27k/sec) downloaded image version 2.
Administering the NAM Proceed with reload of module? [confirm] % reset issued for module 9 Router# 00:31:11:%SNMP-5-MODULETRAP:Module 9 [Down] Trap 00:31:11:SP:The PC in slot 9 is shutting down. Please wait ... 00:31:25:SP:PC shutdown completed for module 9 00:31:25:%C6KPWR-SP-4-DISABLED:power to module in slot 9 set off (admin request) 00:31:28:SP:Resetting module 9 ...
Administering the NAM This example shows how to upgrade the NAM maintenance software: Router# Router#hw-mod module 9 reset hdd:1 Device BOOT variable for reset = hdd:1 Warning:Device list is not verified. Proceed with reload of module? [confirm] % reset issued for module 9 Router# 00:31:11:%SNMP-5-MODULETRAP:Module 9 [Down] Trap 00:31:11:SP:The PC in slot 9 is shutting down. Please wait ...
Administering the NAM 02:27:19:SP:The PC in slot 9 is shutting down. Please wait ... 02:27:36:SP:PC shutdown completed for module 9 02:27:36:%C6KPWR-SP-4-DISABLED:power to module in slot 9 set off (admin request) 02:27:39:SP:Resetting module 9 ...
Administering the NAM • Table 4 describes the user administration tasks you can perform using the CLI and NAM Traffic Analyzer application. Table 4 NAM User Administration User Interface Add Users Remove Users Set Password Recover Password CLI No Yes. Use the rmwebusers command to remove all webusers from the local database. Use the password command. Switch CLI. Traffic Analyzer Add the first user with the CLI when starting the web server.
Administering the NAM Step 4 At the password prompt, enter the password for the account. The default password for the root account is “root,” and the default password for the guest account is “guest.” Password: After a successful login, the command-line prompt appears as follows: Network Analysis Module (WS-X6380-NAM) Console, 2.1(1a) Copyright (C) 1999, 2000, 2001 Cisco Systems, Inc.
Administering the NAM Step 3 Enter the new password again: Retype new UNIX password: passwd: all authentication tokens updated successfully This example shows how to set the password for the root account: root@localhost# password root Changing password for user root New UNIX password: Retype new UNIX password: passwd: all authentication tokens updated successfully If you forget or lose the password, you can enter the clear module password command from the CLI to restore the password for the root account
Administering the NAM Upgrading the NAM Application Software To upgrade the NAM application software, follow these steps: Step 1 Copy the NAM application software image to a directory accessible to FTP. Step 2 Log into the switch through the console port or through a Telnet session. Step 3 To upgrade the application software, the NAM must be running in the maintenance image. If the NAM is already running in the maintenance image, go to Step 4.
Administering the NAM Network Analysis Module (WS-X6380-NAM) Console, 2.1(1a)m Copyright (C) 1999, 2000, 2001 Cisco Systems, Inc. WARNING! Default password has not been changed! root@nam5.cisco.com# upgrade ftp://hostname@172.20.52.3/tftpboot/c6nam.1-2-1.bin.gz Password for hostname@172.20.52.3: 500 'SIZE c6nam.1-1-0-20.gz': command not understood. ftp://hostname@172.20.52.3/tftpboot/c6nam.1-2-1.bin.gz (unknown size) [-] 39103K 40041798 bytes transferred in 48.16 sec (811.
Administering the NAM Step 8 Boot into the maintenance image with this command to reset the NAM maintenance software: Console> (enable) reset mod hdd:2 Step 9 (Optional) Verify the initial configuration after the NAM comes back online by logging into the NAM root account, and enter the following commands: root@localhost# show ip root@localhost# show snmp Step 10 (Optional) Reboot into the application image by entering this command: Console> (enable) reset mod hdd:1 This example shows how to upgrade t
Administering the NAM Operating System-Independent Administration The following sections describe NAM administration that is independent of the switch operating system. Adding NAM Patch Software To install a patch on the NAM, follow these steps: Step 1 Log into the switch through the console port or through a Telnet session. Step 2 To add the patch software, the NAM must be running in the application image. If the NAM is already running in the application image, go to Step 4.
Administering the NAM Cisco Network Analysis Module (WS-X6380-NAM) login: root Password: Network Analysis Module (WS-X6380-NAM) Console, 2.1(1a) Copyright (C) 1999, 2000, 2001 Cisco Systems, Inc. WARNING! Default password has not been changed! root@nam5.cisco.com# patch ftp://hostname/pub/patch_rpms/cisco-nam-system-patch-1.0-1.i386.rpm Proceeding with installation. Please do not interrupt. If installation is interrupted, please try again. Downloading cisco-nam-system-patch-1.0-1.i386.rpm. Please wait...
Administering the NAM Additional NAM Software Administrative Commands The NAM supports these additional administrative commands: Command Description config clear Clears the NVRAM configuration to the factory-set default condition, including: • Deleting all RMON control tables. • Deleting all RMON1 and RMON2 filters. • Returning the RMON configuration file to the default configuration. No IP host configuration data is deleted.
Administering the NAM Command Description patch ftp://user:passwd@host/full-path/filename Applies a patch to the application software from the specified location. ping [-nv] [-c count] [-i wait] [-p pattern] [-s Sends ICMP echo-request packets to another node on the network. To packetsize] hostname | IP address configure ping, you can also use the command without arguments. The following options are supported: -n—Shows network addresses as numbers. -v—Provides verbose output.
Administering the NAM Command Description traceroute [-Inv] [-f first_ttl] [-m max_ttl] [-p port] [-s src_addr] [-t tos] [-w waittime] destination host name | IP address [packetlen] The following options are supported: -I—Uses ICMP ECHO instead of UDP datagrams. -n—Prints hop addresses numerically. -v—Provides verbose output. -f first_ttl—Sets the initial time-to-live used in the first outgoing packet. -m max_ttl—Sets the maximum time-to-live (max number of hops) used.
Administering the NAM Command Description show interface trunk module slot_number Displays current trunk settings for the interfaces. clock set time date Sets the current time and date. clock update-calendar Updates the calendar time to the clock time. clock read-calendar Updates clock time to the calendar time.
Troubleshooting the NAM Unsupported Supervisor Engine CLI Commands These CLI commands are not supported by the NAM: • set port broadcast • set port channel • set port cops • set port disable • set port enable • set port flowcontrol • set port gmrp • set port gvrp • set port host • set port inlinepower • set port jumbo • set port membership • set port negotiation • set port protocol • set port qos • set port rsvp • set port security • set port speed • set port trap • s
Troubleshooting the NAM Symptom The user is unable to start the Traffic Director capture after using the NAM Traffic Analyzer application capture with a large buffer size. Possible Cause All of the buffer space available for capture sessions was requested and allocated for capture sessions using the NAM Traffic Analyzer application (or the reverse).
Troubleshooting the NAM Symptom The user cannot connect to the server. Possible Cause The initial configuration is incorrect or not configured. Recommended Action Reconfigure the NAM as described in “Configuring the NAM” section on page 16. Symptom The user cannot connect to the NAM Traffic Analyzer application. Possible Cause The configuration for the HTTP server is not correct.
Troubleshooting the NAM Error Message ...httpd:tac_authen_pap_read:invalid reply content, incorrect key? ...PAM-tacplus[616]:auth failed:Authentication error, please contact administrator. Possible Cause The TACACS+ secret key configured in the NAM does not match the key in the TACACS+ server. Recommended Action Choose Admin > User > TACACS+, and enter the correct secret key. Error Message ...httpd:tac_connect:connection to 172.20.122.183 failed:Connection timed out ...
Troubleshooting the NAM • You can recover the password in situations where you have forgotten the local web admin user password, or when another user with account permission logged in and changed the local web admin user password. To recover the password if no TACACS+ server is configured on the NAM, follow these steps: Step 1 Access the NAM CLI.
Supported RMON and RMON2 MIB Objects Step 6 Click Users. Step 7 In the contents, click TACACS+. Step 8 Enter the correct information. Step 9 Click Apply. There are restrictions on using passwords when performing upgrades or applying patches. Do not include the password as an argument in upgrade and patch commands. Use command syntax of this form: patch ftp://user@host/full-patch/filename Enter the password when prompted for it.
Supported RMON and RMON2 MIB Objects Table 5 Supervisor Engine Module and NAM RMON Support (continued) Module Object Identifier (OID) and Description Source Supervisor Engine ...mib-2(1).rmon(16).alarm(3) RFC 1757 (RMON-MIB) Network Analysis ...mib-2(1).rmon(16).alarm(3) Network Analysis ...mib-2(1).rmon(16).hosts(4) A threshold that can be set on critical RMON variables for network management. RFC 1757 (RMON-MIB) A threshold that can be set on critical RMON variables for network management.
Supported RMON and RMON2 MIB Objects Table 5 Supervisor Engine Module and NAM RMON Support (continued) Module Object Identifier (OID) and Description Source Network Analysis ...mib-2(1).rmon(16).protocolDir(11) RFC 2021 (RMON2-MIB) Network Analysis ...mib-2(1).rmon(16).protocolDist(12) Network Analysis ...mib-2(1).rmon(16).addressMap(13) Network Analysis ...mib-2(1).rmon(16).nlHost(14) Network Analysis ...mib-2(1).rmon(16).nlMatrix(15) Network Analysis ...mib-2(1).rmon(16).
Supported RMON and RMON2 MIB Objects Table 5 Supervisor Engine Module and NAM RMON Support (continued) Module Object Identifier (OID) and Description Source Network Analysis ...frontier(141).mibdoc2(2).netscout2(1).art(5).artControlTable(2) draft-warth-rmon2-artmib-01.txt Application response time statistics. (ART-MIB) Network Analysis ...mib-2(1).rmon(16).mediaIndependentStats(21) (HC-RMON-MIB) Counters for packets, octets, broadcasts, errors, etc. rmon.dsmonMib(26).dsmonObjects(1).
GNU General Public License Table 5 Module Supervisor Engine Module and NAM RMON Support (continued) Object Identifier (OID) and Description Source rmon.dsmonMib(26).dsmonObjects(1).dsmonCapsObjects(5). dsmonCapabilities(1) (DSMON-MIB) DSMON capabilities variable rmon.dsmonMib(26).dsmonObjects(1).dsmonMatrixObjects(6). dsmonMatrixCtlTable(1) rmon.dsmonMib(26).dsmonObjects(1).dsmonMatrixObjects(6). dsmonMatrixSDTable(2) rmon.dsmonMib(26).dsmonObjects(1).dsmonMatrixObjects(6).
GNU General Public License For example, if you distribute copies of such a program, whether gratis or for a fee, you must give the recipients all the rights that you have. You must make sure that they, too, receive or can get the source code. And you must show them these terms so they know their rights. We protect your rights with two steps: (1) copyright the software, and (2) offer you this license which gives you legal permission to copy, distribute and/or modify the software.
GNU General Public License These requirements apply to the modified work as a whole. If identifiable sections of that work are not derived from the Program, and can be reasonably considered independent and separate works in themselves, then this License, and its terms, do not apply to those sections when you distribute them as separate works.
GNU General Public License 6. Each time you redistribute the Program (or any work based on the Program), the recipient automatically receives a license from the original licensor to copy, distribute or modify the Program subject to these terms and conditions. You may not impose any further restrictions on the recipients' exercise of the rights granted herein. You are not responsible for enforcing compliance by third parties to this License. 7.
Standards Compliance Specifications THE ENTIRE RISK AS TO THE QUALITY AND PERFORMANCE OF THE PROGRAM IS WITH YOU. SHOULD THE PROGRAM PROVE DEFECTIVE, YOU ASSUME THE COST OF ALL NECESSARY SERVICING, REPAIR OR CORRECTION. 12.
Related Documentation Related Documentation • For additional FCC class compliance information, refer to the Catalyst 6000 Regulatory Compliance and Safety Information publication. • For additional information about the NAM, refer to the Catalyst 6000 Family Network Analysis Module Installation and Configuration Note.
Obtaining Technical Assistance Ordering Documentation Cisco documentation is available in the following ways: • Registered Cisco Direct Customers can order Cisco product documentation from the Networking Products MarketPlace: http://www.cisco.com/cgi-bin/order/order_root.pl • Registered Cisco.com users can order the Documentation CD-ROM through the online Subscription Store: http://www.cisco.com/go/subscription • Nonregistered Cisco.
Obtaining Technical Assistance • Download and test software packages • Order Cisco learning materials and merchandise • Register for online skill assessment, training, and certification programs You can self-register on Cisco.com to obtain customized information and service. To access Cisco.com, go to the following URL: http://www.cisco.com Technical Assistance Center The Cisco TAC is available to all customers who need technical assistance with a Cisco product, technology, or solution.
Obtaining Technical Assistance Cisco TAC Escalation Center The Cisco TAC Escalation Center addresses issues that are classified as priority level 1 or priority level 2; these classifications are assigned when severe network degradation significantly impacts business operations. When you contact the TAC Escalation Center with a P1 or P2 problem, a Cisco TAC engineer will automatically open a case.
Obtaining Technical Assistance This document is to be used in conjunction with the documents listed in the “Related Documentation” section. CCVP, the Cisco logo, and the Cisco Square Bridge logo are trademarks of Cisco Systems, Inc.; Changing the Way We Work, Live, Play, and Learn is a service mark of Cisco Systems, Inc.
Obtaining Technical Assistance Catalyst 6000 Family Network Analysis Module Installation and Configuration Note 78 78-10406-05