Quick Start Quick Start Quick Start Guide for Cisco Unified Service Monitor 2.0 1 2 3 4 5 6 7 8 9 10 11 12 13 14 15 16 SUPPLEMENTAL LICENSE AGREEMENT Cisco Unified Service Monitor Overview Server and Client System Requirements Installation and Upgrade Paths Installing Cisco Unified Service Monitor Upgrading to Cisco Unified Service Monitor 2.
1 SUPPLEMENTAL LICENSE AGREEMENT SUPPLEMENTAL LICENSE AGREEMENT FOR CISCO SYSTEMS NETWORK MANAGEMENT SOFTWARE: CISCO UNIFIED SERVICE MONITOR. IMPORTANT-READ CAREFULLY: This Supplemental License Agreement (“SLA”) contains additional limitations on the license to the Software provided to Customer under the End User License Agreement between Customer and Cisco. Capitalized terms used in this SLA and not otherwise defined herein shall have the meanings assigned to them in the End User License Agreement.
2 Cisco Unified Service Monitor Overview Cisco Unified Service Monitor (Service Monitor), a product from the Cisco Unified Communications Management Suite, receives and analyzes data from these sources when they are installed in your voice network and configured properly: • Cisco Unified CallManager clusters—Retain Call Detail Records (CDRs) and Call Management Records (CMRs).
Licensing Service Monitor features software-based product registration and license key activation technologies. The following table provides information about terminology used in the registration process. Understanding Licensing Terms Table 1 describes the PAK and the License file and usage of these terms. Table 1 Understanding PAK and License File Licensing Terms Product Authorization Key (PAK) Description The PAK is printed on the software claim certificate included in product packaging.
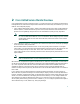
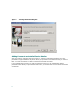
To license your product, you must: Step 1 Register the Service Monitor product with Cisco.com using the MAC address of the server on which Cisco Unified Service Monitor 2.0 will reside and the PAK. The PAK is printed on the software claim certificate. Get your license file from: http://www.cisco.com/go/license Note You will be asked to log in. You must be a registered user of Cisco.com to log in.
Figure 1 Licensing Information Dialog Box Adding Licenses to an Installed Service Monitor After you install or upgrade to Service Monitor 2.0, add any incremental licenses that you have purchased to support additional IP phones. When you purchase an incremental license, you receive a PAK. You must use the PAK to obtain a license file and install the license. If you installed Service Monitor 2.0 with an evaluation license, you can subsequently install a purchased license.
To add support for additional IP phones to Service Monitor and to upgrade from an evaluation license to a purchased license, you must: Step 1 Obtain the license file using the MAC address of the server where Service Monitor 2.0 is installed and the PAK that you received when you purchased the product. Get your license file from: http://www.cisco.com/go/license Note You will be asked to log in. You must be a registered user of Cisco.com to log in.
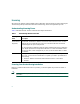
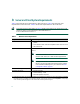
3 Server and Client System Requirements Table 2 lists minimum server requirements for Service Monitor. Table 3 lists minimum client requirements for Service Monitor. Table 4 lists browser requirements for Service Monitor. Note The minimum server requirements in Table 2 might not be sufficient for monitoring a high volume of calls. For more information, see Release Notes for Cisco Unified Service Monitor 2.0.
Note If you want to use a third-party SNMP management tool to make SNMP queries against the server where Service Monitor is installed, Windows SNMP service must be installed. See Configuring Your System for SNMP Queries, page 15. Table 3 Minimum Client Hardware and Software Requirements Component Minimum Requirement Hardware/software • Any PC or server platform with a Pentium IV processor, 1.
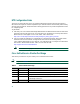
NTP Configuration Notes The clocks on Service Monitor and Cisco Unified CallManager servers must be synchronized for Service Monitor reports to include complete and up-to-date information and accurately reflect activity during a given time period. These notes offer a starting point and do not provide complete instructions for configuring NTP. To get started: 1. Talk with your Cisco Unified CallManager administrators to determine the time server with which Service Monitor should synchronize.
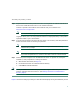
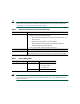
Table 5 Service Monitor Port Usage (continued) Protocol Port Number Service Name TCP 43459 Database. TCP 5665–5680 Interprocess communication between the user interface and back-end processes. Note Note These ports must be free. Service Monitor uses TFTP to find the configuration file for a given Cisco 1040. Service Monitor by default uses port 69 on the TFTP servers. 4 Installation and Upgrade Paths Table 6 lists the supported installation paths. Table 7 lists the supported upgrade paths.
Table 6 Supported Installation Paths (continued) If you are installing Cisco Unified Service Monitor on a system that... Then do this Has any product other than Operations Manager 2.0 installed 1. Uninstall other products; for example, uninstall all CiscoWorks and Network Management System (NMS) products. 2. After you complete the uninstallation, verify that NMSROOT, if it exists, does not contain any files.
Table 7 lists the supported upgrade paths. Table 7 Supported Upgrade Paths If you are upgrading to Cisco Unified Service Monitor 2.0 on a system that... Then do this Service Monitor software has already been upgraded. To Has been upgraded with activate Service Monitor 2.0: Operations Manager 2.0 (which includes Service Monitor 2.0) and 1. Order Service Monitor 2.0. The PAK will be shipped to you. Service Monitor 2.0 is not yet When you order, note that licensing for Service Monitor 2.
Table 7 Supported Upgrade Paths (continued) If you are upgrading to Cisco Unified Service Monitor 2.0 on a system that... Has a licensed version of Service Monitor 1.0 or Service Monitor 1.1 installed Then do this 1. Order Service Monitor 2.0. The PAK will be shipped to you. When you order, note that licensing for Service Monitor 2.0 no longer limits the number of sensors that can register. Licensing is now based upon the number of phones being monitored. 2.
5 Installing Cisco Unified Service Monitor This section includes both of the following: • Before You Install Service Monitor, page 15 • Performing the Service Monitor Installation, page 16 Before You Install Service Monitor Service Monitor is already installed on a server when you install Operations Manager. To activate Service Monitor on such a server, register your PAK on Cisco.com and install the license file for Cisco Unified Service Monitor.
Note Windows online help provides instructions for adding and removing Windows components, such as Windows SNMP service. To locate the instructions, try selecting the Index tab in Windows online help and entering a keyword or phrase, such as install SNMP service.
• An Advanced Server with terminal services enabled in application server mode. • A system with Internet Information Services (IIS) enabled. • A system that does not have name lookup. • A system with 2 network interface cards (NICs). We recommend that you: • Install Service Monitor on a system that has a static IP address. • Disable the virus scan software on your system. You can restart it after installation is complete.
The installation program checks the name lookup and DHCP. If a static IP address is not configured on your system, the DHCP-Enabled Network Adapters dialog box appears. Click Yes. The Setup Type window appears. Step 6 Select one of the following radio buttons: • Typical—To install the complete Service Monitor package, which contains Common Services 3.0 with Service Pack 4 and Service Monitor 2.0.
Step 9 Click Next. The Change Admin Password window appears: a. Enter an admin password, confirm, and click Next. The Change System Identity Account Password window appears b. Enter a System Identity Account password (and confirm), and click Next. The Create casuser dialog box appears. c. Click Yes to continue with the installation.
For more information, see NTP Configuration Notes, page 10. Step 12 A message appears asking whether to reboot your system now. Reboot your system before you start Step 13. Step 13 After the installation completes, verify that Service Monitor was installed correctly by starting Service Monitor. See Starting Cisco Unified Service Monitor, page 26. After You Install Service Monitor You should exclude the NMSROOT\databases directory from virus scanning.
Note In releases earlier than Service Monitor 2.0, licensing ensured that no more than the licensed number of sensors was registered with Service Monitor. In Service Monitor 2.0, licensing ensures that the licensed number of phones being monitored is not greatly exceeded. Service Monitor software is already upgraded to release 2.0 on a server where you have upgraded to Operations Manager 2.0. To activate Service Monitor on such a server: 1. Delete existing sensor configuration files (QOV*.
Step 5 Select one of the following radio buttons: • Typical—To install the complete Service Monitor package, which contains Common Services 3.0 with Service Pack 4 and Service Monitor 2.0. • Custom—To install the complete Service Monitor package and to enter data that is otherwise entered automatically for you.
Caution Do not run Service Monitor on this system; uninstall Service Monitor and install it on another system that has only one NIC. If Windows SNMP service is not installed on your system, you will see this message: Windows SNMP service is not installed on your system. This installation will continue. To install support for system application and host resources MIBs, you must install the Windows SNMP service, using Add/Remove Programs from the Control Panel.
Performing Post-Upgrade Configuration This section provides the minimum steps required to enable sensors to register with Service Monitor 2.0. For complete configuration procedures, including how to add Cisco Unified CallManagers to Service Monitor, see the configuration checklists in User Guide for Cisco Unified Service Monitor. Step 1 Start Service Monitor. See Starting Cisco Unified Service Monitor, page 26. Step 2 Add at least one TFTP server to Service Monitor: a.
Note If you use Cisco Unified CallManager as a TFTP server, Service Monitor cannot copy configuration files to Cisco Unified CallManager due to security settings on the latter. You will need to manually upload the configuration file as described in Step 3e. After uploading the configuration file, reset the TFTP server on Cisco Unified CallManager. For more information, see Cisco Unified CallManager documentation. Step 4 Wait a few minutes and verify that sensors have registered to Service Monitor.
MAC-Specific Configuration File—QOV001120FFCF18.CNF In a MAC-specific configuration file, the default ID, A000, has been replaced by the sensor MAC address; the receiver DNS name is included, although an IP address could appear instead. The last updated date and time represent the last time that the configuration file was updated; this could be when the sensor registered with Service Monitor or when a user edited the configuration file from the Service Monitor user interface.
Uninstalling Service Monitor Caution You must use the Cisco Unified Service Monitor uninstallation program to remove Service Monitor from your system. If you try to remove the files and programs manually, you can seriously damage your system. Use this procedure if you need to uninstall Service Monitor. Step 1 As the local administrator, log in to the system on which Service Monitor is installed, and select Start > All Programs > Cisco Unified Service Monitor 2.
Step 1 As the local administrator, log in to the machine on which you will reinstall Service Monitor, and insert the Service Monitor CD-ROM into the CD-ROM drive. The installer window appears, asking you if you want to install Service Monitor. Note If the CD-ROM is already in the CD-ROM drive and you stopped the reinstallation process to close programs or if Autostart is disabled, click Setup.exe from the top directory of your CD-ROM to restart the process. Step 2 Click Yes. The Welcome window appears.
Step 10 The Summary window appears, displaying the current settings. Click Next. The reinstallation proceeds and the Setup Complete window appears. Step 11 Click Finish. 9 Where to Go Next After you have installed Service Monitor, you are ready to configure it and start monitoring IP telephony service quality.
Table 8 Related Documentation To learn more about... See this document On the In the On the Cisco product product On Doc. package? CD?1 Cisco.com? DVD? In the online help? The known product bugs (DDTSs) Release Notes for Cisco No Unified Service Monitor 2.0 Yes Yes Yes No Release Notes for Cisco Unified Operations Manager 2.0 No No Yes Yes No Performing a typical installation Quick Start Guide for Cisco Unified Service Monitor 2.
You can access international Cisco websites at this URL: http://www.cisco.com/public/countries_languages.shtml Product Documentation DVD The Product Documentation DVD is a library of technical product documentation on a portable medium. The DVD enables you to access installation, configuration, and command guides for Cisco hardware and software products. With the DVD, you have access to the HTML documentation and some of the PDF files found on the Cisco website at this URL: http://www.cisco.
From this site, you will find information about how to do the following: • Report security vulnerabilities in Cisco products • Obtain assistance with security incidents that involve Cisco products • Register to receive security information from Cisco A current list of security advisories, security notices, and security responses for Cisco products is available at this URL: http://www.cisco.
Tip We encourage you to use Pretty Good Privacy (PGP) or a compatible product (for example, GnuPG) to encrypt any sensitive information that you send to Cisco. PSIRT can work with information that has been encrypted with PGP versions 2.x through 9.x. Never use a revoked encryption key or an expired encryption key. The correct public key to use in your correspondence with PSIRT is the one linked in the Contact Summary section of the Security Vulnerability Policy page at this URL: http://www.cisco.
Cisco Support Website The Cisco Support website provides online documents and tools for troubleshooting and resolving technical issues with Cisco products and technologies. The website is available 24 hours a day at this URL: http://www.cisco.com/en/US/support/index.html Access to all tools on the Cisco Support website requires a Cisco.com user ID and password. If you have a valid service contract but do not have a user ID or password, you can register at this URL: http://tools.cisco.
Tip Displaying and Searching on Cisco.com If you suspect that the browser is not refreshing a web page, force the browser to update the web page by holding down the Ctrl key while pressing F5. To find technical information, narrow your search to look in technical documentation, not the entire Cisco.com website. After using the Search box on the Cisco.com home page, click the Advanced Search link next to the Search box on the resulting page and then click the Technical Support & Documentation radio button.
Definitions of Service Request Severity To ensure that all service requests are reported in a standard format, Cisco has established severity definitions. Severity 1 (S1)—An existing network is “down” or there is a critical impact to your business operations. You and Cisco will commit all necessary resources around the clock to resolve the situation.
• Internet Protocol Journal is a quarterly journal published by Cisco for engineering professionals involved in designing, developing, and operating public and private internets and intranets. You can access the Internet Protocol Journal at this URL: http://www.cisco.com/ipj • Networking products offered by Cisco, as well as customer support services, can be obtained at this URL: http://www.cisco.com/en/US/products/index.
Corporate Headquarters Cisco Systems, Inc. 170 West Tasman Drive San Jose, CA 95134-1706 USA www.cisco.com Tel: 408 526-4000 800 553-NETS (6387) Fax: 408 526-4100 European Headquarters Cisco Systems International BV Haarlerbergpark Haarlerbergweg 13-19 1101 CH Amsterdam The Netherlands www-europe.cisco.com Tel: 31 0 20 357 1000 Fax: 31 0 20 357 1100 Americas Headquarters Cisco Systems, Inc. 170 West Tasman Drive San Jose, CA 95134-1706 USA www.cisco.