
User Manual
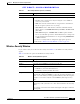
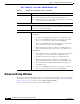
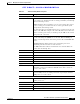
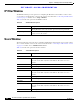
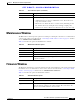
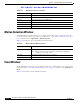
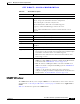
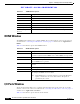
Table Of Contents
- Contents
- Preface
- Introduction
- Basic Set Up
- Viewing Live Video
- Advanced Viewing Set Up
- Managing an IP Camera through the Web
- Connecting to an IP Camera
- Basic Setup Window
- Advanced Setup Window
- IP Filter Window
- Users Window
- Maintenance Window
- Firmware Window
- Video Window
- Audio Window
- Mail Window
- Motion Detection Window
- Event Window
- SNMP Window
- DDNS Window
- I/O Ports Window
- RS-485 Window
- System Window
- Image Window
- Network Window
- Syslog & Log Window
- View Video Log Window
- Troubleshooting
- Streaming Video/Audio Solution
- Index

EFT DRAFT—CISCO CONFIDENTIAL
5-13
Cisco Video Surveillance System IP Camera User Guide
OL-14220-01
Chapter 5 Managing an IP Camera through the Web
SNMP Window
SNMP Window
The SNMP window allows you to configure SNMP. To access this window, connect to the camera as
described in the “Connecting to an IP Camera” section on page 5-2 and then choose Applications >
SNMP.
Table 5-13 describes the options in the SNMP window.
Table 5-12 Event Window Options
Option Description
Event Schedule
Schedule List The Event Schedule shows all of the event types that are configured in the
camera, and provides information about the configuration:
Name—Descriptive event name set by the user.
Effective Time Frame—When the event will be triggered.
Trigger by—Shows what kind trigger activates the event.
Action—Shows what kind of the actions are issued when the event is
triggered
New Schedule
Effective Time Frame Choose the desired option for the period.
Start Time Choose the desired start time using a 24 hour clock.
End Time Choose the desired end time using a 24 hour clock.
Trigger Event
Enable Check this check box to perform all of the events that are configured and
scheduled.
Interval Select the desired option for the events interval.
Trigger by
• Input 1 / 2—Describes the states that the inputs must be in for an event
to be triggered. Only one input can be used. The states for all the inputs
used must be reached before the event will be triggered.
• Motion Detection—Movement in a motion detection window can be
used to trigger events.
Actions
• E-Mail—If checked, an e-mail (with attachment) is delivered to the
SMTP server. (The SMTP server must be configured in the Mail window
as described in the “Mail Window” section on page 5-11.)
• FTP—If checked, an FTP upload will be activated to the FTP server.
(FTP servers must be configured in the FTP page in the “Mail Window”
section on page 5-11.)
• Output 1 / 2—If checked, the output ports state is activated as
configured. (Output ports must be configured in the I/O Ports window as
described in the “I/O Ports Window” section on page 5-14)