
User Manual
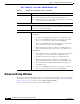
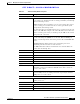
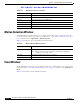
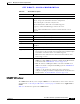
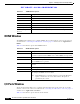
Table Of Contents
- Contents
- Preface
- Introduction
- Basic Set Up
- Viewing Live Video
- Advanced Viewing Set Up
- Managing an IP Camera through the Web
- Connecting to an IP Camera
- Basic Setup Window
- Advanced Setup Window
- IP Filter Window
- Users Window
- Maintenance Window
- Firmware Window
- Video Window
- Audio Window
- Mail Window
- Motion Detection Window
- Event Window
- SNMP Window
- DDNS Window
- I/O Ports Window
- RS-485 Window
- System Window
- Image Window
- Network Window
- Syslog & Log Window
- View Video Log Window
- Troubleshooting
- Streaming Video/Audio Solution
- Index

EFT DRAFT—CISCO CONFIDENTIAL
5-6
Cisco Video Surveillance System IP Camera User Guide
OL-14220-01
Chapter 5 Managing an IP Camera through the Web
Advanced Setup Window
Advanced Setup Window
The Advanced Setup window provides options for configuring various network and protocol settings for
an IP camera. To access this window, connect to the camera as described in the “Connecting to an IP
Camera” section on page 5-2 and then choose Setup > Advanced Setup.
Table 5-3 describes the options in the Advanced Setup window.
Authentication Type Select the appropriate value: Open System or Shared Key. Refer to your
wireless card’s documentation to determine which method to use.
Note In Infrastructure mode, either setting typically works, because most
access points can use both methods.
WPA/WPA2 Personal Mode Options
Shared Key Enter the key value. Data is encrypted using a key derived from the network
key. Other wireless stations must use the same network key. The PSK must
be from 8 to 63 characters in length
WPA/WPA2 Enterprise Mode Options
Protocol Type Select the desire protocol type and enter the required date in the fields.
• EAP-TLS
–
User ID—The user ID used for logging in to your Radius server.
–
Root CA—Click Browse and browse to the location on your PC
where you stored the Root CA file. Then click Upload.
–
User CA: Click Browse browse to the location on your PC where
you stored the User CA file. Then click Upload.
–
Password—Enter the camera’s client log in to the Radius server.
This entry must match the key that is stored on the Radius server.
• EAP-TTLS
–
Process Method—Choose an authentication method as required that
used for processes and transmits CA to your Radius server.
–
User ID—User ID used for logging in to your Radius server.
–
Password—Enter the camera’s client log in to the Radius server.
This entry must match the key that is stored on the Radius server.
–
Anonymous ID—The unsigned public ID used for logging in to
your Radius server.
–
Root CA—Click Browse and browse to the location on your PC
where you stored the Root CA file. Then click Upload.
Table 5-2 Wireless Security Window Options (continued)
Option Description