
User's Manual


4-13
Cisco IOS Software Configuration Guide for Cisco Aironet Access Points
OL-11350-01
Chapter 4 Configuring the Access Point for the First Time
Assigning Basic Settings
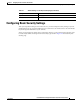
• IP Address—Use this setting to assign or change the wireless device’s IP address. If DHCP is
enabled for your network, leave this field blank.
Note If the wireless device’s IP address changes while you are configuring the wireless device using
the web-browser interface or a Telnet session over the wired LAN, you lose your connection to
the wireless device. If you lose your connection, reconnect to the wireless device using its new
IP address. Follow the steps in the “Resetting the Device to Default Settings” section on page 4-2
if you need to start over.
• IP Subnet Mask—Enter the IP subnet mask provided by your network administrator so the IP
address can be recognized on the LAN. If DHCP is enabled, leave this field blank.
• Default Gateway—Enter the default gateway IP address provided by your network administrator.
If DHCP is enabled, leave this field blank.
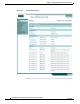
• Role in Radio Network—Click on the button that describes the role of the wireless device on your
network. Select Access Point (Root) if the wireless device is connected to the wired LAN. Select
Repeater (Non-Root) if it is not connected to the wired LAN.The only role supported on the Airlink
is root.
–
Access Point—A root device; accepts associations from clients and bridges wireless traffic
from the clients to the wireless LAN. This setting can be applied to any access point.
–
Repeater—A non-root device; accepts associations from clients and bridges wireless traffic
from the clients to root access point connected to the wireless LAN. This setting can be applied
to any access point.
–
Root Bridge—Establishes a link with a non-root bridge. In this mode, the device also accepts
associations from clients. This setting is available only for the 1200 and 1240 series access
points.
–
Non-Root Bridge—In this mode, the device establishes a link with a root bridge. This setting
is available only for the 1200 and 1240 series access points.
–
Install Mode—Places the 1300 series access point/bridge in auto installation mode so you can
align and adjust a bridge link for optimum efficiency.
–
Workgroup Bridge—Emulates a Cisco Aironet 350 Series Workgroup Bridge. In the
Workgroup bridge mode, the access point functions as a client device that associates with a
Cisco Aironet access point or bridge. A wokgroup bridge can have have a maximum of 254
clients, presuming that no other wireless clients are associated to the root bridge or access point.
This setting is available for the 1100, 1200, and 1300 series access points.
–
Universal Workgroup Bridge—Configures the access point as a workgroup bridge capable of
associating with non-Cisco access points. This setting is available on 1130, and 1240 series
access points and 1300 series access point/bridges.
–
Scanner—Functions as a network monitoring device. In the Scanner mode, the access point
does not accept associations from clients. It continuously scans and reports wireless traffic it
detects from other wireless devices on the wireless LAN. All access points can be configured
as a scanner.
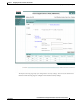
• Optimize Radio Network for—Use this setting to select either preconfigured settings for the
wireless device radio or customized settings for the wireless device radio.
–
Throughput—Maximizes the data volume handled by the wireless device, but might reduce its
range.
–
Range—Maximizes the wireless device’s range but might reduce throughput.