
- Cisco 1800 Series Integrated Services Router Manual


4-5
Cisco 1800 Series Routers (Modular) Hardware Installation Guide
OL-5876-03
Chapter 4 Chassis Installation Procedures for Cisco 1800 Series Routers (Modular)
Setting Up the Chassis
Installing the Router in a Rack
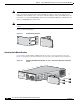
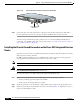
After you attach the brackets to the router chassis, use the screws provided with the rack to install the
chassis in the rack. (See
Figure 4-3.) Start with the lower pair of screws first, and rest the brackets on
the lower screws while you insert the upper pair of screws.
Tip The screw slots in the brackets are spaced to line up with every second pair of screw holes in the rack.
When the correct screw holes are used, the small threaded holes in the brackets line up with unused screw
holes in the rack. If the small holes do not line up with the rack holes, you must raise or lower the
brackets to the next rack hole.
Warning
Take care when connecting units to the supply circuit so that wiring is not overloaded.
Statement 1018
Warning
To prevent the system from overheating, do not operate it in an area that exceeds the maximum
recommended ambient temperature of 50°C (122°F).
Statement 1047
Caution Be sure to leave space above and below each router in a rack, to allow for cooling air circulation.
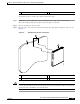
Figure 4-3 Mounting the Chassis in a Rack (Typical)
Warning
To prevent bodily injury when mounting or servicing this unit in a rack, you must take special
precautions to ensure that the system remains stable. The following guidelines are provided to
ensure your safety:
• This unit should be mounted at the bottom of the rack if it is the only unit in the rack.
• When mounting this unit in a partially filled rack, load the rack from the bottom to the top with the heaviest
component at the bottom of the rack.
• If the rack is provided with stabilizing devices, install the stabilizers before mounting or servicing the unit in
the rack.
Statement 1006
127168
CISCO 1841
1
0
0
-2
4
0
V
A
C
-
1
A
5
0
/6
0
H
z