
Installation Guide
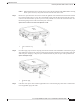
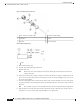

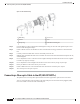

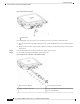

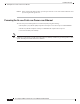

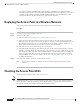

Figure 50: Terminating DC plug to the cable
Grommet and Seal Ring4DC 2-conductor 18 AWG cable1
Gasket5Crimp Pins2
Connector body6Seal Nut3
Figure 51: Wire Stripping Length
cable1
a) Dis-assemble the DC plug .
b) Pass the cable through the plug components.
c) Strip the cable end.
Remove the wire jacket and tin the wire strands. Tinning the strands helps to insert the wire
into the crimp pins.
Note
d) Insert wire conductor into crimp pins. Using a 0.10 inch (2.54 mm) Hex crimp tool, crimp the pin to the
wire to secure it in place. Repeat for the second pin. If you must re-do the crimping process, you can use
the 2 extra pins supplied.
e) Insert the crimped pins and wire into the female barrel of the connector body. Be sure to insert the proper
wire polarity into the corresponding barrel shown on the body. Push to be sure the pin is fully seated into
the barrel.
Pin 1 (+V) Pin 2 (-V), the connector body is marked (+) and (-) to show polarity pin assignments.
Note
f) Slide the gasket and seal the ring down the cable, thread the ring on to the body. Use caution to be sure
the gasket is correctly seated into the ring. Hand tighten to seal gasket fully.
Cisco Catalyst 9124AX Series Outdoor Access Point Hardware Installation Guide
54
Installation Overview
Connecting a DC Power Cable to the Access Point