
Installation Guide


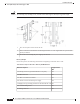

When you are installing a Layer 3 AP on a different subnet than the controller, ensure the following:
• Ensure that a DHCP server is reachable from the subnet on which you want to install the AP.
• The subnet has a route back to the controller and ensure that the route back to the controller
has the destination UDP ports 5246 and 5247 open for CAPWAP communications.
• Ensure that the route back to the primary, secondary, and tertiary controllers allows IP packet
fragments.
• Ensure that the AP and the controller have a static 1-to-1 NAT to an outside address if address
translation is used. (Port Address Translation is not supported.).
Note
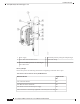
Mounting the Access Point
This section provides instructions to mount the AP. Personnel mounting the AP must have knowledge of the
wireless AP, bridging techniques, and grounding methods.
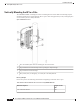
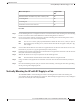
Choosing a Mounting Kit
You can mount the AP in one of the following configurations:
•
On a vertical wall or
pole for C9124AXD-x
•
On a horizontal eave or
pole for C9124AXI-x
• On a cable strand
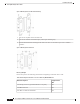
PurposeAP Mounting Kit
3
Fixed mounting kit for vertical mounting on wall and for pole of
diameter 2 to 5 inch (51 to 127 mm). See:
Vertically Mounting the AP to a Wall, on page 25
Vertically Mounting the AP to a Pole, on page 28
AIR-MNT-VERT1=
Fixed mounting kit, allowing mounting of both AP and power
supply, for vertical mounting on wall and for pole of diameter 2
to 5 inch (51 to 127 mm). See:
Vertically Mounting the AP with DC Supply to a Wall, on page
29
Vertically Mounting the AP with DC Supply to a Pole, on page
31
AIR-MNT-VERT2=
Cisco Catalyst 9124AX Series Outdoor Access Point Hardware Installation Guide
24
Installation Overview
Mounting the Access Point