
Installation Guide


To calculate path loss and determine how far apart to install the APs, consult an RF planning expert.
Note
Before you begin the installation process, ensure the following:
• Perform a site survey. For more information, see Performing Site Surveys, on page 73.
• Your network infrastructure devices must be operational and properly configured.
• Your controllers must be connected to switch trunk ports.
• Your switch must be configured with untagged access ports for connecting your APs.
• A DHCP server with Option 43 configured must be reachable by your AP, or manually configure the
controller information in the AP. For information about configuring DHCP Option 43, see
http://www.cisco.com/c/en/us/support/docs/wireless-mobility/wireless-lan-wlan/
97066-dhcp-option-43-00.html
• Become familiar with the AP installation components, see Typical Access Point Installation Components,
on page 18.
• Familiarize yourself with the best practices to install Cisco outdoor wireless access points video series,
see
https://www.cisco.com/c/en/us/td/docs/wireless/access_point/outdoor/video/ap-best-practices.html
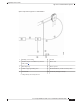
Typical Access Point Installation Components
The Cisco Catalyst 9124AX Series Outdoor Access Point is designed to be installed in an outdoor environment,
such as the exterior roof overhang of a tall building or a streetlight pole. Carefully review the Figure 23:
Components in a Typical Access Point Installation, on page 19 to become familiar with the system components,
connectors, indicators, cables, system interconnection, and grounding.
Cisco Catalyst 9124AX Series Outdoor Access Point Hardware Installation Guide
18
Unpacking Your Access Point
Typical Access Point Installation Components