
Installation Guide


• AP-mounting brackets to mount the C9124AXI or C9124AXD AP.
DescriptionMounting Brackets
Vertical mount to a wall or 2 to 5 inch (51 to 127 mm) diameter poleAIR-MNT-VERT1=
Articulating mount to a wall or 2 to 5 inch (51 to 127 mm) diameter poleAIR-MNT-ART1=
Vertical mount with DC adapter to a wall or 2 to 5 inch (51 to 127 mm) diameter
pole
AIR-MNT-VERT2=
Horizontal mount to a wall or 2 to 5 inch (51 to 127 mm) diameter poleAIR-MNT-HORZ1=
Optional for AIR-MNT-HORZ1= kit to mount DC power supplyAIR-ACC-PS-MNT1
Cable strand horizontal mountAIR-MNT-STRAND1=
• Accessory kits
DescriptionAccessory Kit
Gland kit for SFP portAIR-SFP-KIT1=
AP paintable coverC9124-CVR1=
Additional Ethernet port plugs, RJ45 dust caps, ground lug, DC plugAIR-ACC-KIT1=
• Power injectors when PoE is not available
DescriptionPower Supply
60W rated outdoor power injector, with North America AC plugAIR-PWRINJ-60RGD1=
60W rated outdoor power injector, global version without AC plugAIR-PWRINJ-60RGD2=
30W rated single-port PoE injectorAIR-PWRINJ6=
External AC/DC power supply when PoE is not availableAIR-PWRADPT-RGD2=
Preinstallation Checks and Installation Guidelines
Because the AP is a radio device, it is susceptible to common causes of interference that can reduce throughput
and range. Follow these basic guidelines to ensure the best possible performance:
• Thoroughly review the information provided in Installation Overview, on page 21.
• Install the AP in an area where structures, trees, or hills do not obstruct radio signals to and from the AP.
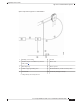
• We recommend that you install the AP no higher than 40 feet to support the wireless clients on the ground.
Mounting all the APs at the same height provides the best throughput.
• If the SFP port is not in use, the port plug should remain in place and must be tightened to 12.5 lbf-in
torque. If the DC, console, or PoE ports are not in use, the port cap should remain in place.
Cisco Catalyst 9124AX Series Outdoor Access Point Hardware Installation Guide
17
Unpacking Your Access Point
Preinstallation Checks and Installation Guidelines