Cisco Catalyst 9124AX Series Outdoor Access Point Hardware Installation Guide First Published: 2021-03-29 Americas Headquarters Cisco Systems, Inc. 170 West Tasman Drive San Jose, CA 95134-1706 USA http://www.cisco.
THE SPECIFICATIONS AND INFORMATION REGARDING THE PRODUCTS IN THIS MANUAL ARE SUBJECT TO CHANGE WITHOUT NOTICE. ALL STATEMENTS, INFORMATION, AND RECOMMENDATIONS IN THIS MANUAL ARE BELIEVED TO BE ACCURATE BUT ARE PRESENTED WITHOUT WARRANTY OF ANY KIND, EXPRESS OR IMPLIED. USERS MUST TAKE FULL RESPONSIBILITY FOR THEIR APPLICATION OF ANY PRODUCTS.
CONTENTS PREFACE Preface vii About this Guide vii Conventions vii Related Documentation viii Cisco Bug Search Tool viii Communications, Services, and Additional Information viii CHAPTER 1 About the Cisco Catalyst 9124AX Series Outdoor Access Point 1 Introduction to Cisco Catalyst 9124AX Series Outdoor Access Point 1 Cisco Catalyst 9124AX Series Outdoor Access Point Features 1 AP Model Numbers and Regulatory Domains 3 Antennas and Radios 3 CHAPTER 2 Hardware Features 5 Access Point Views, Ports, and
Contents Additional Tools and Hardware Required for Installation 16 Cisco Orderable Accessories 16 Preinstallation Checks and Installation Guidelines 17 Typical Access Point Installation Components 18 CHAPTER 4 Installation Overview 21 Preparing the AP for Installation 21 Performing a Preinstallation Configuration (Optional) 22 Mounting the Access Point 24 Choosing a Mounting Kit 24 Vertically Mounting the AP to a Wall 25 Vertically Mounting the AP to a Pole 28 Vertically Mounting the AP with DC Supply t
Contents CHAPTER 6 Troubleshooting 65 Troubleshooting the Access Point to Cisco Controller Join Process 65 Important Information for Controller-based Deployments 66 Configuring DHCP Option 43 CHAPTER 7 Safety Guidelines and Warnings 66 69 FCC Safety Compliance Statement 72 Safety Precautions 72 Avoiding Damage to Radios in a Testing Environment 72 Performing Site Surveys 73 CHAPTER 8 Declarations of Conformity and Regulatory Information 75 Manufacturers Federal Communication Commission Declaratio
Contents Cisco Catalyst 9124AX Series Outdoor Access Point Hardware Installation Guide vi
Preface This preface describes this guide and provides information about the conventions used in this guide, and related documentation. Note The documentation set for this product strives to use bias-free language. For purposes of this documentation set, bias-free is defined as language that does not imply discrimination based on age, disability, gender, racial identity, ethnic identity, sexual orientation, socioeconomic status, and intersectionality.
Preface Related Documentation Caution Warning Means reader be careful. Cautions contain information about something you might do that could result in equipment damage or loss of data. Safety warnings appear throughout this guide in procedures that, if performed incorrectly, can cause physical injuries. A warning symbol precedes each warning statement. Related Documentation All user documentation for the Cisco Catalyst 9124AX series access point is available at the following URL: https://www.cisco.
CHAPTER 1 About the Cisco Catalyst 9124AX Series Outdoor Access Point • Introduction to Cisco Catalyst 9124AX Series Outdoor Access Point, on page 1 • Cisco Catalyst 9124AX Series Outdoor Access Point Features, on page 1 • AP Model Numbers and Regulatory Domains, on page 3 • Antennas and Radios, on page 3 Introduction to Cisco Catalyst 9124AX Series Outdoor Access Point Cisco Catalyst 9124AX Series Outdoor Access Point is a Wi-Fi 6 technology based outdoor access point.
About the Cisco Catalyst 9124AX Series Outdoor Access Point Cisco Catalyst 9124AX Series Outdoor Access Point Features • MU-MIMO technology for uplink and downlink. • OFDMA-based scheduling for both uplink and downlink.
About the Cisco Catalyst 9124AX Series Outdoor Access Point AP Model Numbers and Regulatory Domains • Monitor mode: In the monitor mode, the AP is excluded from handling data traffic between clients and infrastructure. The AP acts as dedicated sensor for location–based services (LBS), rogue AP detection, and Intrusion Detection System (IDS). When the AP is in monitor mode, it actively monitors the airwaves and typically does not serve clients.
About the Cisco Catalyst 9124AX Series Outdoor Access Point Antennas and Radios • C9124AXI-x • C9124AXD-x The C9124AXI-x and 9124AXD-x AP models have four internal dual-band antennas with dedicated 2.4-GHz and 5-GHz radios, one internal single-band antenna with a dedicated 2.4-GHz IoT radio, and one dual-band antenna with a dedicated 2.4-GHz and 5-GHz AUX radio.
CHAPTER 2 Hardware Features This section describes the following hardware features of the C9124AXI-x and C9124AXD-x models: • Access Point Views, Ports, and Connectors, on page 5 • C9124AXI (Internal Antenna) Model: Antenna Radiation Patterns, on page 7 • C9124AXD (Directional Antenna) Model: Antenna Radiation Patterns, on page 10 • Power Sources, on page 12 Access Point Views, Ports, and Connectors Cisco Catalyst 9124AX Series Outdoor AP has multiple options that you can use to power the AP or join the
Hardware Features Connectors and Ports Connectors and Ports on the Base Figure 1: Models C9124AXI and C9124AXD Base Connectors and Ports SFP port for uplink1. The SFP port only supports DC power IN. 1 3 1 Gig PSE (PoE-OUT) Ethernet Port 4 Reset / Status LED If the port is not being used, do not remove the covering plug. Otherwise, it might lead to water leaking into the AP 2 2.5G mGig PD (PoE-IN) Ethernet port 1 Use the SFP port or the Gigabit Ethernet port as the uplink port.
Hardware Features C9124AXI (Internal Antenna) Model: Antenna Radiation Patterns Connectors and Ports on the Sides Figure 2: Models C9124AXI and C9124AXD Left–Side and Right–Side Connectors and Ports 1 Console Port 2 Grounding Pad 3 DC Power In C9124AXI (Internal Antenna) Model: Antenna Radiation Patterns The following illustrations show the C9124AXI model with internal antenna radiation patterns: Cisco Catalyst 9124AX Series Outdoor Access Point Hardware Installation Guide 7
Hardware Features C9124AXI (Internal Antenna) Model: Antenna Radiation Patterns Figure 3: C9124AXI–Dual-Band Antenna Radiation Pattern (2.4–GHz Figure 4: C9124AXI–Dual-Band Antenna Radiation Pattern (2.
Hardware Features C9124AXI (Internal Antenna) Model: Antenna Radiation Patterns Figure 7: C9124AX–IoT Antenna Radiation Pattern (2.4–GHz Azimuth) Figure 8: C9124AX–IoT Antenna Radiation Pattern (2.4–GHz Elevation) Figure 9: C9124AXI–AUX RF ASIC Antenna Radiation Pattern (2.4–GHz Azimuth) Figure 10: C9124AXI–AUX RF ASIC Antenna Radiation Pattern (2.
Hardware Features C9124AXD (Directional Antenna) Model: Antenna Radiation Patterns Figure 11: C9124AXI–AUX RF ASIC Antenna Radiation Pattern (5–GHz Azimuth) Figure 12: C9124AXI–AUX RF ASIC Antenna Radiation Pattern (5–GHz Elevation) C9124AXD (Directional Antenna) Model: Antenna Radiation Patterns The C9124AXD model with directional internal antenna has its radio radiation patterns shown in the following images: Figure 13: C9124AXD–Dual-Band Antenna Radiation Pattern (2.
Hardware Features C9124AXD (Directional Antenna) Model: Antenna Radiation Patterns Figure 15: C9124AXD–Dual-Band Antenna Radiation Pattern (5–GHz Figure 16: C9124AXD–Dual-Band Antenna Radiation Pattern (5–GHz Azimuth) Elevation) Figure 17: C9124AX–IoT Antenna Radiation Pattern (2.4–GHz Azimuth) Figure 18: C9124AX–IoT Antenna Radiation Pattern (2.
Hardware Features Power Sources Figure 19: C9124AXD–AUX RF ASIC Antenna Radiation Pattern (2.4–GHz Azimuth) Figure 20: C9124AXD–AUX RF ASIC Antenna Radiation Pattern (2.
Hardware Features Power Injectors • Power over Ethernet (PoE): For more information, see Powering the Access Point, on page 50. Danger Connect the unit only to DC power source that complies with the safety extra-low voltage (SELV) requirements in IEC 60950 based safety standards. Statement 1033 Caution For PoE options and their corresponding modes of operation, see Table 11: Cisco Catalyst 9124AX AP Reduced Power Feature Matrix, on page 50.
Hardware Features Ethernet (PoE) Ports Tip The AP senses the Ethernet and power signals, and automatically switch internal circuitry to match the cable connections. Danger To reduce the risk of fire, use only No. 24 AWG or larger telecommunication line cord. Statement 1023 The Ethernet cable must be a shielded, outdoor rated, Category 5e (CAT5e) or better cable. The AP senses the Ethernet and power signals and automatically switches internal circuitry to match the cable connections.
CHAPTER 3 Unpacking Your Access Point • Package Contents, on page 15 • Unpacking the Access Point, on page 15 • Optional Tools and Hardware from Cisco, on page 16 • Cisco Orderable Accessories, on page 16 • Preinstallation Checks and Installation Guidelines, on page 17 • Typical Access Point Installation Components, on page 18 Package Contents Each AP package contains the following items: • One C9124AXI or C9124AXD Outdoor AP • Ground lug and screws with lock washers • RJ45 Ethernet port termination plug
Unpacking Your Access Point Optional Tools and Hardware from Cisco • (Optional) Mounting brackets only if you opted for these when ordering the AP. If any item is missing or damaged, contact your Cisco representative or reseller for instructions.
Unpacking Your Access Point Preinstallation Checks and Installation Guidelines • AP-mounting brackets to mount the C9124AXI or C9124AXD AP.
Unpacking Your Access Point Typical Access Point Installation Components Note To calculate path loss and determine how far apart to install the APs, consult an RF planning expert. Before you begin the installation process, ensure the following: • Perform a site survey. For more information, see Performing Site Surveys, on page 73. • Your network infrastructure devices must be operational and properly configured. • Your controllers must be connected to switch trunk ports.
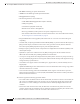
Unpacking Your Access Point Typical Access Point Installation Components Figure 23: Components in a Typical Access Point Installation 1 Building roof overhang 6 Ground 2 Shielded outdoor-rated Ethernet (CAT5e or better) cable2 7 Power cord 3 Water drip loop 8 Power injector 4 6-AWG copper grounding wire 1 9 Shielded Ethernet (CAT5e or better) cable1 5 Ground rod1 10 Controller (through a switch) 2 Independently sourced by the user.
Unpacking Your Access Point Typical Access Point Installation Components Cisco Catalyst 9124AX Series Outdoor Access Point Hardware Installation Guide 20
CHAPTER 4 Installation Overview Installing an AP involves the following high-level tasks. • Preparing the AP for Installation, on page 21 • Performing a Preinstallation Configuration (Optional), on page 22 • Mounting the Access Point, on page 24 Preparing the AP for Installation Before you mount and deploy the AP, we recommend that you perform a site survey (or use the site planning tool) to determine the best location to install your AP.
Installation Overview Performing a Preinstallation Configuration (Optional) Performing a Preinstallation Configuration (Optional) Performing the following procedures ensure that the AP installation and the initial operation proceed as expected. This procedure is optional. Note If your wireless controller is configured properly, you can install the AP in its final location and connect it to the network from there.
Installation Overview Performing a Preinstallation Configuration (Optional) Note To use an SFP module, you must insert it into an AP's SFP port before the AP boots, in order to ensure correct power consumption and PoE derating. a) Ensure that the AP has Layer 3 connectivity to the Cisco Controller Management and AP-Manager interfaces. b) Configure the switch to which the AP should be attached.
Installation Overview Mounting the Access Point Note When you are installing a Layer 3 AP on a different subnet than the controller, ensure the following: • Ensure that a DHCP server is reachable from the subnet on which you want to install the AP. • The subnet has a route back to the controller and ensure that the route back to the controller has the destination UDP ports 5246 and 5247 open for CAPWAP communications.
Installation Overview Vertically Mounting the AP to a Wall AP Mounting Kit 3 Purpose AIR-MNT-ART1= Pivoted mounting kit for both vertical and horizontal mounting, on wall and for pole of diameter 2 to 5 inch (51 to 127 mm). See: Articulating Mount for the AP to a Wall, on page 33 Articulating Mount for the AP to a Pole, on page 37 AIR-MNT-HORZ1=AIR-ACC-PS-MNT1 Fixed mounting kit, allowing mounting the AP to mounted (Optional) horizontal to the ground.
Installation Overview Vertically Mounting the AP to a Wall Figure 25: Mounting Bracket for Wall and Pole Mounting 1 One of four keyhole slots to mount the AP. 2 One of four slots for steel band clamps, used for pole mounting only. 3 Bracket mount holes for fastening bracket to the wall. You can use bolts of up to 1/4” or 6 mm in diameter.
Installation Overview Vertically Mounting the AP to a Wall Materials Required Supplied in the Kit? Crimping tool for ground lug, Panduit CT-720 with CD-720-1 die No Four wall mounting screws No Four wall anchors (specified for all material) No Drill bit for wall anchors No Electric drill and standard screwdriver No #6 AWG ground wire No Shielded outdoor-rated Ethernet (CAT5e or better) cable No Grounding block No Grounding rod No 10–mm box-end wrench or socket set No Procedure Step 1
Installation Overview Vertically Mounting the AP to a Pole Vertically Mounting the AP to a Pole The AIR-MNT-VERT1= mounting kit contains a mounting bracket used for both wall mounting and pole mounting. This kit can be used to install the AP on a pole or mast. It supports metal, wood, or fiberglass poles of 2 to 5 inches (51 to 127 mm) in diameter. Figure 27: AP Mounted on a Pole 1 One of four M6 keyhole slots for mounting the AP on the bracket.
Installation Overview Vertically Mounting the AP with DC Supply to a Wall Materials Required Supplied in the Kit? Four M6 x12 mm hex head bolts Yes Two stainless steel band clamps (adjustable 2 to 5 inch (51 to 127 mm) Yes 10–mm box-end wrench No Outdoor rated shielded Ethernet cable No Ground lug (provided with the access point) Yes Ground block and rod No Crimping tool for ground lug, Panduit CT-720 with CD-720-1 die No #6 AWG ground wire No Procedure Step 1 Select a mounting location o
Installation Overview Vertically Mounting the AP with DC Supply to a Wall Caution The mounting wall, attaching screws, and wall anchors must support a 50-lb (22.7–kg) static weight. Figure 28: Mounting Bracket for Wall and Pole Mounting AP with Power Supply 1 One of four keyhole slots to mount the AP. 2 Three of six bracket mount holes for fastening the bracket to a wall. Support bolts of up to 0.
Installation Overview Vertically Mounting the AP with DC Supply to a Pole Materials Required Supplied in the Kit? Shielded outdoor-rated Ethernet (CAT5e or better) cable No Grounding block No Grounding rod No 10-mm box-end wrench or socket set No Procedure Step 1 Use the mounting bracket as a template to mark six screw hole locations on the mounting wall. The mounting bracket screw hole locations and the dimensions of the mounting bracket are shown in .
Installation Overview Vertically Mounting the AP with DC Supply to a Pole 1 Power supply 4 Band clamp slots for passing the clamps through. 2 Screw holes for four #8-32 screws. 5 Steel band clamps. 3 One of four M6 keyhole slots for mounting the AP on the bracket.
Installation Overview Articulating Mount for the AP to a Wall Materials Needed Supplied in the Kit? 10–mm box-end wrench No Outdoor rated shielded ethernet cable No Ground lug (provided with the access point) Yes Ground block and rod No Crimping tool for ground lug, Panduit CT-720 with CD-720-1 die No #6 AWG ground wire No Procedure Step 1 Select a mounting location on the pole to mount the AP. You can attach the AP to a pole having a diameter of 2 to 5 inch (51 to 127 mm).
Installation Overview Articulating Mount for the AP to a Wall Figure 29: Visualization of AP Fastened to the Pivoting Wall Mounting Kit Figure 30: Pivoting Wall Mounting Bracket 1 One of four bolt holes for fastening to the back of the AP. This is the AP-plate end of the bracket and is fastened to the back of the AP. 2 3 Screw holes for wall mounting. These screw holes can also be used as slots for steel band clamps in pole-mount installations. Wall-plate end of the bracket.
Installation Overview Articulating Mount for the AP to a Wall Figure 31: Pivoting Wall Mounting Bracket Dimensions Figure 32: Exploded View of the Pivoting Mounting Kit 1 90.0 mm M8 screw 5 80.0 mm M8 screw with washer and spring washer for fastening the pole-mount screw clamp to the pivoting bracket base plate.
Installation Overview Articulating Mount for the AP to a Wall Table 6: Materials for Mounting AP to a Wall with AIR-MNT-ART1= Kit Materials Needed Supplied in the Kit? Ground lug and screws (provided with the access point) Yes Pivoting mount kit and hardware Yes (8) M6 x 12-mm Hex-head Bolts Yes Adapter bracket for option horizontal mount Yes Two stainless steel band clamps (adjustable 2 to 5 inch (51 to 127 mm) Yes Caution Crimping tool for ground lug, Panduit CT-720 with CD-720-1 die No Fo
Installation Overview Articulating Mount for the AP to a Pole Step 6 Using the 90 mm M8 long screw and the hardware supplied with the pivoting bracket, bolt the AP and bracket plate to the wall plate mounted on the wall. See Figure 30: Pivoting Wall Mounting Bracket , on page 34 for this assembly. Do not fully tighten the assembly. Note The AP should be mounted with the status LED on the base facing downwards.
Installation Overview Articulating Mount for the AP to a Pole Figure 34: Pivoting Mounting Kit with Pole Mount Clamp 1 One of four mounting holes for the AP. This is 3 the AP-plate end of the bracket and is fastened to the back of the AP 2 One of four slots for band clamps. Pole mount screw clamp. It can fit poles having a diameter of up to 2 to 3 inches (50 to 76 mm) This is the pivot bracket base plate and is fastened to the pole.
Installation Overview Wall Mounting the AP with Horizontal Kit Materials Required Supplied in the Kit? #6 AWG ground wire No Shielded outdoor-rated Ethernet (CAT5e or better) cable No Grounding block No Grounding rod No 13-mm box-end wrench or socket set No 10-mm box-end wrench No Procedure Step 1 Select a mounting location on the pole to mount the AP. You can attach the AP to any pole with a diameter of 2 to 5 inch (51 to 127mm).
Installation Overview Wall Mounting the AP with Horizontal Kit Before you begin Ensure that you have the following materials before beginning to mount the AP horizontally to a wall: Table 8: Materials Needed for Mounting the AP using AIR-MNT-HORZ1= Kit Materials Required Supplied in the Kit? Wall/Pole Mount L-Bracket Yes Solar Shield Cover Yes (4) M6 x 12-mm Hex-head Bolts Yes (2) Adjustable Band Clamps 2 to 5 inch (51 to 127 mm) Dia Yes (4) 8-32 x 0.
Installation Overview Pole Mounting the AP with Horizontal Kit Figure 36: L-bracket AP mount dimensions Step 2 Use four screws and, if required, wall anchors to attach the L-bracket to the mounting surface. You must procure these screws and anchors, and they must follow local codes to support at least 50 lbs (22.7 kg.) Step 3 Position the AP horizontally against the L-bracket's bottom to align the four mounting holes on the AP’s back with the slots in the mounting bracket.
Installation Overview Pole Mounting the AP with Horizontal Kit Figure 37: Pole Mounted Horizontal Kit (AIR-MNT-HORZ1=) 1 L-Bracket 2 Solar Shield 3 (4) M6 x 12–mm Hex-head Bolts 4 (4) 8-32 x 0.62” Phillips Pan Head Screw 5 (2) Adjustable Band Clamps 2 to 5 inch (51 to 127 mm) Dia.
Installation Overview DC Supply Mount Bracket Materials Required Supplied in the Kit? (4) wall screws and anchors (specified for wall material) No Drill bit for wall anchors No 10–mm box-end wrench or socket set No Phillips Screwdriver No Procedure Step 1 Select a mounting location on the pole to mount the AP. You can attach the AP to a pole with a diameter of 2 to 5 inch (51 to 127 mm).
Installation Overview DC Supply Mount Bracket Figure 38: Installing the DC supply bracket on to the L-bracket 1 DC supply mount bracket 2 8-32 x 0.
Installation Overview Strand Mounting the AP Procedure Step 1 Install the DC bracket to the L-bracket with the four screws supplied. Tighten the screws to 15 lbf-in (17 kgf-cm) of tourque. See Figure 38: Installing the DC supply bracket on to the L-bracket, on page 44. Step 2 Mount the DC supply to the bracket. For bracket dimensions, see Figure 39: DC Supply Bracket Dimensions, on page 44. Strand Mounting the AP The Strand Mount Kit (SMK) is used to mount the AP horizontally onto a cable strand.
Installation Overview Strand Mounting the AP 2 SMK Lower Bracket 5 5/16-18 x 1.25 inchBolt 3 5/16-18 x 0.75” Bolt 6 Cable Clamp Figure 42: Assembling the AP to the SMK and Solar Shield 1 SMK Bracket Assembly 4 M8 split lock washer 2 Solar Shield 5 M8 flat washer 3 M8 x 16 mm Button head hex bolt 6 8-32 x 0.
Installation Overview Strand Mounting the AP Materials Required Supplied in the Kit? (4) 8-32 x 0.62” Phillips Pan Head Screw Yes 5–mm Hex wrench No 13–mm box-end wrench or socket set No Phillips Screwdriver No Procedure Step 1 Assemble the cable clamps to the cable bracket on both cable brackets (see Figure 42: Assembling the AP to the SMK and Solar Shield, on page 46). Set the height of the cable brackets as required.
Installation Overview AP Paintable Cover Kit Note You may require to pull the cable strand or support cable away from the fiber or cable bundle during installation. Ensure to re-secure the cable after the installation. AP Paintable Cover Kit You can install a cover C9124-CVR= and paint these covers to blend the AP in its surrounding environment. You can install the cover before or after all connections are completed.
Installation Overview Grounding the Access Point Procedure Step 1 Position and rotate the cover over the AP. Figure 46: Installing the AP Cover Kit Step 2 Carefully pull back the flanged wall with screws to pass the cover over the AP. The covers are a snug fit to the AP. Step 3 Align the two captive screws on the top of the cover with the screw holes. Grounding the Access Point The AP must be grounded before connecting power.
Installation Overview Powering the Access Point Figure 47: Position of the Ground Pad on the Right Side of the AP 1Ground pad, where the ground strap screw holes are located. Powering the Access Point The AP supports these power sources: • DC power – 24–56 VDC • Power-over-Ethernet (PoE) The AP can be powered via the PoE input from an inline power injector or a suitably powered switch port. Depending on the configuration and regulatory domain, the required power for full operation is 802.3bt or UPOE.
Installation Overview Connecting a Power Injector SKU PoE-in/DC Radio 0 dBm Radio Input 1 dBm AUX Radio Ethernetm SPF GbE PoE-out Notes Gig Module PHY 2.4-GHz radio 5-GHz Chillwave Primary radio disabled – disabled – enabled 1G N N N Serving radios disabled 2x2 23 2x2 23 enabled 1G N Y N - .3bt / UPOE 4x4 24 4x4 24 enabled 2.5G Y Y 7W With 802.3bt or UPOE input, limit PoE-out to 7.0W DC input 4x4 24 4x4 24 enabled 2.5G Y Y 15.4W PoE output is 802.
Installation Overview Connecting a DC Power Cable to the Access Point Danger To reduce the risk of fire, use only No. 24 AWG or larger telecommunication line cord. Statement 1023 Note The installer is responsible for ensuring that powering the AP from this type of power injector is allowed by local and/or national safety and telecommunications equipment standards. Step 4 Ensure that the antennas are connected, and that ground is attached to the AP before you apply power to the AP.
Installation Overview Connecting a DC Power Cable to the Access Point Caution Step 3 When installing DC power to the AP, always connect the AP end of the cable FIRST. When removing the DC power connector, always disconnect the AP end of the cable LAST. Remove the cap from the DC connector located on the right side of the AP. Push inward toward the AP and turn counterclockwise about a ¼ turn. The cap should dis-engage from the bayonet thread on the 2-pin DC connector.
Installation Overview Connecting a DC Power Cable to the Access Point Figure 50: Terminating DC plug to the cable 1 DC 2-conductor 18 AWG cable 4 Grommet and Seal Ring 2 Crimp Pins 5 Gasket 3 Seal Nut 6 Connector body Figure 51: Wire Stripping Length 1 cable a) Dis-assemble the DC plug . b) Pass the cable through the plug components. c) Strip the cable end. Note Remove the wire jacket and tin the wire strands. Tinning the strands helps to insert the wire into the crimp pins.
Installation Overview Connecting Data Cables g) Thread the seal nut on to the seal ring. Hand tighten until the ring grommet seals onto the cable jacket. Step 6 Install the DC plug into the AP connector. Connecting Data Cables All the models of this AP support data connections through the Ethernet port and the Small Form-factor Pluggable (SFP) port. However, both the Ethernet port and the SFP port cannot be used for data simultaneously.
Installation Overview Connecting a Fiber-optic Cable to the AP (AIR-SPF-KIT1=) Figure 52: Cable Gland Assembly 1 RJ45 Plug 4 Screw nut 2 Gasket 5 Seal 3 Clamp ring 6 Thread-lock sealing nut Step 5 Insert the Ethernet cable's unterminated end through the sealing nut end of the cable gland and pull several inches of cable through the adapter. Step 6 Install an RJ-45 connector on the Ethernet cable's unterminated end using your Ethernet cable installation tool.
Installation Overview Connecting a Fiber-optic Cable to the AP (AIR-SPF-KIT1=) Figure 53: Fiber-Optic cable and gland installed to AP Before you begin You require the following materials for connecting the fiber-optic cable to the AP: • Cisco Small form-factor pluggable (SFP) adapter kit • SFP transceiver module • SC or Duplex LC fiber-optic cables. The fiber optic cable’s outer diameter should be 0.24 to 0.50 inch (6 to 12.7 mm). The cable gland cannot hold a cable with a diameter more than 0.50” (12.
Installation Overview Connecting a Fiber-optic Cable to the AP (AIR-SPF-KIT1=) Figure 54: Removing the SFP port plug 1 SFP Port Plug Do not discard the plug unless you are sure the SFP port will never need to be sealed in the future. a) Place the AP on its back (resting on the heat fins) on a stable but padded surface to avoid scratching the paint. b) Using a 12-mm wrench or large flat blade, or Philips screwdriver, turn the SFP port plug counterclockwise and remove it.
Installation Overview Connecting a Fiber-optic Cable to the AP (AIR-SPF-KIT1=) Step 5 3 SFP Gland Adapter body 7 Small Cable Rubber Gland 0.24 to 0.30 inch (6.0 to 7.6 mm) diameter 4 Body O-ring 8 Gland nut Terminate the SC or LC fiber optic cable.
Installation Overview Powering the Access Point over Power-over-Ethernet Caution When removing this SFP assembly, you must proceed in the reverse order of this installation. Start by loosening the cable gland’s nut. Powering the Access Point over Power-over-Ethernet The AP can be powered through Power-over-Ethernet (PoE) using the following: • 802.3at (PoE+): Any 802.3at (30W) compliant switch port or Cisco Power Injector AIR-PWRINJ6= • 802.3bt: Any 802.3bt compliant switch port or IEEE 802.
CHAPTER 5 Configuring and Deploying the Access Point This section describes how to connect the AP to a controller. For instructions on how to configure the AP, see the relevant release's Cisco Wireless Controller Configuration Guide. • Controller Discovery Process, on page 61 • Deploying the Access Point in a Wireless Network, on page 62 • Checking the Access Point LEDs, on page 62 Controller Discovery Process The Cisco AP must join a controller to function as an AP and start serving clients.
Configuring and Deploying the Access Point Deploying the Access Point in a Wireless Network the CISCO-CAPWAP-CONTROLLER provides backward compatibility in an existing customer deployment. When an AP receives an IP address and DNS information from a DHCP server, it contacts the DNS to resolve CISCO-CAPWAP-CONTROLLER.localdomain. When the DNS sends a list of controller IP addresses, the AP sends discovery requests to the controllers.
Configuring and Deploying the Access Point Checking the Access Point LEDs Table 13: AP LED Signals LED Message Color Type Meaning Boot loader status sequence Boot loader status sequence: Blinking Green • DRAM memory test in progress • DRAM memory test OK • Board initialization in progress • Initializing FLASH file system • FLASH memory test OK • Initializing Ethernet • Ethernet OK • Starting AP OS • Initialization successful Association status Operating Status Chirping (short blips) Green This sta
Configuring and Deploying the Access Point Checking the Access Point LEDs LED Message Color Type Meaning Boot loader errors Red There has been a DRAM memory test failure Blinking Red and Amber There has been a FLASH file system failure Blinking Red and Off This sequence may indicate any of the following: • Environment variable failure • Bad MAC address • Ethernet failure during image recovery • Boot environment failure • No Cisco image file • Boot failure AP OS errors Red There has been a softwar
CHAPTER 6 Troubleshooting • Troubleshooting the Access Point to Cisco Controller Join Process, on page 65 • Important Information for Controller-based Deployments, on page 66 • Configuring DHCP Option 43, on page 66 Troubleshooting the Access Point to Cisco Controller Join Process AP can fail to join a controller for many reasons: a RADIUS authorization is pending; self-signed certificates are not enabled on the controller; the AP and the controller regulatory domains do not match, and so on.
Troubleshooting Important Information for Controller-based Deployments • The AP is still connected to the same controller, and a specific syslog server's IP address has been configured for the AP on the controller using the config ap syslog host specific Cisco_AP syslog_server_IP_address command. In this case, the controller sends the new specific syslog server's IP address to the AP. • The AP is disconnected from the controller and joins another controller.
Troubleshooting Configuring DHCP Option 43 • Type—0xf1 (decimal 241) • Length—Number of controller IP addresses * 4 • Value—IP addresses of the controller management interfaces listed sequentially in hex Procedure Step 1 Enter configuration mode at the Cisco IOS CLI. Step 2 Create the DHCP pool, including the necessary parameters such as default router and name server.
Troubleshooting Configuring DHCP Option 43 Cisco Catalyst 9124AX Series Outdoor Access Point Hardware Installation Guide 68
CHAPTER 7 Safety Guidelines and Warnings Translated versions of the following safety warnings are provided in the translated safety warnings document shipped with your AP. The translated warnings are also in the Translated Safety Warnings for Cisco Catalyst Access Points, available on Cisco.com. Danger IMPORTANT SAFETY INSTRUCTIONSThis warning symbol means danger. You are in a situation that could cause bodily injury.
Safety Guidelines and Warnings Danger This equipment must be externally grounded using a customer-supplied ground wire before power is applied. Contact the appropriate electrical inspection authority or an electrician if you are uncertain that suitable grounding is available. Statement 366 Danger Do not work on the system or connect or disconnect cables during periods of lightning activity.
Safety Guidelines and Warnings Danger Invisible laser radiation may be emitted from disconnected fibers or connectors. Do not stare into beams or view directly with optical instruments. Statement 1051 Danger Do not locate the antenna near overhead power lines or other electric light or power circuits, or where it can come into contact with such circuits. When installing the antenna, take extreme care not to come into contact with such circuits, because they may cause serious injury or death.
Safety Guidelines and Warnings FCC Safety Compliance Statement • Avoiding Damage to Radios in a Testing Environment, on page 72 • Performing Site Surveys, on page 73 FCC Safety Compliance Statement The FCC, with its action in ET Docket 96-8, has adopted a safety standard for human exposure to RF electromagnetic energy emitted by FCC-certified equipment. When used with approved Cisco antennas, Cisco Catalyst products meet the uncontrolled environmental limits found in OET-65 and ANSI C95.1, 1991.
Safety Guidelines and Warnings Performing Site Surveys Note These distances assume free space path loss and are conservative estimates. Required separation distances for damage and performance degradation levels in actual deployments are less if conditions are not non-line-of-sight. • Reduce the configured transmit power to the minimum level. • Use directional antennas, and keep them away from each other.
Safety Guidelines and Warnings Performing Site Surveys • Antenna type and placement: Proper antenna configuration is a critical factor in maximizing radio range. As a general rule, range increases in proportion to antenna height. However, do not place the antenna higher than necessary because the extra height also increases potential interference from other unlicensed radio systems and decreases the wireless coverage from the ground.
CHAPTER 8 Declarations of Conformity and Regulatory Information This section provides declarations of conformity and regulatory information for the Cisco Catalyst 9124AX Series Outdoor APs. You can find additional information at this URL: www.cisco.
Declarations of Conformity and Regulatory Information VCCI Statement for Japan This device complies with Part 15 rules. Operation is subject to the following two conditions: 1. This device may not cause harmful interference, 2. This device must accept any interference received, including interference that may cause undesired operation. This equipment has been tested and found to comply with the limits of a Class B digital device, pursuant to Part 15 of the FCC Rules.
Declarations of Conformity and Regulatory Information Guidelines for Operating Cisco Catalyst Access Points in Japan Guidelines for Operating Cisco Catalyst Access Points in Japan This section provides guidelines for avoiding interference when operating Cisco Catalyst access points in Japan. These guidelines are provided in both Japanese and English.
Declarations of Conformity and Regulatory Information Canadian Compliance Statement electrical devices than products designated by CISCO. The use of cables that are certified by Electrical Appliance and Material Safety Law (that have “PSE” shown on the code) is not limited to CISCO-designated products. Canadian Compliance Statement This device complies with Industry Canada licence-exempt RSS standard(s).
Declarations of Conformity and Regulatory Information Canadian Compliance Statement Antenna Type Antenna Gain Single-Port Dual-Band Omni (VPOL) AUX 2.4 GHz—6 dBi Antenna Impedance 50 ohms 5 GHz—7 dBi Single-Port Dual-Band Omni (VPOL) AUX 2.4 GHz—6 dBi 50 ohms 5 GHz—7 dBi Single-Port Dual-Band Omni (VPOL) 2.4 GHz—7 dBi 50 ohms 5 GHz—7 dBi Single-Port Dual-Band Omni (VPOL) 2.4 GHz—7 dBi 50 ohms 5 GHz—7 dBi Single-Port Dual-Band Omni (VPOL) 2.
Declarations of Conformity and Regulatory Information Industry Canada Antenna Type Antenna Gain Antenna Impedance Single-Port Dual-Band Omni (VPOL) 2.4 GHz—9 dBi 50 ohms 5 GHz—9 dBi Single-Port Dual-Band Omni (VPOL) 2.4 GHz—9 dBi 50 ohms 5 GHz—9 dBi Single-Port Dual-Band Omni (VPOL) 2.
Declarations of Conformity and Regulatory Information Administrative Rules for Cisco Catalyst Access Points in Taiwan Administrative Rules for Cisco Catalyst Access Points in Taiwan This section provides administrative rules for operating Cisco Catalyst APs in Taiwan. The rules for all access points are provided in both Chinese and English.
Declarations of Conformity and Regulatory Information Operation of Cisco Catalyst Access Points in Brazil The operation of the low-power radio-frequency devices is subject to the interference caused by the operation of an authorized radio station, by another intentional or unintentional radiator, by industrial, scientific and medical (ISM) equipment, or by an incidental radiator. Chinese Translation English Translation Low-power Radio-frequency Devices Technical Specifications 4.
Declarations of Conformity and Regulatory Information Declaration of Conformity for RF Exposure Figure 58: Brazil Regulatory Information Portuguese Translation Este equipamento não tem direito à proteção contra interferência prejudicial e não pode causar interferência em sistemas devidamente autorizados. English Translation This equipment is not entitled to the protection from harmful interference and may not cause interference with duly authorized systems.
Declarations of Conformity and Regulatory Information This Device Meets FCC Guidelines for Exposure to Radio Waves specified from the user in accordance to the regulatory guidelines which are designed to reduce the overall exposure of the user or operator. Table 14: Separation Distance MPE Distance Limit 0.35 mW/cm2 30 cm (12 inches) 1.
Declarations of Conformity and Regulatory Information Cet appareil est conforme aux directives internationales en matière d'exposition aux fréquences radioélectriques As such the systems are designed to be operated as to avoid contact with the antennas by the end user.
Declarations of Conformity and Regulatory Information Declaration of Conformity Statements • Cisco Systems Spread Spectrum Radios and RF Safety white paper at this URL: http://www.cisco.com/warp/public/cc/pd/witc/ao340ap/prodlit/rfhr_wi.