Quick Start Guide Cisco Craft Works Interface Quick Start Guide Cisco IOS XR Software Release 3.
1 Introduction This document introduces Craft Works Interface (CWI) that supports Cisco IOS XR Software Release 3.4. Note This document refers to CWI managing devices. For Cisco IOS XR software, the devices can be any or all of the secure domain routers (SDRs) of which your Cisco IOS XR system is composed.
Note If you are using a CORBA connection and require notifications, the router must be explicitly configured for each client that is to receive notifications. These notifications include real-time inventory updates (for example, online insertion and removal [OIR]), alarms, and change-of-configuration events. See the “Configuring the Router and CWI Client” section on page 4 for information on configuring the router to send notifications to a specified client.
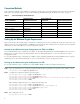
Hardware Requirements Table 2 lists the CWI client hardware requirements. Table 2 CWI Client Hardware Requirements System Requirement CPU and CPU Speed MHz Monitor Display Drive Space Settings Windows-based PC IBM PC-compatible 500 MHz PentiumIII minimum, 256 MB minimum, CWI=5MB, 1024 by 1.20 GHz Pentium IV recommended 512 MB recommended JRE=48MB. 768 pixels UNIX Solaris 550 MHz minimum, 1.
Enabling the HTTP Server To download and install CWI, you must enable the HTTP server on the device. Note The HTTP server is used only to install CWI. After installation, the server can be deactivated.
Connection Methods Some connection methods require additional configuration on the router, as described in Table 4. For the connection methods that require cryptographic (crypto) set up, see the “Setting Up the Minimum Crypto Requirements” section on page 6.
Step 4 Authenticate the CA by getting the certificate for the CA. RP/0/RP0/CPU0:router# crypto ca authenticate ca-name Step 5 Obtain a router certificate from the CA. RP/0/RP0/CPU0:router# crypto ca enroll ca-name 5 Installing, Launching, and Uninstalling CWI This section provides information on how to install, launch, and uninstall CWI. For a list of the login modes, see the “Login Modes and Requirements” section on page 22.
Note Step 5 You must install JRE 1.5 to proceed with the CWI installation. If this is the first time the CWI client has started CWI, the Java Plug-in must be installed and the CWI Cisco security certificate must be accepted. a. If the Java Plug-in installation is completed, a dialog box appears asking you to trust the security certificate distributed by Cisco Systems. This dialog box differs depending on the client platform. b. The security certificate must be accepted to run CWI.
Launching CWI Without Using the Device Tree To launch CWI with SSL either enabled or not enabled, perform the following steps: Step 1 Double-click the CWI icon to launch the client desktop. The CWI - Login window appears (see Figure 1). You have the option to add a device or device group and log in to multiple routers. See the “Launching CWI from the Device Tree” section on page 10 for more information.
Step 7 (Optional) If you chose the Scripted connection category to log in to the intermediate or Scripted server: a. Enter the Scripted username. b. Enter the Scripted password. c. Click the ellipsis button to display the Login Script Steps window (see Figure 7). Follow the procedure in the “Specifying the User Login Script” section on page 15. Note In addition, you must enter the applicable information in the Device Description field to uniquely identify the connection.
Adding or Editing a Device To add or edit a new device to the Device Tree, perform the following steps: Step 1 From the CWI - Login window, right-click the Login information directory and choose Add New Device. The Add Device window appears (see Figure 2). Or you can right-click the device in the Login information directory and choose Edit to display the Edit Device window.
Adding or Editing a Device Group To add or edit a new device group to the device tree, perform the following steps: Step 1 Figure 3 From the CWI - Login window, right-click the Login Information directory and choose Add New Device Group. The Add Device Group window appears (see Figure 3). Or you can right-click the device group and choose Edit to display the Edit Device Group window. Add Device Group Window Step 2 Enter the name of the group in the Group Name field.
Step 3 Enter the same AAA password across all routers. Step 4 (Optional) Enter the enable password for IOS. Note When you connect to an IOS device, you must enter the enable password. Step 5 Choose one of the following connection categories from the drop-down menu: • IP • Console/Aux • Scripted Note Step 6 If you choose the IP-based or Console/Aux connection categories, the scripted login fields are not displayed.
Figure 5 Progress Window If one or more devices failed, see the “Encountering an Error While Logging into Multiple Devices Simultaneously” section on page 14. Encountering an Error While Logging into Multiple Devices Simultaneously If an error is encountered while logging in to multiple devices simultaneously from the Progress window (see Figure 5), you can: • Click the Continue to Desktop button if at least one device passed. • Click the Back to Login button to go back to the CWI - Login window.
Figure 6 displays the Failed Log window. Click the Close button to go back to the Progress window. Figure 6 Failed Log Window Specifying the User Login Script You can access devices not directly accessible from the CWI workstation through the Scripted Login capability. Table 5 lists the fields in the Login Script Steps window (see Figure 7).
Figure 7 Login Script Steps Window The exact inputs depend on the intermediate server that is being used. If you are connecting to the intermediate machine by using SSHv1 or SSHv2, you do not need to specify steps for sending the username and password to the intermediate machine, because this is done when establishing a connection. Table 6 lists the steps that you can enter for a Telnet connection to the intermediate server with a Telnet connection from the server to the device.
Uninstalling CWI To uninstall a specific version of CWI, perform the following steps: Step 1 Navigate to the following CWI uninstall directory: /uninstall Step 2 Execute the uninstall script of the desired version, as shown in the following example: CWI__uninstall.cmd For Windows, you have the option to double-click the CWI__uninstall.cmd filename to uninstall CWI. Follow the online instructions.
Understanding the Admin Planes and Device Planes For Cisco IOS XR devices, CWI can manage both the admin planes and device planes on a single desktop. A node is available for each plane in the Inventory Tree of the CWI desktop. Each plane provides you with different domains (see Table 8). Table 8 Supported Domains Node Application Inventory 1 Nonshared. For example, line cards, PLIMs2, SPAs3, and so forth. Device All Admin Inventory Viewer Rack Environment Monitor Nonshared and shared.
• Filter records. • Set preferences. CWI Desktop Window The CWI Desktop is the main point of access to all CWI applications and tools, allowing you to configure, monitor, and manage routers (see Figure 8). The CWI Desktop is designed with common elements that provide an easy-to-use and consistent user interface. The elements of the CWI Desktop window are described in Table 10.
Figure 8 CWI Desktop 1 Inventory tree 3 CWI Desktop toolbar 2 CWI Desktop menu bar 4 CWI application pane The CWI Desktop lets you to communicate with the router using the applications that are described in Table 11. Table 11 Applications for the CWI Desktop Application Description Alarm Dashboard Provides a summary of the alarm status information for all routers on the CWI Desktop. A color code is used to indicate active alarm counts by severity.
Table 11 Applications for the CWI Desktop (continued) Application Description Configuration Editor Displays the target configuration in CLI format. The Configuration Editor provides general text editor functions, such as copy, paste, redo, and undo, and provides syntax checking and CLI functions, such as command completion and CLI help. Fabric Status Viewer Displays the port ID and port status columns in text format in a Fabric Status Viewer table.
Table 12 Network Information (continued) Type Function VPN When setting the minimum router configuration, you must use the client Virtual Private Network (VPN) IP address and Domain Name Server (DNS) name instead of the client IP address and DNS name when configuring the IP hostname for the CWI client. This mapping is required for the client to receive notifications from the router. If you have a VPN, you can use the basic or SSL encryption configuration.
• HTTP server status (running or not running) • XML agent status (running or not running) Table 14 lists the applications and features to the corresponding login mode type. Table 14 Login Modes Used for Applications and Features Mode Description Full Mode (MGBL-PIE and XML Agent) The entire set of CWI applications is provided.
Table 15 Connection Methods and Applications CWI Application Console Port (Serial Cable or Through a Terminal Server) Telnet (No XML) Telnet/SSH, or CORBA Connection (XML) Launch and Login Yes. Enter the serial port or Yes. Enter the DNS name or IP terminal server and port name. address. Yes. Enter the DNS name or IP address. Main Desktop Yes, but no notifications or associated alarms are displayed. Yes, but no notifications or associated alarms are displayed.
8 Obtaining Documentation Cisco documentation and additional literature are available on Cisco.com. This section explains the product documentation resources that Cisco offers. Cisco.com You can access the most current Cisco documentation at this URL: http://www.cisco.com/techsupport You can access the Cisco website at this URL: http://www.cisco.com You can access international Cisco websites at this URL: http://www.cisco.com/public/countries_languages.
A current list of security advisories, security notices, and security responses for Cisco products is available at this URL: http://www.cisco.com/go/psirt To see security advisories, security notices, and security responses as they are updated in real time, you can subscribe to the Product Security Incident Response Team Really Simple Syndication (PSIRT RSS) feed. Information about how to subscribe to the PSIRT RSS feed is found at this URL: http://www.cisco.com/en/US/products/products_psirt_rss_feed.
Cisco Technical Support & Documentation Website The Cisco Technical Support & Documentation website provides online documents and tools for troubleshooting and resolving technical issues with Cisco products and technologies. The website is available 24 hours a day at this URL: http://www.cisco.com/techsupport Access to all tools on the Cisco Technical Support & Documentation website requires a Cisco.com user ID and password.
Severity 1 (S1)—An existing network is “down” or there is a critical impact to your business operations. You and Cisco will commit all necessary resources around the clock to resolve the situation. Severity 2 (S2)—Operation of an existing network is severely degraded, or significant aspects of your business operations are negatively affected by inadequate performance of Cisco products. You and Cisco will commit full-time resources during normal business hours to resolve the situation.
Corporate Headquarters Cisco Systems, Inc. 170 West Tasman Drive San Jose, CA 95134-1706 USA www.cisco.com Tel: 408 526-4000 800 553-NETS (6387) Fax: 408 526-4100 European Headquarters Cisco Systems International BV Haarlerbergpark Haarlerbergweg 13-19 1101 CH Amsterdam The Netherlands www-europe.cisco.com Tel: 31 0 20 357 1000 Fax: 31 0 20 357 1100 Americas Headquarters Cisco Systems, Inc. 170 West Tasman Drive San Jose, CA 95134-1706 USA www.cisco.