
Router Quick Start Guide


8
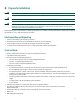
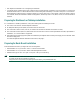
Brackets Front-Mounted—Chassis Recessed in Rack
Locate the rack-mount and cable-management brackets and screws (1, 2, 3 in the illustration above) and a Number 2 Phillips
screwdriver.
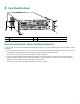
1. Align the cable-management bracket (1) to the side of the router. Align the rack-mount bracket over it—as shown
above—and insert and tighten the screws (3).
Go to the “Two-Post or Four-Post Rack Installation” section on page 10.
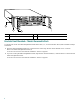
2. If you are not using the cable-management brackets, align the rack-mount brackets (2)—as shown above—to the router and
insert and tighten the screws.
Go to the “Two-Post or Four-Post Rack Installation” section on page 10.
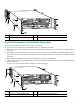
1
Cable-management bracket
3
M4 x 8-mm Phillips flathead screws
2
Rack-mount bracket
2
ET
HER
N
ET-10BF
L
E
N
R
X
0
1
2
3
4
T
X
R
X
T
X
R
X
T
X
R
X
T
X
R
X
T
X
ETHERNET 10BT
E
N
A
B
L
E
D
0
2
1
3
L
I
N
K
0
1
2
3
0
4
1
3
5
6
FA
S
T
S
E
R
IA
L
E
N
T
D
T
C
R
D
R
C
L
B
C
D
T
D
T
C
R
D
R
C
L
B
C
D
T
D
T
C
R
D
R
C
L
B
C
D
T
D
T
C
R
D
R
C
L
B
C
D
E
N
A
B
L
E
D
M
II
LINK
RJ
45
F
A
S
T
E
T
H
ER
N
E
T
0
TO
KEN RING
0
1
2
3
ENABLED
IN-RING
4/16 Mbps
Cisco 7200
Series
FAST ETHERNET INPUT/OUTPUT CONTROLLER
ENABLED
PCMCIA
EJECT
SLOT 0
FE
ENABLE
FE LINK
CPU RESET
1O POWER
OK
SLOT 1
FE MII
EN
53499
1
2
3