
Router Installation and Configuration Guide

2-17
Cisco 7201 Installation and Configuration Guide
OL-11364-04
Chapter 2 Installing the Cisco 7201 Router
Connecting I/O Cables
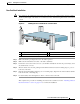
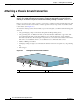
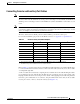
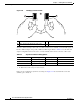
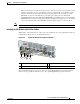
Figure 2-12 Console and Auxiliary Port RJ-45 Connectors
Step 1 Before connecting a terminal to the console port, configure the terminal to match the router console port
as follows: 9600 baud, 8 data bits, no parity, 1 stop bits (9600 8N1).
Step 2 After you establish normal router operation, you can disconnect the terminal.
Connecting the Fast Ethernet Management Port Cable
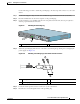
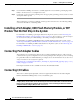
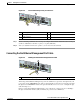
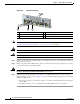
Figure 2-13 Installing the Fast Ethernet Management Port Cable
When using the Fast Ethernet Management port in the default mode (speed-auto and duplex-auto) the
port operates in auto-MDI/MDI-X mode. The port automatically provides the correct signal connectivity
through the Auto-MDI/MDI-X feature. The port automatically senses a crossover or straight-through
cable and adapts to it.
However, when the Fast Ethernet Management port is configured to a fixed speed (10 or 100 Mbps)
through command-line interface (CLI) commands, the port is forced to MDI mode.
1 Auxiliary port 4 Cable to console terminal or DTE
2 Console port 5 Cable to modem or DCE
3 RJ-45 connector
170866
G
E
0/0
G
E
0/1
G
E
0/2
G
E
0/3
A
U
X
C
O
N
S
O
LE
M
N
G
M
N
T
U
S
E
O
N
LY
F
E
LIN
K
0
FE
0/0
R
J4
5
S
F
P
S
F
P
SF
P
S
F
P
L
IN
K
/A
C
T
V
A
L
A
R
M
P
W
R
O
K
ST
A
TU
S
C
F
A
C
T
V
COMPACT FLASH
LIN
K
/A
C
T
V
R
X
T
X
L
IN
K
/A
C
T
V
L
IN
K
/A
C
T
V
R
X
T
X
EN
R
J45
E
N
1
2
3
4
5
Cisco 7201
1 Fast Ethernet Management port 2 Fast Ethernet RJ-45 cable
170868
G
E
0/0
G
E
0/1
G
E
0/2
G
E
0/3
A
U
X
C
O
N
S
O
LE
M
N
G
M
N
T
U
S
E
O
N
L
Y
F
E
L
IN
K
0
F
E
0/0
R
J45
S
F
P
S
F
P
S
F
P
S
F
P
L
IN
K
/A
C
T
V
A
L
A
R
M
PW
R
O
K
S
T
A
T
U
S
C
F
A
C
T
V
COMPACT FLASH
L
IN
K
/A
C
T
V
R
X
T
X
L
IN
K
/A
C
T
V
L
IN
K
/A
C
T
V
R
X
T
X
E
N
R
J45
E
N
1
2