
Bridge/Router Installation and Configuration Guide


3-19
Cisco 12016, Cisco 12416, and Cisco 12816 Router Installation and Configuration Guide
OL-11495-01
Chapter 3 Installing the Router
Rack-Mounting the Router Chassis
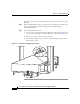
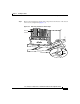
Step 4 Insert the chassis into the rack until the chassis rack-mounting flanges are flush
against the mounting flanges on the rack (or the optional center-mount brackets,
if installed).
• The weight of the chassis is now supported by the rack-mounting platform.
Remove the scissor-jack platform and set it safely aside.
Note Save and reassemble all parts of the shipping package in case it becomes
necessary to transport the router to another location or return it to Cisco.
Do not discard or destroy any of the shipping materials.
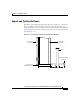
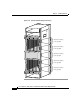
Step 5 Secure the chassis to the rack beginning (Figure 3-11):
a. Identify one of the holes in group A that aligns with a mounting hole on the
mounting flanges of the rack.
b. Hold the chassis in position against the mounting flanges on the rack and have
a second person insert and loosely tighten one of the mounting screws
provided.
c. Repeat step b. for the mounting hole on the other side of the chassis.
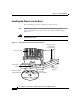
Step 6 Repeat Step 5 for each group of chassis mounting holes (groups b through e).
Step 7 Tighten all mounting screws (five on each side of the chassis) securely.