Cisco Secure Router 520 Series Hardware Installation Guide Americas Headquarters Cisco Systems, Inc. 170 West Tasman Drive San Jose, CA 95134-1706 USA http://www.cisco.
THE SPECIFICATIONS AND INFORMATION REGARDING THE PRODUCTS IN THIS MANUAL ARE SUBJECT TO CHANGE WITHOUT NOTICE. ALL STATEMENTS, INFORMATION, AND RECOMMENDATIONS IN THIS MANUAL ARE BELIEVED TO BE ACCURATE BUT ARE PRESENTED WITHOUT WARRANTY OF ANY KIND, EXPRESS OR IMPLIED. USERS MUST TAKE FULL RESPONSIBILITY FOR THEIR APPLICATION OF ANY PRODUCTS.
CONTENTS Preface vii Objective vii Audience vii Organization vii Conventions viii Related Documentation xiii Obtaining Documentation and Submitting a Service Request CHAPTER 1 Product Overview xiv 1-1 Router Models 1-1 Cisco Secure Router 520 Ethernet-to-Ethernet Routers 1-1 Cisco Secure Router 520 ADSL-over-POTS Routers 1-3 Cisco Secure Router 520 ADSL-over-ISDN Routers 1-4 Hardware Features 1-5 Serial Number Label Location 1-6 LED Indicators on the Routers 1-6 Integrated 802.
Contents CHAPTER Router Mounting Procedures 3 3-1 Connecting a Radio Antenna to a Wireless Router Placing the Router on a Desktop CHAPTER 3-2 Mounting the Router in a Rack 3-3 Router Installation 4 3-1 Mounting the Router on a Wall What to Do Next 3-1 3-5 4-1 Typical Installation 4-1 Installing the Cisco Secure Router 520 Ethernet-to-Ethernet Router 4-2 Installing the Cisco Secure Router 520 ADSL-over-POTS Router 4-3 Installing the Cisco Secure Router 520 ADSL-over-ISDN Router 4-5 Connectin
Contents INDEX Cisco Secure Router 520 Series Hardware Installation Guide OL-12892-01 v
Contents Cisco Secure Router 520 Series Hardware Installation Guide vi OL-12892-01
Preface This preface describes the objectives, audience, organization, and conventions of this guide, and describes related documents that have additional information.
Preface Chapter 3, “Router Mounting Procedures” Provides procedures for mounting the router on a wall, desktop, or rack. Chapter 4, “Router Installation” Provides procedures for cabling and installing the router. Chapter 5, “Troubleshooting” Describes problems that could occur with the router hardware, possible causes of the problems, and steps for solving the problems. Appendix A, “Specifications” Provides router, port, and cabling specifications.
Preface Varoitus TÄRKEITÄ TURVALLISUUSOHJEITA Tämä varoitusmerkki merkitsee vaaraa. Tilanne voi aiheuttaa ruumiillisia vammoja. Ennen kuin käsittelet laitteistoa, huomioi sähköpiirien käsittelemiseen liittyvät riskit ja tutustu onnettomuuksien yleisiin ehkäisytapoihin. Turvallisuusvaroitusten käännökset löytyvät laitteen mukana toimitettujen käännettyjen turvallisuusvaroitusten joukosta varoitusten lopussa näkyvien lausuntonumeroiden avulla.
Preface Aviso INSTRUÇÕES IMPORTANTES DE SEGURANÇA Este símbolo de aviso significa perigo. Você está em uma situação que poderá ser causadora de lesões corporais. Antes de iniciar a utilização de qualquer equipamento, tenha conhecimento dos perigos envolvidos no manuseio de circuitos elétricos e familiarize-se com as práticas habituais de prevenção de acidentes.
Preface Aviso INSTRUÇÕES IMPORTANTES DE SEGURANÇA Este símbolo de aviso significa perigo. Você se encontra em uma situação em que há risco de lesões corporais. Antes de trabalhar com qualquer equipamento, esteja ciente dos riscos que envolvem os circuitos elétricos e familiarize-se com as práticas padrão de prevenção de acidentes. Use o número da declaração fornecido ao final de cada aviso para localizar sua tradução nos avisos de segurança traduzidos que acompanham o dispositivo.
Preface Cisco Secure Router 520 Series Hardware Installation Guide xii OL-12892-01
Preface Related Documentation The Cisco Secure Router 520 Series product is shipped with a minimal set of printed documentation. Additional product documentation is available on Cisco.com. In addition to the Cisco Secure Router 520 Series Hardware Installation Guide (this document), the Cisco Secure Router 520 Series documentation set includes the following documents.
Preface Obtaining Documentation and Submitting a Service Request For information on obtaining documentation, submitting a service request, and gathering additional information, see the monthly What’s New in Cisco Product Documentation, which also lists all new and revised Cisco technical documentation, at: http://www.cisco.com/en/US/docs/general/whatsnew/whatsnew.
CH A P T E R 1 Product Overview The Cisco Secure Router 520 Series routers are designed for small businesses with up to 50 users and teleworkers who want secure connectivity to corporate LANs and to the Internet. These routers provide advanced security features that include secure Virtual Private Network (VPN) access and comprehensive threat defense with Cisco IOS Firewall, Intrusion Prevention Solution (IPS), and URL filtering.
Chapter 1 Product Overview Router Models Figure 1-1 shows the front panel of the Cisco Secure Router 520 Ethernet-to-Ethernet wireless router. The front panel contains the LEDs, ports, reset button, and antenna. The antenna is available only with the wireless router.
Chapter 1 Product Overview Router Models Figure 1-2 shows the back panel of the Cisco Secure Router 520 Series router. It contains the Kensington security slot for securing the router and the input jack for the AC adapter. The back panel is identical for all the Cisco Secure Router 520 Series routers.
Chapter 1 Product Overview Router Models Figure 1-3 shows the front panel of the Cisco Secure Router 520 ADSL-over-POTS wireless router. The front panel contains the LEDs, ports, reset button, and antenna. The antenna is available only with the wireless router.
Chapter 1 Product Overview Hardware Features Figure 1-4 shows the front panel of the Cisco Secure Router 520 ADSL-over-ISDN wireless router. The front panel contains the LEDs, ports, reset button, and antenna. The antenna is only available with the wireless router.
Chapter 1 Product Overview Hardware Features Serial Number Label Location Figure 1-5 shows the serial number label, which is located on the back of the Cisco Secure Router 520 Series routers. Serial Number Location on the Back of the Cisco Secure Router 520 Series Router 231487, 781-00540-01 Figure 1-5 SN: XXX NNNNXX XX SN: XXXNNNNXXXX LED Indicators on the Routers The LEDs, which are located on the router’s front panel, indicate the status or activity on the router. Table 1-1 describes the LEDs.
Chapter 1 Product Overview Hardware Features Table 1-1 LED Indicators on the Routers (continued) LED Color Description Router WLAN DATA Green Wireless LAN link traffic. Blinks when there is traffic on the wireless LAN. Off when there is no traffic. Cisco Secure Router 520 Series wireless routers only LAN FE0 Green On when a device connects to the Ethernet LAN 0 All Cisco Secure Router 520 Series routers port.
Chapter 1 Product Overview Hardware Features Router Memory The Cisco Secure Router 520 Series routers support the following types of memory: • Flash Memory • SDRAM Flash Memory Flash memory stores the image of the ROMMON boot code, the Cisco IOS software, and the router configuration file. By default, the router ships with 36 MB of flash memory, with no option for expansion. The router has enough memory to support the Cisco IOS Advanced IP Services image.
Chapter 1 Product Overview Regulatory Compliance Table 1-2 Cisco Secure Router 520 Series Feature Summary (continued) Feature Description Autosensing function Eliminates the need for a crossover cable and allows the router to detect medium-dependent interface (MDI) in normal mode or medium-dependent interface in crossover mode (MDIX) in any other PC or hub by means of a straight-through cable or a crossover cable.
Chapter 1 Product Overview Regulatory Compliance Cisco Secure Router 520 Series Hardware Installation Guide 1-10 OL-12892--01
CH A P T E R 2 Preinstallation Information This chapter provides information about safety, unpacking the router, and preparing the Cisco Secure Router 520 Series router for installation.
Chapter 2 Preinstallation Information Safety Warnings and Guidelines Warning Do not work on the system or connect or disconnect cables during periods of lightning activity. Statement 1001 Warning Ultimate disposal of this product should be handled according to all national laws and regulations. Statement 1040 Warning To reduce the risk of fire, use only No. 26 AWG or larger telecommunication line cord.
Chapter 2 Preinstallation Information Preventing Damage to the Router General Safety Guidelines for Wireless Routers Use the following guidelines for wireless routers: • Do not touch or move the antenna while the unit is transmitting or receiving data. • Do not hold any component containing a radio so that the antenna is very close to or touching any exposed parts of the body, especially the face or eyes, while transmitting.
Chapter 2 Preinstallation Information Unpacking the Box Unpacking the Box Figure 2-1 shows the items included with the Cisco Secure Router 520 Series routers.
Chapter 2 Preinstallation Information Preparing for Installation Table 2-1 Items Shipped with the Cisco Secure Router 520 Series Routers (continued) Cisco Secure Router 520 Ethernet-to-Ethernet Cisco Secure Router 520 ADSL-over-POTS Cisco Secure Router 520 ADSL-over-ISDN 1 1 1 1 1 1 Cisco documentation6 1 1 1 Swivel-mount dipole antenna (wireless routers only) 1 1 1 Item Power adapter Power cord 5 1. DSL = digital subscriber line.
Chapter 2 Preinstallation Information What to Do Next Cisco Secure Router 520 Series Hardware Installation Guide 2-6 OL-12892--01
CH A P T E R 3 Router Mounting Procedures This chapter provides the procedures for mounting the Cisco Secure Router 520 Series routers.
Chapter 3 Router Mounting Procedures Mounting the Router on a Wall To install the router on a desktop, table, or other flat surface, follow these steps: Step 1 Place the unit upside-down on the flat surface. Step 2 Attach the four rubber pads to the recessed areas on the bottom of the unit. Step 3 Place the unit right-side-up on the flat surface.
Chapter 3 Router Mounting Procedures Mounting the Router in a Rack Warning This unit is intended to be mounted on a wall. Please read the wall mounting instructions carefully before beginning installation. Failure to use the correct hardware or to follow the correct procedures could result in a hazardous situation to people and damage to the system.
Chapter 3 Router Mounting Procedures Mounting the Router in a Rack Warning To prevent bodily injury when mounting or servicing this unit in a rack, you must take special precautions to ensure that the system remains stable. The following guidelines are provided to ensure your safety: -- This unit should be mounted at the bottom of the rack if it is the only unit in the rack.
Chapter 3 Router Mounting Procedures What to Do Next What to Do Next Install the router by following the instructions in Chapter 4, “Router Installation.
Chapter 3 Router Mounting Procedures What to Do Next Cisco Secure Router 520 Series Hardware Installation Guide 3-6 OL-12892-01
CH A P T E R 4 Router Installation This chapter provides the procedures for cabling and installing a Cisco Secure Router 520 Series router.
Chapter 4 Router Installation Typical Installation Installing the Cisco Secure Router 520 Ethernet-to-Ethernet Router Figure 4-1 shows a typical installation for the Cisco Secure Router 520 Ethernet-to-Ethernet router. The figure shows the front panel of the router.
Chapter 4 Router Installation Typical Installation Step 5 Connect the AC adapter to the router. See the “Connecting the AC Adapter” section on page 4-12. Step 6 To configure the router software by using the command-line interface (CLI) or to troubleshoot problems, connect a terminal or PC to the console port. See the “Connecting a Terminal or PC to the Console Port” section on page 4-14.
Chapter 4 Router Installation Typical Installation To install a Cisco Secure Router 520 ADSL-over-POTS router, follow these steps: Step 1 If you have a wireless router, first connect the radio antenna to the router. See the “Connecting a Radio Antenna to a Wireless Router” section on page 3-1. Step 2 Connect the server, PC, or workstation to the router. See the “Connecting a Server, PC, or Workstation” section on page 4-6.
Chapter 4 Router Installation Typical Installation Installing the Cisco Secure Router 520 ADSL-over-ISDN Router Figure 4-3 shows a typical installation for the Cisco Secure Router 520 ADSL-over-ISDN router. The figure shows the front panel of the router.
Chapter 4 Router Installation Connecting a Server, PC, or Workstation Step 6 To configure the router software by using the command-line interface (CLI) or to troubleshoot problems, connect a terminal or PC to the console port. See the “Connecting a Terminal or PC to the Console Port” section on page 4-14. Step 7 (Optional) To use the console port as a backup link to the WAN port in case the ADSL service goes down, connect an analog modem to the console port.
Chapter 4 Router Installation Connecting an External Ethernet Switch (Optional) To connect a server, PC, workstation, or other Ethernet device to a built-in Ethernet switch port on the router, follow these steps. Caution Do not turn on the server, PC, workstation, or other Ethernet device until you have completed all connections to the router. Step 1 Connect one end of the yellow Ethernet cable to a built-in Ethernet switch port on the router.
Chapter 4 Router Installation Connecting a Broadband Modem (Optional) To connect the router to an external Ethernet switch, follow these steps: Step 1 Connect one end of the yellow Ethernet cable to a built-in Ethernet switch port on the router. Step 2 Connect the other end of the cable to an available port on the Ethernet switch to add an additional Ethernet connection. Step 3 Turn on the Ethernet switch.
Chapter 4 Router Installation Connecting an ADSL Line—ADSLoPOTS Port Step 3 Turn on the broadband modem. Connecting an ADSL Line—ADSLoPOTS Port This section applies only to the Cisco Secure Router 520 ADSL-over-POTS router. Figure 4-7 shows the asymmetric digital subscriber line over plain old telephone service (ADSLoPOTS) port on the router connected to an ADSL line.
Chapter 4 Router Installation Connecting an ADSL Line—ADSLoISDN Port You can connect the ADSL cable directly to a cable wall jack or you can connect it to the wall jack using a splitter. To connect the ADSL cable, perform one of the following, as appropriate: • To connect the ADSL cable directly to a cable wall jack see Figure 4-7 on page 4-9. Then follow these steps: – Connect one end of the ADSL cable to the ADSLoPOTS port on the router. – Connect the other end of the cable to the wall jack.
Chapter 4 Router Installation Connecting an ADSL Line—ADSLoISDN Port Figure 4-8 shows the ADSLoISDN port on the router connected to a cable wall jack using a splitter.
Chapter 4 Router Installation Connecting the AC Adapter You can connect the ADSL cable directly to a cable wall jack or you can connect it to the wall jack using a splitter. To connect the ADSL cable, perform one of the following, as appropriate: • To connect the ADSL cable directly to a cable wall jack see Figure 4-7 on page 4-9. Then follow these steps: Note Although Figure 4-7 shows an ADSLoPOTS port, the connection to the wall jack is the same for both ADSLoISDN and ADSLoPOTS ports.
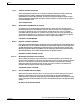
Chapter 4 Router Installation Connecting the AC Adapter Figure 4-9 Connecting the AC Adapter 1 5 4 3 1 Router 2 AC adapter input jack on the router 3 Power cord 4 AC adapter 5 Electrical outlet 231504 2 To connect the AC adapter to the router and to an electrical outlet, follow these steps: Step 1 Connect one end of the power supply cable into the input jack on the router. Step 2 Connect the other end of the power supply cable to the AC adapter.
Chapter 4 Router Installation Connecting a Terminal or PC to the Console Port Connecting a Terminal or PC to the Console Port The console port is a service port to which you can connect a terminal or PC either to configure the software by using the command-line interface (CLI) or to troubleshoot problems with the router. Figure 4-10 shows a DB-9 connector from a PC connected to the console port on the router.
Chapter 4 Router Installation Connecting an Asynchronous Modem to the Console Port Note To connect an asynchronous modem to the console port, you must have an optional router modem cable. Contact your router vendor to order this cable. Figure 4-11 shows an asynchronous modem connected to the console port on the router. Although the figure shows a Cisco Secure Router 520 Ethernet-to-Ethernet router, this procedure applies to all Cisco Secure Router 520 Series routers.
Chapter 4 Router Installation Verifying Router Operation To connect the console port on the router to an asynchronous modem, follow these steps: Step 1 Connect the RJ-45 end of the router modem cable to the console port. Step 2 Connect the DB-25 connector end of the router modem cable to an available port on the asynchronous modem. Step 3 Connect one end of the RJ-11 telephone cable to a wall jack, and then connect the other end of the RJ-11 cable to the modem.
CH A P T E R 5 Troubleshooting This chapter describes problems that could occur with the router hardware, possible causes of the problems, and steps for solving the problems. This chapter contains the following sections: • Before You Call Your Cisco Reseller, page 5-1 • Problems During First Startup, page 5-2 • Problems After the Router Is Running, page 5-3 For more information on problems that could occur with the software, see the Cisco Secure Router 520 Series Software Configuration Guide.
Chapter 5 Troubleshooting Problems During First Startup Problems During First Startup Table 5-1 lists problems that could occur the first time you turn on the router. Table 5-1 Problems During First Startup Symptom Problem Solutions All LEDs, including SYS PWR LED, are off. No power to router. Perform the following tasks in the order given: No connection to modem or to Ethernet switch. (WAN FE4 LED is off.) No connection to Ethernet devices. (LAN—FE0, FE1, FE2, and FE3 are off.
Chapter 5 Troubleshooting Problems After the Router Is Running Table 5-1 Symptom Problems During First Startup (continued) Problem Solutions No connection to A cable-related problem: xDSL link. (The CD • Wrong cable. LED on the front panel is off for a long time.) • Check that you are using the correct cable. See Appendix A, “Specifications.” No connection to A cable-related problem: xDSL link. (The CD • Improperly connected LED on the front panel cable. is off for a long time.
Chapter 5 Troubleshooting Problems After the Router Is Running Table 5-2 Problems After the Router Is Running (continued) Symptom Problem Connection to the xDSL line is intermittent or lost. (The ADSL CD LED on the front panel is off.) A cable-related problem: • Disconnected cable. • Damaged cable. Connection to the xDSL line or WAN Problem with xDSL or WAN is lost. (The ADSL CD LED and the service. LAN—FE0, FE1, FE2, or FE3—LEDs on the front panel are off).
A P P E N D I X A Specifications This appendix provides system, port, and cabling specifications for the Cisco Secure Router 520 Series routers. It contains the following sections: • Router Specifications, page A-1 • LAN Port Pinouts, page A-2 • Console Connector Pinouts, page A-3 • ADSL Port Connector Pinouts, page A-3 • Cable Specifications, page A-4 Router Specifications Table A-1 provides the system specifications for the routers.
Appendix A Specifications LAN Port Pinouts Table A-1 Router Specifications (continued) Description Design Specification Frequency 50 to 60 Hz Power output 26 W maximum Output voltages 5 V and 12 V Integrated 802.11b/g Radio Module Radio technology IEEE 802.11b and 802.11g standard compliant Operating frequency 2412 to 2484 MHz ISM1 band Modulation schemes OFDM2, DQPSK3, DBPSK4 16 QAM5, 64 QAM, and CCK6 Number of channels 11 channels for the U.S.
Appendix A Specifications Console Connector Pinouts Console Connector Pinouts Table A-3 provides pinouts for the console connector (for connecting a terminal or PC). Table A-3 Console Connector Pinouts (RJ-45-to-DB-9) RJ-45 Pin Function DB-9 Pin 1 RTS 8 2 DTR 6 3 TXD 2 4 GND 5 5 GND 5 6 RXD 3 7 DSR 4 8 CTS 7 The console port is configured as a data communications equipment (DCE) device.
Appendix A Specifications Cable Specifications Cable Specifications This section provides specifications for the following Ethernet cables, which you might need to provide: • Straight-through cable • Crossover cable Because of the autocrossover (autosensing) function, both straight-through and crossover cables can be used for the Ethernet LAN port. Ethernet Cable Specifications Table A-5 provides specifications that apply to both straight-through and crossover Ethernet cables.
INDEX Numerics 100BASE-T 10BASE-T C cables 1-9 autosensing in router 1-9 802.
Index installing D damage to the router, preventing desktop, placing router on desktop mounting Cisco Secure Router 520 ADSL-over-ISDN Router 4-5 2-3 Cisco Secure Router 520 ADSL-over-POTS Router 4-3 3-1 3-1 Cisco Secure Router 520 Ethernet-to-Ethernet Router 4-2 digital subscriber line access multiplexer See DSLAM integrated 802.
Index wall router specifications 3-2 A-1 router temperature specifications A-1 O output voltage specifications, router S A-2 safety guidelines, wireless routers 2-3 safety warnings P general PC, connecting to router wireless routers 4-6 SDRAM pinouts ADSL connector LAN port 2-2 1-8 security A-3 console connector 2-1 IPsec hardware accelerator A-3 software features A-2 port 1-8 serial number label location 1-6 4-6 ADSL-over-ISDN 1-9 server, connecting to router ADSL-over-
Index U unpacking the router 2-4 V verifying router operations 4-16 W wall mounting 3-1, 3-2 warnings general 2-1 wireless routers 2-2 weight specifications, router A-1 wireless routers description 1-7 integrated 802.