
Bridge/Router Installation Guide


4-17
Cisco CRS-1 Carrier Routing System 4-Slot Line Card Chassis Installation Guide
OL-10971-07
Chapter 4 Installing and Removing SFCs, RPs, MSCs, PLIMs, and Associated Components
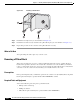
How to Install or Remove a Pillow Block
The following items are included in the CRS-4-PILLBLK= pillow block replacement kit:
• 2 replacement pillow blocks
• 6 Phillips-head screws
Note A Phillips screwdriver is not included in the CRS-4-PILLBLK= pillow block replacement kit.
Steps
To remove a pillow block, follow these steps:
Step 1 Attach the ESD-preventive wrist strap to your wrist and connect its leash to one of the ESD connection
sockets on the front (PLIM) side of the chassis or a bare metal surface on the chassis.
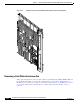
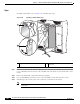
Step 2 Locate the pillow block to be replaced. Use a Phillips screwdriver to remove the lower right screw. (See
item number 1 in
Figure 4-10.)
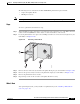
Figure 4-10 Removing a Pillow Block
Step 3 Remove the lower left screw (located below the pillow block pin). (See item number 2 in Figure 4-10.)
Step 4 Remove the top left screw (located above the pillow block pin). (See item number 3 in Figure 4-10.)
Step 5 Remove the pillow block and set it aside.
Step 6 Repeat this procedure for the card slot’s other pillow block if necessary.
What’s Next
After performing this task, you may install a new pillow block (see the “Installing a Pillow Block”
section on page 4-14).
203970
1
3
2