
Bridge/Router Installation Guide


2-26
Cisco CRS-1 Carrier Routing System 4-Slot Line Card Chassis Installation Guide
OL-10971-07
Chapter 2 Installing and Removing Power Components
Installing a Power Supply
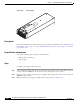
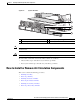
Figure 2-20 Power Supply
Prerequisites
Before performing this task, make sure that the power shelf has been installed (see the “Installing an AC
Power Shelf” section on page 2-22 or the “Installing a DC Power Shelf” section on page 2-11); remove
any cosmetic covers.
Required Tools and Equipment
You need the following tools and part to perform this task:
• ESD-preventive wrist strap
• Power supply
Steps
To install a power supply, follow these steps:
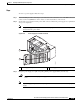
Step 1 Attach the ESD-preventive wrist strap to your wrist and connect its leash to one of the ESD connection
sockets on the front (PLIM) side of the chassis or a bare metal surface on the chassis.
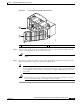
Step 2 Using two hands to support and guide the power supply, slide it partway into the power tray on the front
(PLIM) side of the chassis.
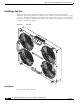
Step 3 Make sure that the power supply door grille is in the open position (see Figure 2-21).
158349