
Network Card User Manual


Installing the Cisco AS5800 3-13
Replacing the Dial Shelf Cards and Dial Shelf Controller Card
Replacing the Dial Shelf Cards and Dial Shelf Controller Card
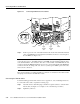
Replace the trunk cards, modem cards, and dial shelf controller cards in the chassis as follows:
Timesaver Your dial shelf arrived with trunk cards, modem cards, and dial shelf controller cards
installed in the proper slots. You can refer to the notes you made before removing the cards (as
described in the “Removing Dial Shelf Cards and Dial Shelf Controller Cards” section on page 2-9)
when replacing cards in the dial shelf chassis.
If you did not note the original card configuration, replace the cards in the dial shelf slots, which are
numbered from left to right, as follows:
• Trunk cards must be installed in slots numbered 0 to 5, beginning with slot 0.
• Modem cards can be installed in slots numbered on the backplane as slots 2 to 11.
• Dial shelf controller cards must be installed in slots numbered on the backplane as slot 12 and
slot 13. A single dial shelf controller card can be installed in either
slot 12 or slot 13.
Caution Trunk cards and modem cards weigh 8 lb (3.6 kg) each. Dial shelf controller cards weigh
8.5 lb (3.8 kg) each. Use two hands when removing or replacing cards in the dial shelf.
Step 1 Attach your ESD-preventive wrist strap between you and an unpainted chassis surface.
Caution To prevent ESD damage, handle trunk cards by ejector levers and carrier edges only and
use an ESD-preventive wrist strap or other grounding device.
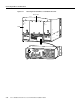
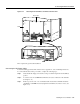
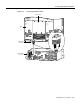
Step 2 Carefully align the card carrier guides with the top and bottom grooves in the slot. Avoid
touching the circuitry or any connector pins.
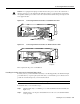
Step 3 Slide the carrier into the slot until the ejector levers make contact with the chassis frame.
(See Figure 3-10.)
12
6
93