
Network Card User Manual


Installing the Cisco AS5800 3-7
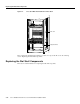
Installing the Dial Shelf in the Rack
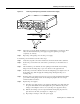
Step 4 Lift and slide the dial shelf chassis into the rack, resting it on the two support brackets.
Push it back until the forward brackets or chassis mounting flanges meet the mounting
strips or posts on both sides of the equipment rack. When the chassis is slid back all the
way, keep one or two people holding the chassis in place using the handles, or gripping
the chassis where the DC PEMs belong.
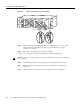
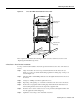
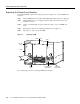
Figure 3-5 Mounting Support Brackets for the Cisco AS5800
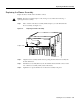
Note The brackets support the chassis until you complete the installation. Removing the
brackets is optional. If you leave the brackets installed, they can be used as spacers
between the dial shelf and the optional AC-input power shelf.
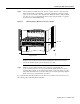
Step 5 While two people hold the dial shelf steady, a third person should insert the
10-32 x 3/8-in. slotted screws (2 screws per bracket) through the brackets (or chassis
mounting flange) and into the mounting strip. Install two screws near the bottom of the
flanges first, then install more screws above them, spaced evenly along the flange. Tighten
all the screws using a 1/4-in. flat-blade screwdriver.
To complete the dial shelf rack installation, mount the rear set of brackets to the chassis. Proceed to
the following section “Mounting the Rear Brackets.”
29093
Support brackets
Dial shelf