
Network Card User Manual


Connecting to an AC Power Source
Cisco AS5800 Universal Access Server Hardware Installation Guide3-6
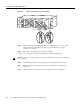
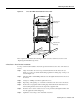
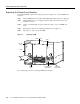
Figure 3-4 illustrates the standard AC-input power shelf installed in a 4-post rack.
Figure 3-4 Installing the AC-Input Power Shelf in a 4-Post Rack
Installing the Dial Shelf in the Rack
One person can not install the dial shelf chassis in the rack unassisted. Two or preferably three people
will be needed.
To secure the rack-mount brackets to the posts or mounting strips in the rack, you must use the
slotted mounting screws provided. Because the brackets support the entire weight of the chassis, be
sure to use at least two slotted screws per bracket.
Be sure you have the dial shelf prepped as described in the previous chapter before installing it in
the rack. To install the dial shelf chassis in the rack, complete the following steps:
Tips To prevent injury, review the safety precautions in the “Safety Recommendations” section on
page 2-14 before installing the dial shelf in the rack.
Step 1 Verify that your path to the rack is unobstructed and ensure that the rack is stabilized.
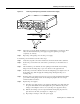
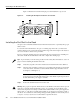
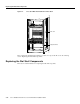
Step 2 Attach one support bracket to each front post or mounting strip using the provided slotted
screws and a 1/4-in., flat-blade screwdriver. Ensure that the support brackets are level.
(See Figure 3-5 and Figure 3-7.)
Note Because the brackets support the weight of the entire chassis, be sure to use at least
two slotted screws per bracket. These brackets also ensure that the required space between
the dial shelf and the power supply is available.
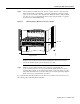
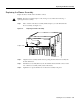
Step 3 Position the dial shelf chassis in front of the rack.
Warning Two people are required to lift the chassis. Use the handles on the chassis sides. To prevent
injury, keep your back straight and lift with your legs, not your back. To prevent damage to the
chassis and components, never attempt to lift the chassis with the handles on the power supplies, the
filter module, or on the blower assembly. These handles are not designed to support the weight of
the chassis. To see translations of the warnings that appear in this publication, refer to the Regulatory
Compliance and Safety Information document that accompanied this device.
P
W
R
O
K
F
AU
L
T
T
E
M
P
I LIM
P
W
R
O
K
F
A
U
LT
T
E
M
P
I L
IM
A
C
1
P
O
W
E
R
2
C
B
2
C
B
1
H11160