
Network Card User Manual


Installing the Cisco AS5800 3-3
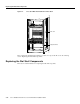
Installing the Power Shelf in the Rack
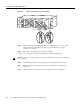
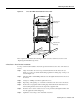
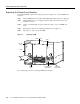
Figure 3-1 Cables Mounted on the Rear of the AC Power Shelf
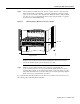
Installing the Power Shelf in the Rack
You install the power shelf in the rack by securing the permanent mounting flanges to two posts or
mounting strips in the rack using the slotted mounting screws provided. Because the mounting
flanges support the weight of the entire power shelf, be sure to use at least two slotted screws per
mounting flange.
Note You need to leave 1.75 in. (4.45 cm) between the power shelf and the dial shelf that you will
install directly above it.
Caution To maintain a low center of gravity, ensure that heavier equipment is installed near the
bottom of the rack.
Caution The AC-input power shelf with both power supplies installed weighs approximately 47 lb
(21.31 kg). Use caution when lifting the power shelf. Bend your knees and lift using your legs. Do
not strain your back. We recommend that you remove the power supplies from the AC-input power
shelf before you mount it in a rack.
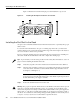
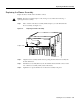
To remove a standard power supply, follow these steps:
Caution A single power supply weighs 14.5 lb (6.6 kg). Use both hands when removing or
replacing a power supply.
Step 1 Attach an ESD-preventive wrist strap between you and an unpainted chassis surface.
Step 2 Lift the metal spring-clip in the center of the ejector lever to release the lock. (The power
supplies are secured by self-locking ejector levers. (See Figure 3-2.)
Step 3 Apply downward pressure to the ejector lever to disconnect the power supply from the
power backplane.
Red
Black
Ground
BUS
—
terminal
stud
BUS
+
terminal
stud
Red
Black
Monitor
cable
29094