
Network Card User Manual
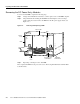


Installing the Rack-Mount Brackets on the Chassis
Cisco AS5800 Universal Access Server Hardware Installation Guide2-12
Mounting Forward Brackets for an Offset Telco Rack Installation
To install the forward rack-mount brackets on the dial shelf for an offset telco rack-mount
configuration, complete the following steps:
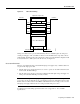
Step 1 Locate the forward upper and lower threaded holes on the right side of the chassis. (See
Figure 2-7, positions a and b.)
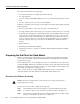
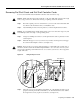
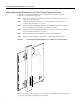
Step 2 Align one rack-mount bracket with a set of forward-upper threaded holes in the
orientation shown in Figure 2-8, position a.
Step 3 Thread two M5 x 10-mm Phillips flathead screws through the bracket and into the side of
the chassis. Tighten the screws using a No. 2 Phillips screwdriver.
Step 4 Align the second rack-mount bracket with the forward-lower position threaded holes in
the orientation shown in Figure 2-8, position b.
Step 5 Fasten the bracket to the chassis using two screws as described in Step 3.
Step 6 Repeat Step 1 through Step 5 to mount the two forward brackets on the left side.
Figure 2-8 Positioning the Rack-Mount Brackets for an Offset Telco Rack Installation
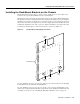
Review the remaining sections regarding safety and special rack-mounting considerations, and then
proceed to the next chapter, “Installing the Cisco AS5800.”
H11042
Front
Rear
a
b
c
d