
Universal Gateway Chassis Installation Guide

IN-1
Cisco AS5350XM Universal Gateway Chassis Installation Guide
OL-6417-02
INDEX
Numerics
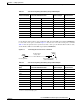
10BASE-T port pinouts (table) C-4
A
AC power supply specifications 1-4
alarm port, connecting 3-13
alarm port, description 2-5
alarm port connection (figure) 3-13
alarm port pinouts C-5
alarm port pinouts (table) C-5
attaching rack brackets 3-4
attaching the chassis to a 19-inch rack (figure) 3-5
attaching the rubber feet (figure) 3-3
Auxiliary Port
adapter
C-3
connecting 3-12
connecting a DTE or DCE device 2-5
pinouts C-4
specification 1-5
auxiliary port signaling and cabling using a DB-25 adapter
(table)
C-4
B
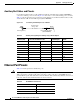
Bantam Jack pinouts C-5
Bantam Jack port pinouts (table) C-5
BITS port, connecting to 3-12
BITS port, description 2-5
BITS port pinouts C-5
BITS port pinouts (table) C-5
blank slot covers, caution 3-6
C
Cables
console port
C-2
rollover cable C-2
cabling specifications C-1
Caution
alarm port screw torque
3-13
blank slot covers 3-6
DIMM handling A-7
ESD wrist-strap safety 2-2
removing the fan tray 4-5
static electricity B-2
caution symbol, meaning of viii
Chassis
components
1-1
opening A-2
rack-mounting 3-1
removing the cover A-1, B-2
replacing cover A-8
replacing the cover B-11
safety recommendations A-1
setting on the desktop 3-1
specifications 1-4
chassis ground connection 3-5
chassis LEDs, descriptions 4-2
Cisco AS5350, installation 3-1
Cisco AS5350 Chassis (figure) A-10
Cisco AS5350 ground lug attachment (figure) 3-6
Cisco AS5350 overview 1-1
compact flash, replacing A-4
connecting a modem to the auxiliary port 2-5, 3-12
connecting a modem to the auxiliary port (figure) 3-12