
Universal Gateway Chassis Installation Guide

3-4
Cisco AS5350XM Universal Gateway Chassis Installation Guide
OL-6417-02
Chapter 3 Installing the Cisco AS5350XM Universal Gateway
Setting Up the Chassis
Required Tools and Equipment
You need the following tools and equipment to rack-mount the chassis:
• Number 2 Phillips screwdriver (not included)
• Medium flat-blade screwdriver (not included)
• Screws for attaching the chassis to the rack (not included)
• Standard rack-mount brackets (included)
• Screws for attaching the brackets to the chassis (included)
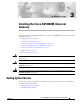
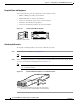
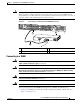
Figure 3-2 Standard Rack-Mount Brackets
Attaching the Brackets
To attach the mounting brackets to the chassis, follow this procedure:
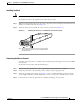
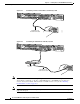
Step 1 Set the chassis on a flat surface. (See Figure 3-3.)
Note The chassis may be installed with either the front or rear panel facing forward.
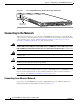
Step 2 Attach the standard 19- (48.26-) or 23-inch (58.42-cm) rack brackets to the sides of the chassis. Use the
screws provided with the mounting brackets. (See Figure 3-3.)
Note There are three sets of mounting holes on the sides of the chassis. Attach the brackets for front,
rear, or middle mounting.
Figure 3-3 Standard Bracket Installation—Front Panel Forward
36012
Bracket for 23-inch rackBracket for 19-inch rack
35669
Note: The second bracket attaches to the other side of the chassis.
The chassis can also be installed with the rear panel forward.