Cisco Unified SIP Phone 3905 User Guide for Cisco Unified Communications Manager 8.6 First Published: January 01, 2012 Last Modified: August 13, 2012 Americas Headquarters Cisco Systems, Inc. 170 West Tasman Drive San Jose, CA 95134-1706 USA http://www.cisco.
THE SPECIFICATIONS AND INFORMATION REGARDING THE PRODUCTS IN THIS MANUAL ARE SUBJECT TO CHANGE WITHOUT NOTICE. ALL STATEMENTS, INFORMATION, AND RECOMMENDATIONS IN THIS MANUAL ARE BELIEVED TO BE ACCURATE BUT ARE PRESENTED WITHOUT WARRANTY OF ANY KIND, EXPRESS OR IMPLIED. USERS MUST TAKE FULL RESPONSIBILITY FOR THEIR APPLICATION OF ANY PRODUCTS.
CONTENTS CHAPTER 1 Features of Your Cisco Unified SIP Phone 3905 1 Buttons and Hardware 2 Phone Screen 4 Phone Connections 4 Footstand 5 Adjust Handset Rest 6 CHAPTER 2 Applications 9 Call History 9 View Call History 9 Dial from Call History 10 Preferences 10 Ringtones 10 Change Ringtone 11 Phone Information 11 View Phone Information 11 Administrator Settings 11 CHAPTER 3 Messages 13 Personalize Voicemail 13 Check for Voice Messages 13 Listen to Voice Messages 14 CHAPTER 4 Calling Features 15 Auto A
Contents Forward All Calls 16 Call Pickup 16 Answer Call Using Pickup 17 Answer Call Using Group Pickup 17 Call Waiting 17 Respond to Call Waiting Notification 17 Codes 18 Place Call Using Forced Authorization Code 18 Conference 18 Set Up Conference 18 Drop Party from Conference 19 Hookflash 19 Activate Features with Hookflash 19 Hold 19 Hold Call 19 Mute 20 Mute Phone 20 Plus Dialing 20 Dial international number 20 Redial 20 Redial Number 20 Shared Lines 21 Transfer 21 Transfer Call 21 Toggle Between Call
Contents Change Browser Password 26 Change PIN 26 Change User Options Language 26 CHAPTER 6 Product Safety, Security, Accessibility, and Related Information 27 Safety and Performance Information 27 Power Outage 27 Cisco Product Security Overview 27 Accessibility Features 28 CHAPTER 7 Warranty 29 Cisco One-Year Limited Hardware Warranty Terms 29 Cisco Unified SIP Phone 3905 User Guide for Cisco Unified Communications Manager 8.
Contents Cisco Unified SIP Phone 3905 User Guide for Cisco Unified Communications Manager 8.
CHAPTER 1 Features of Your Cisco Unified SIP Phone 3905 This chapter describes the features of the Cisco Unified SIP Phone 3905. • Buttons and Hardware, page 2 • Phone Screen, page 4 • Phone Connections, page 4 • Footstand, page 5 • Adjust Handset Rest, page 6 Cisco Unified SIP Phone 3905 User Guide for Cisco Unified Communications Manager 8.
Features of Your Cisco Unified SIP Phone 3905 Buttons and Hardware Buttons and Hardware 1 Phone screen Shows information about your phone such as directory number, active call, and phone menu listings. 2 Light strip Indicates an incoming call (flashing red) or new voice message (steady red). Cisco Unified SIP Phone 3905 User Guide for Cisco Unified Communications Manager 8.
Features of Your Cisco Unified SIP Phone 3905 Buttons and Hardware 3 Navigation bar and Select/Feature button The Navigation bar allows you to scroll through menus and highlight items. The Select button (in the middle of the Navigation bar) allows you to select a highlighted item. When the phone is off-hook, the Select button functions as the Feature button. You can access these features: • Call Forward All: Allows you to forward a call. • Voice Mail: Allows you access voice mails.
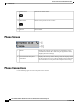
Features of Your Cisco Unified SIP Phone 3905 Phone Screen 11 Redial button Dials the last dialed number. 12 Back button Returns to the previous screen or menu. 13 Handset Phone handset. Phone Screen 1 Header Displays date and time. Also displays line information such as voicemail and missed calls. When using the Applications menu, displays phone menu listings. 2 Line details and other phone information Displays the directory number. During a call, also displays details for the active line.
Features of Your Cisco Unified SIP Phone 3905 Footstand 1 DC adapter port (DC 4.2V). 4 Network port (10/100 SW) connection. IEEE 802.3af power enabled. 2 AC-to-DC power supply (optional). 5 Access port (10/100 PC) connection. 3 AC power wall connection. 6 Handset connection. Footstand The Cisco Unified IP Phone 3905 has a foldable footstand. When the footstand is unfolded, it gives the phone an elevated viewing angle.
Features of Your Cisco Unified SIP Phone 3905 Adjust Handset Rest Adjust Handset Rest If your phone is wall-mounted, you may need to adjust the handset rest to ensure that the receiver does not slip out of the cradle. Cisco Unified SIP Phone 3905 User Guide for Cisco Unified Communications Manager 8.
Features of Your Cisco Unified SIP Phone 3905 Adjust Handset Rest Procedure Step 1 Step 2 Step 3 Step 4 Step 5 Remove the handset from the cradle and pull the plastic tab from the handset rest. Rotate the tab 180 degrees. Hold the tab between two fingers, with the corner notches facing you. Line up the tab with the slot in the cradle and press the tab evenly into the slot. An extension protrudes from the top of the rotated tab. Return the handset to the handset rest.
Features of Your Cisco Unified SIP Phone 3905 Adjust Handset Rest Cisco Unified SIP Phone 3905 User Guide for Cisco Unified Communications Manager 8.
CHAPTER 2 Applications Phone applications allow you to access the following: • Call History, page 9 • Preferences, page 10 • Phone Information, page 11 • Administrator Settings, page 11 Call History Call History allows you to view information about the last 50 calls on your phone, listed under the following categories: • Missed: lists the last 50 missed calls • Received: lists the last 50 received calls • Placed: lists the last 50 placed calls • All: lists the last 50 calls, including Missed, Received, a
Applications Dial from Call History Step 3 The phone screen displays the four call categories. Select a category. The phone screen displays the call history for the selected category. Step 4 Press the button to return to the Call History screen, or press Applications to exit the call history. Dial from Call History Procedure Step 1 Step 2 Step 3 Step 4 Press Applications . Use the Navigation bar and button to scroll and select Call History. The phone screen displays the four call categories.
Applications Phone Information Change Ringtone Procedure Step 1 Step 2 Step 3 Step 4 Step 5 Step 6 Press Applications . Use the Navigation bar and button to scroll and select Preferences. Select Ringtone. Select a ringtone. Press the Select button to confirm your selection and play a sample. Press the button to return to the Preferences screen.
Applications Administrator Settings Cisco Unified SIP Phone 3905 User Guide for Cisco Unified Communications Manager 8.
CHAPTER 3 Messages Voice messages are stored on your voicemail system. Your company determines the voicemail system your phone uses. • Personalize Voicemail, page 13 • Check for Voice Messages, page 13 • Listen to Voice Messages, page 14 Personalize Voicemail Procedure Step 1 Step 2 Step 3 Step 4 Press the Feature button. Use the Navigation pad to scroll and select Voice Mail. Press the Feature button. Follow the voice prompts.
Messages Listen to Voice Messages Listen to Voice Messages Procedure Step 1 Step 2 Step 3 Step 4 Press the Feature button. Use the Navigation pad to scroll and select Voice Mail. Press the Feature button. Follow the voice prompts. Cisco Unified SIP Phone 3905 User Guide for Cisco Unified Communications Manager 8.
CHAPTER 4 Calling Features • Auto Answer, page 15 • Auto Barge, page 16 • Call Forward All, page 16 • Call Pickup, page 16 • Call Waiting, page 17 • Codes, page 18 • Conference, page 18 • Hookflash, page 19 • Hold, page 19 • Mute, page 20 • Plus Dialing, page 20 • Redial, page 20 • Shared Lines, page 21 • Transfer, page 21 Auto Answer Auto Answer prompts your phone to automatically answer incoming calls after one ring. Your system administrator sets up Auto Answer to work with your speakerphone.
Calling Features Auto Barge Auto Barge Auto barge, if configured, allows you to barge into a shared line call automatically. For example, in a shared line scenario, when you go off-hook and a call remote is already in use, you can barge into the call automatically. Call Forward All Call Forward All allows you to forward calls on your phone to another number. Call Forward All applies to all calls that you receive. You can set up Call Forward All directly on your phone.
Calling Features Answer Call Using Pickup • Group Pickup—Allows you to answer a call on a phone that is outside your call pickup group by using a group pickup number (provided by your system administrator). Your system administrator sets up the call pickup group you are in and the call pickup buttons depending on your call-handling needs and work environment. Answer Call Using Pickup Procedure Step 1 Step 2 Step 3 Press the Feature button. Use the Navigation pad to scroll and select Pickup.
Calling Features Codes Your phone puts the original call on hold automatically and connects the ringing call. Codes Codes allow you to place a call using a billing or tracking code. Your phone supports Forced Authorization Codes (FAC) that allow you to manage call access and accounting. Your administrator provides you with the codees. The Forced Authorization Codes feature requires that the user enter a valid authorization code before the call connects.
Calling Features Drop Party from Conference Drop Party from Conference Only the conference host can drop a party from a conference. Procedure Step 1 Step 2 Verify that you are in a conference. Press and release the hookswitch. The party who joined last is dropped from the conference. Hookflash Hookflash allows you to activate features on your phone by quickly pressing and releasing the hookswitch button on the phone cradle rest.
Calling Features Mute Mute Mute allows you to block audio input for your handset and speakerphone, so that you can hear other parties on the call but they cannot hear you. Mute Phone Procedure Step 1 Step 2 Press the Mute button to turn mute on. Press the Mute button again to turn mute off. Plus Dialing Plus Dialing allows you to press and hold the “*” key for at least 1 second to add a plus “+” sign as the first digit in a phone number for international dialing. It applies only for off-hook dialing.
Calling Features Shared Lines Shared Lines Shared lines allow you to use one phone number for multiple phones. You may have a shared line if you have multiple phones and want one phone number, share call-handling tasks with co-workers, or handle calls on behalf of a manager. For example, if you share a line with a co-worker: • When a call comes in on the shared line: ◦ Your phone rings and the phone light strip flashes amber. ◦ Your co-worker’s phone rings and the phone light strip flashes amber.
Calling Features Toggle Between Calls Before Completing Transfer Step 5 (Or, skip to Step 5 while the call is ringing.) Press the Transfer button again or hang up to complete the transfer. Toggle Between Calls Before Completing Transfer After you connect to the transfer recipient—but before you transfer a call to this party—you can press the Hold/Resume button to toggle between the two calls. This allows you to consult privately with the party on each call before you complete the transfer.
CHAPTER 5 User Options Web Pages Your Cisco Unified SIP Phone is a network device that can share information with other network devices in your company, including your personal computer. You can use your computer to sign in to your Cisco Unified CM User Options web pages, where you can control features, settings, and services for your Cisco Unified SIP Phone.
User Options Web Pages Device Settings Device Settings You can make changes to your device settings on your phone from the User Options web pages. You can make changes to line settings on your phone. Select Device from User Options Web Page Procedure Step 1 Step 2 On your User Options web page, select User Options > Device. The Device Configuration window displays. Toolbar buttons located at the top of the Device Configuration window are specific to the selected device type.
User Options Web Pages User Settings Related Topics Call Forward All, on page 16 Change Voice Message Indicator Setting Procedure Step 1 Step 2 Step 3 Step 4 Step 5 Step 6 Sign in to your User Options web page. Select User Options > Device. Select a phone from the Name drop-down menu. Select Line Settings. In the Message Waiting Lamp area, choose from various settings.
User Options Web Pages Change Browser Password Change Browser Password Procedure Step 1 Step 2 Step 3 Step 4 Step 5 On your User Options web page, select User Options > User Settings. Enter your current password. Enter your new password. Reenter your new password in the Confirm Password field. Select Save. Change PIN Procedure Step 1 Step 2 Step 3 Step 4 Step 5 On your User Options web page, select User Options > User Settings. Enter your current PIN. Enter your new PIN.
CHAPTER 6 Product Safety, Security, Accessibility, and Related Information This section contains the following topics: • Safety and Performance Information, page 27 • Cisco Product Security Overview, page 27 • Accessibility Features, page 28 Safety and Performance Information Power outages and other devices can affect your Cisco Unified IP Phone. Power Outage Your accessibility to emergency service through the phone depends on the phone being powered.
Product Safety, Security, Accessibility, and Related Information Accessibility Features Accessibility Features The Cisco Unified SIP Phone 3905 provide accessibility features for the vision impaired, the blind, and the hearing and mobility impaired. http://www.cisco.com/en/US/docs/voice_ip_comm/cuipph/all_models/accessibility/english/user/guide/access_ 3905.html You can also find more information about accessibility at this Cisco website: http://www.cisco.com/web/about/responsibility/accessibility/index.
CHAPTER 7 Warranty • Cisco One-Year Limited Hardware Warranty Terms, page 29 Cisco One-Year Limited Hardware Warranty Terms Special terms apply to your hardware warranty and services that you can use during the warranty period. Your formal Warranty Statement, including the warranties and license agreements applicable to Cisco software, is available on Cisco.com at the following URL: http://www.cisco.com/en/US/docs/general/warranty/English/1Y1DEN__.
Warranty Cisco One-Year Limited Hardware Warranty Terms Cisco Unified SIP Phone 3905 User Guide for Cisco Unified Communications Manager 8.
INDEX A accessibility features 28 administrator settings 11 Applications 9, 10, 11 Administrator Settings 11 Call History 9 Phone Information 11 Preferences 10 audible message indicator, See message indicators Auto Answer, description 15 Auto Barge, description 16 B Back 2 button 2 Cisco Unified SIP Phone 3905 2 browser password 26 change 26 buttons 2 Cisco Unified SIP Phone 3905 2 Back 2 Hold 2 Mute 2 Redial 2 Speakerphone 2 Transfer 2 Volume 2 C Call Forward All 16, 24 description 16 set up 24 setup 16
Index conference 18, 19 description 18 drop a party using hookflash 19 set up using hookflash 18 connections 4 Cisco Unified SIP Phone 3905 4 contrast 11 customize voicemail 13 D dial 10 from call history 10 L language 26 change for user options web pages 26 line 24, 25 settings 24, 25 Call Forward 24 voice message indicator 25 listen to voice messages 14 locale 26 change for user options web pages 26 log in and out, See sign in and out logs, See Call History M F filter call history 10 footstand 5 Cisco
Index preferences 10, 11 contrast 11 ringtones 10 R received calls 9 redial 2 button 2 Cisco Unified SIP Phone 3905 2 Redial 20 description 20 redial a number 20 ringtones 10 S safety and performance 27 power outage 27 screen 2 Cisco Unified SIP Phone 3905 2 description 2 set 10, 11 contrast 11 ringtones 10 shared lines 21 description 21 sign in and out 23 user options 23 Speakerphone 2, 15 Auto Answer with 15 button 2 Cisco Unified SIP Phone 3905 2 T Transfer 2 button 2 Cisco Unified SIP Phone 3905 2 T
Index Cisco Unified SIP Phone 3905 User Guide for Cisco Unified Communications Manager 8.