CH A P T E R 1 Product Overview and Installation This chapter describes the Cisco Aironet CB21AG and PI21AG client adapters and their role in a wireless network. This chapter also provides information that you need to know before installing a client adapter and instructions for installing the client adapter hardware and software.
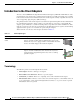
Chapter 1 Product Overview and Installation Introduction to the Client Adapters Introduction to the Client Adapters The Cisco Aironet IEEE 802.11a/b/g Wireless LAN Client Adapters (CB21AG and PI21AG) are radio modules that provide wireless data communications among fixed, portable, and mobile devices within both wireless and wired network infrastructures. The client adapters are fully compatible when used in devices supporting “plug-and-play” (PnP) technology.
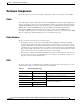
Chapter 1 Product Overview and Installation Hardware Components Hardware Components The client adapters have three major hardware components: a radio, a radio antenna, and two LEDs. Radio The client adapters contain a dual-band radio that is both IEEE 802.11a and 802.11b/g compliant. The radio uses both direct-sequence spread spectrum (DSSS) technology and orthogonal frequency division multiplexing (OFDM) technology for client applications in the 2.
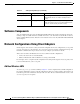
Chapter 1 Product Overview and Installation Software Components Table 1-2 LED Operating Messages (continued) Status LED (green) Activity LED (amber) Condition Blinking slowly Blinking slowly Client adapter is associated to an access point (in infrastructure mode) or another client (in ad hoc mode). Blinking quickly Blinking quickly Client adapter is transmitting or receiving data while associated to an access point (in infrastructure mode) or another client (in ad hoc mode).
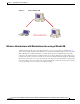
Chapter 1 Product Overview and Installation Network Configurations Using Client Adapters Ad Hoc Wireless LAN 47520 Figure 1-1 Wireless Infrastructure with Workstations Accessing a Wired LAN A infrastructure network can be created by placing two or more access points on a LAN. Figure 1-2 shows a microcellular network with workstations accessing a wired LAN through several access points.
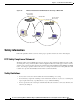
Chapter 1 Product Overview and Installation Safety information Figure 1-2 Wireless Infrastructure with Workstations Accessing a Wired LAN Access Point (Root Unit) Access Point (Root Unit) 65999 Wired LAN Safety information Follow the guidelines in this section to ensure proper operation and safe use of the client adapter.
Chapter 1 Product Overview and Installation Unpacking the Client Adapter • Use in specific environments: – The use of wireless devices in hazardous locations is limited to the constraints posed by the safety directors of such environments. – The use of wireless devices on airplanes is governed by the Federal Aviation Administration (FAA). – The use of wireless devices in hospitals is restricted to the limits set forth by each hospital.
Chapter 1 Product Overview and Installation System Requirements Package Contents Each client adapter is shipped with the following items: • 1-dBi gain antenna permanently attached by a 6.6-ft (2-m) cable, antenna base, low-profile bracket, two mounting screws, and two plastic wall anchors (PCI cards only) • Quick Start Guide: Cisco Aironet 802.11a/b/g Wireless LAN Client Adapters (CB21AG and PI21AG) • Cisco Aironet 802.
Chapter 1 Product Overview and Installation Site Requirements – Your hardware or software token password • All necessary infrastructure devices (such as access points, servers, gateways, user databases, etc.) must be properly configured for any authentication type you plan to enable on the client.
Chapter 1 Product Overview and Installation Inserting the Client Adapter Inserting the Client Adapter This section provides instructions for inserting a PC-Cardbus card or PCI card into your computer. Caution These procedures and the physical connections they describe apply generally to conventional Cardbus slots and PCI expansion slots. In cases of custom or nonconventional equipment, be alert to possible differences in Cardbus slot and PCI expansion slot configurations.
Chapter 1 Product Overview and Installation Inserting the Client Adapter Step 4 If the Found New Hardware Wizard window appears, click Cancel. If you do not click Cancel, the wizard will attempt to install software for the client adapter but will be unable to find it. Note Step 5 Go to the “Installing the Client Adapter Driver and Software” section on page 1-18.
Chapter 1 Product Overview and Installation Inserting the Client Adapter Step 2 Slide the bracket away from the card; then tilt the bracket to free the antenna cable. Caution Do not pull on the antenna cable or detach it from the PCI card. The antenna is meant to be permanently attached to the card. Step 3 Hold the low-profile bracket to the card so that the LEDs slip through their corresponding holes on the bracket.
Chapter 1 Product Overview and Installation Inserting the Client Adapter Figure 1-5 STATUS ACTIVITY 2 Inserting a PCI Card into a PC 3 1 95582 STATUS ACTIVITY 1 Antenna cable 2 LEDs 3 Card edge connector Step 6 Tilt the card to enable the LEDs to slip through the opening in the CPU back panel. See the enlarged view in Figure 1-5. Step 7 Press the card into the empty slot until its connector is firmly seated.
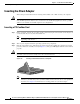
Chapter 1 Product Overview and Installation Inserting the Client Adapter Figure 1-6 Inserting the Antenna into Its Base 1 2 95584 3 1 Antenna 2 Notch 3 Antenna base Step 3 Press the antenna cable into the receptacle on the top of the base as shown in Figure 1-6. Step 4 Press the antenna straight down into the receptacle until it clicks into place.
Chapter 1 Product Overview and Installation Inserting the Client Adapter Follow the steps below to position the PCI card’s antenna on a flat horizontal surface or to mount it to a wall. Step 1 Step 2 Perform one of the following: • If you want to use the antenna on a flat horizontal surface, position the antenna so it is pointing straight up. Then go to Step 7. • If you want to mount the antenna to a wall, go to Step 2. Drill two holes in the wall that are 1.09 in. (2.8 cm) apart.
Chapter 1 Product Overview and Installation Inserting the Client Adapter Mounting the Antenna 95595 Figure 1-8 Step 6 The antenna rotates 90 degrees from its base. For optimal reception, position the antenna so it is pointing straight up (see Figure 1-9). Rotating the Antenna 95596 Figure 1-9 1-16 Step 7 Boot up your PC.The green LED lights when the card is inserted properly. Step 8 If the Found New Hardware Wizard window appears, click Cancel.
Chapter 1 Product Overview and Installation Obtaining Client Adapter Software Obtaining Client Adapter Software The software is provided on the CD that shipped with your client adapter; however, Cisco recommends retrieving it from Cisco.com to ensure that you have the latest version. • To obtain the version of the software on the CD, open the FileList.txt file on the CD root directory. • To obtain the version of the latest software on Cisco.
Chapter 1 Product Overview and Installation Installing the Client Adapter Driver and Software Installing the Client Adapter Driver and Software Caution Do not eject your client adapter at any time during the installation process, including during the reboot. Follow these steps to use to install the client software on a device that is running Windows Vista. Step 1 Double-click WinClient-802.11a-b-g-Vista-Ins-Wizard-vxx.exe. A window appears that asks you if you want to run the softward file.
Chapter 1 Product Overview and Installation Installing the Client Adapter Driver and Software Figure 1-11 Step 4 Click Next. A Cisco Aironet Installation Program dialog box that includes a message about driver and hardware installation appears (see Figure 1-12). Figure 1-12 Step 5 Cisco Aironet Installation Program Window Cisco Aironet Installation Program Dialog Box—Driver Installation and Hardware Insertion Click OK.
Chapter 1 Product Overview and Installation Installing the Client Adapter Driver and Software Figure 1-13 Step 6 Allow the software installation to finish. A Windows Security dialog box might appear (see Figure 1-14). Figure 1-14 Step 7 1-20 Cisco Aironet Installation Program—Setup Status Window Windows Security—Windows can’t verify the publisher of this driver software Dialog Box If this dialog box appears, double-click Install this driver software anyway.
Chapter 1 Product Overview and Installation Installing the Client Adapter Driver and Software Figure 1-15 Step 8 Cisco Aironet Installation Program—InstallShield Wizard Complete Window Click Finish. Cisco Aironet 802.
Chapter 1 Product Overview and Installation Installing the Client Adapter Driver and Software 1-22 Cisco Aironet 802.