
Network Router User Manual


A-15
Cisco 7304 Router MIB Specifications Guide
OL-4925-02
Appendix A Using MIBs
Monitoring Quality of Service
Step 3 To enable linkUp and linkDown traps on an interface, set ifLinkUpDownTrapEnable to enabled(1). For
information about how to configure the router to send linkDown traps only for the lowest layer of an
interface, see the “SNMP Trap Filtering for linkDown Traps” section on page A-15.
Step 4 To enable the Internet Engineering Task Force (IETF) standard for linkUp and linkDown traps, issue the
following command. (The IETF standard is based on RFC 2233.)
Router(config)# snmp-server trap link ietf
Step 5 To enable linkUp and linkDown traps on ATM subinterfaces, issue the following command:
Router(config)# snmp-server enable traps atm subif
Step 6 To enable linkUp and linkDown traps on an ATM permanent virtual circuit (PVC), issue the following
commands. In the first command, interval specifies the minimum interval between successive traps, and
fail-interval specifies the minimum interval for storing failed time stamps.
Router(config)# snmp-server enable traps atm pvc interval seconds fail-interval seconds
Router(config)# interface atm slot/subslot/port
Router(config-if)# pvc vpi/vci
Router(config-if-atm-vc)# oam-pvc manage
Step 7 To disable traps, use the no form of the appropriate command.
SNMP Trap Filtering for linkDown Traps
Use the SNMP trap filtering feature to filter linkDown traps so that SNMP sends a linkDown trap only if
the main interface goes down. If an interfaces goes down, all of its subinterfaces go down, which results in
numerous linkDown traps for each subinterface. This feature filters out those subinterface traps.
This feature is turned off by default. To enable the SNMP trap filtering feature, issue the following
CLI command. Use the no form of the command to disable the feature.
[no] snmp ifmib trap throttle
Monitoring Quality of Service
This section provides an example of how to use SNMP to access QoS configuration information and
statistics on the router. It contains the following sections:
• Configuring QoS, page A-16
• Accessing QoS Configuration Information and Statistics, page A-16
• Monitoring QoS, page A-19
• Sample QoS Applications, page A-22
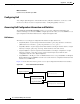
Purpose and Benefits
Previously, the only way to access QoS configuration information and statistics was to enter show
commands at the CLI.
With the enhanced management feature, you can use SNMP to access QoS configuration information
and statistics on the router. This means that you can now collect and store QoS information for use in
management applications. You can also use bulk-file transfer to copy the information to another system.