
Unified Videoconferencing Gateway Installation and Upgrade Guide

2-5
Installation and Upgrade Guide for Cisco Unified Videoconferencing 3545 PRI Gateway and 3545 Serial Gateway Release 5.5
OL-14912-01
Chapter 2 Installing the Cisco Unified Videoconferencing 3545 Gateway
Mounting the Cisco Unified Videoconferencing 3545 Chassis in a 19-inch Rack
Related Topics
• Serial Gateway Cable Connections and Pin-outs, page 2-15
Mounting the Cisco Unified Videoconferencing 3545 Chassis in
a 19-inch Rack
You can optionally mount the Cisco Unified Videoconferencing 3545 chassis in a standard 19-inch rack.
Two mounting brackets and a set of screws are included in the Cisco Unified
Videoconferencing 3545 chassis shipping box.
Procedure
Step 1 Disconnect all cables including the power cables.
Step 2 Place the Cisco Unified Videoconferencing 3545 chassis right-side up on a hard flat surface, with the
front panel facing you.
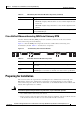
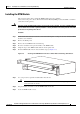
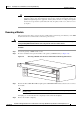
Step 3 Position a mounting bracket over the mounting holes on each side of the Cisco Unified
Videoconferencing 3545 chassis, as shown in Figure 2-4.
Step 4 Pass the screws through the brackets and tighten them into the screw holes on each side of the
Cisco Unified Videoconferencing 3545 chassis using a suitable screwdriver.
Figure 2-4 Fitting a Bracket for Rack Mounting
Step 5
Insert the Cisco Unified Videoconferencing 3545 chassis into the 19-inch rack.
Step 6 Fasten the brackets to the side rails of the rack.
Step 7 Make sure that the air vents at the sides of the Cisco Unified Videoconferencing 3545 chassis are not
blocked.
157267