
User Manual


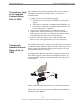


Table Of Contents
- Permissions, Trademarks & Distribution
- Safety
- Regulatory Information
- Introduction
- Package Inventory
- LMX Models
- Minimum Computing Requirements
- Physical Characteristics
- Installing the LMX Modem
- Accessing the Internet
- Troubleshooting
- Installing Navini Diagnostics (NavDiag)
- Troubleshooting Using Navini Diagnostics (NavDiag)
- Uninstalling Navini Diagnostics (NavDiag)
- Optional Batteries
- Optional External Battery Packs
- Connecting the Standard External Battery Pack (S-EBP)
- The Indicator Light on the Standard External Battery Pack (S
- Charging the Standard External Battery Pack (S-EBP)
- Connecting and Disconnecting the Heavy Duty External Batter
- The Indicator Light on the Heavy Duty External Battery Pack
- Charging the Heavy Duty External Battery Pack (HD-EBP)
- Care & Maintenance
- Upgrading the Modem
- ADDENDUM 1: Ripwave™-MX Modem - PC Troubleshooting
- ADDENDUM 2: End User Software License Agreement

Navini Networks, Inc. Ripwave-MX Modem User Guide
051123_pv1.3_Ripwave-MX Modem User Guide_40-00382-00b(prelim4.4.2)
nd
isconnecting the
eavy Duty
xternal Battery
ack (HD-EBP)
If y
of t ck,
foll
Connecting a
D
H
E
P
ou have a HD-EBP, the battery pack is installed in the bottom
he LMX Modem. To install and or remove the battery pa
ow the steps based on your model of Modem.
Step Action Illustration
1. De e front bu
on the HD-EBP so that
the front prong moves in
towards the center of the
H
press th tton
D-EBP.
2. Place the back slot of
the LMX Modem over
the back prong of the
HD-EBP.
3. Place the front part of
the opening on the LMX
Modem over the front
prong on the battery.
4. Release the button on
the battery.
5. Press firmly down on
the Modem so that the
Modem firmly connects
with the HD-EBP.
Front
button
Front prong Back prong
Front slot Back slot
Front
button
Front prong Back prong
Front
button
Front prong Back prong
Front slot Back slotFront slot Back sl
ot
28