
User Manual

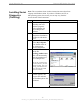
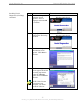
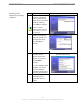


Table Of Contents
- Permissions, Trademarks & Distribution
- Safety
- Regulatory Information
- Introduction
- Package Inventory
- LMX Models
- Minimum Computing Requirements
- Physical Characteristics
- Installing the LMX Modem
- Accessing the Internet
- Troubleshooting
- Installing Navini Diagnostics (NavDiag)
- Troubleshooting Using Navini Diagnostics (NavDiag)
- Uninstalling Navini Diagnostics (NavDiag)
- Optional Batteries
- Optional External Battery Packs
- Connecting the Standard External Battery Pack (S-EBP)
- The Indicator Light on the Standard External Battery Pack (S
- Charging the Standard External Battery Pack (S-EBP)
- Connecting and Disconnecting the Heavy Duty External Batter
- The Indicator Light on the Heavy Duty External Battery Pack
- Charging the Heavy Duty External Battery Pack (HD-EBP)
- Care & Maintenance
- Upgrading the Modem
- ADDENDUM 1: Ripwave™-MX Modem - PC Troubleshooting
- ADDENDUM 2: End User Software License Agreement

Navini Networks, Inc. Ripwave-MX Modem User Guide
Installing Navini
iagnostics (NavDiag),
ontinued
roubleshooting
sing Navini
iagnostics
NavDiag)
D
c
T
U
D
(
Step Action Illustration
14. At the Install Complete
screen, click
Done to
window.
Windows 2000 Screen
close the
pe s software application, double-click
on the Navini Diagnostics icon on your desktop.
To o n the Navini Diagnostic
Navini Diagnostics.lnk
The Connection Status screen will open and display data if the
Modem is in session. The screen will refresh live data every
second.
17
051123_pv1.3_Ripwave-MX Modem User Guide_40-00382-00b(prelim4.4.2)