
User Manual
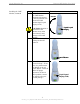
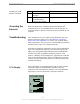

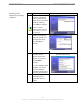


Table Of Contents
- Permissions, Trademarks & Distribution
- Safety
- Regulatory Information
- Introduction
- Package Inventory
- LMX Models
- Minimum Computing Requirements
- Physical Characteristics
- Installing the LMX Modem
- Accessing the Internet
- Troubleshooting
- Installing Navini Diagnostics (NavDiag)
- Troubleshooting Using Navini Diagnostics (NavDiag)
- Uninstalling Navini Diagnostics (NavDiag)
- Optional Batteries
- Optional External Battery Packs
- Connecting the Standard External Battery Pack (S-EBP)
- The Indicator Light on the Standard External Battery Pack (S
- Charging the Standard External Battery Pack (S-EBP)
- Connecting and Disconnecting the Heavy Duty External Batter
- The Indicator Light on the Heavy Duty External Battery Pack
- Charging the Heavy Duty External Battery Pack (HD-EBP)
- Care & Maintenance
- Upgrading the Modem
- ADDENDUM 1: Ripwave™-MX Modem - PC Troubleshooting
- ADDENDUM 2: End User Software License Agreement

Navini Networks, Inc. Ripwave-MX Modem User Guide
Installing the LMX
Modem, continued
051123_pv1.3_Ripwave-MX Modem User Guide_40-00382-00b(prelim4.4.2)
Step Action Illustration
4. Rotate the antenna on
the LMX Modem
clockwise 180 degrees
P position. This
CAUTION! Rotation or
movement of the
antenna in any other
direction may cause
to the U
reveals the LMX
Modem liquid crystal
display (LCD).
damage to the LMX
Modem.
5.
Off
button in.
Turn the Modem ON by
pushing the On/
6.
with
ll
If the LCD turns on,
proceed to Step 7. If not,
there is a problem
the Modem or the AC
power adapter. Check a
cables for proper
connection. If there is
still a problem, contact
the supplier who gave
you the package.
Antenna
Liquid Crystal
Display
Antenna
Liquid Crystal
Display
Liquid Crystal
Display
On/O ButtonffOn/O ButtonffOn/O Buttonff
Liquid Crystal
Display (LCD)
Liquid Crystal
Display (LCD)
11