Ripwave™-MX Modem User Guide For use with all Ripwave-MX Modem models Part Number 40-00382-00 Revision B, Version 1.0, PV1.3 November 23, 2005 Proprietary All information disclosed by this document is the proprietary property of Navini Networks, Inc. and is protected by copyright, trademark, and/or trade secret laws. All rights therein are expressly reserved.
Navini Networks, Inc. Ripwave-MX Modem User Guide TABLE OF CONTENTS PERMISSIONS, TRADEMARKS & DISTRIBUTION.............................................................................3 SAFETY .......................................................................................................................................................4 REGULATORY INFORMATION ..............................................................................................................5 INTRODUCTION..................
Navini Networks, Inc. Ripwave-MX Modem User Guide Permissions, Trademarks & Distribution Copyright© 2001 - 2005, Navini Networks, Inc. All information contained herein and disclosed by this document is confidential and the proprietary property of Navini Networks, Inc. and all rights therein are expressly reserved.
Navini Networks, Inc. Ripwave-MX Modem User Guide Safety When using Navini Ripwave electronic equipment, always follow basic safety precautions to reduce the risk of electrical shock, fire, and injury to people and/or property. Follow all warnings and instructions that come with the equipment. 1. Do not use the equipment while you are in a bathtub, shower, pool, or spa. Exposure of the equipment to water could cause severe electrical shock or serious damage to the equipment. 2.
Navini Networks, Inc. Ripwave-MX Modem User Guide Regulatory Information FCC Notice CAUTION: This device is a Radio Frequency transmitter. It is required to comply with FCC RF exposure requirements for transmitting devices. For all LMX Modems except for the 2.6 LMX with window mount, a minimum separation distance of 8 inches (20 cm) or more must be maintained between the antenna and all persons during device operations to ensure compliance with the FCC’s rules for Radio Frequency Exposure. For the 2.
Navini Networks, Inc. Ripwave-MX Modem User Guide INFORMATION REGARDING ANTENNAS This device has three embedded antennas: one upright antenna with approximately 2 dBi gain and two patch antennas, one on each side of the device. Each patch antenna has approximately 6 dBi gain. 6 051123_pv1.3_Ripwave-MX Modem User Guide_40-00382-00b(prelim4.4.
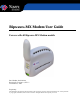
Navini Networks, Inc. Ripwave-MX Modem User Guide Introduction Congratulations! The Liquid Cystal Display Ripwave™-MX (LMX) dual-mode Modem is a user-friendly, easy-to-install device that helps you connect wirelessly to the Internet. It provides complete broadband Internet access to residential and small office/home office (SOHO) customers without the necessity of professional hardware installation.
Navini Networks, Inc. Ripwave-MX Modem User Guide Operating Frequencies Modem Model Frequency Range 2.4 GHz LMX 2.5 – 2.6 GHz LMX 3.4 GHz LMX 3.5 GHz LMX 2400-2483 LMX E 2.5-2.6 LMX E 3410-3525 LMX E 3475-3600 LMX E Operating Band 2.400 GHz – 2.483 GHz ISM 2.500 GHz – 2.686 GHz MMDS/ITFS 3.410 GHz – 3.525 GHz BWA/FWA 3.475 GHz – 3.600 GHz BWA/FWA The “E” in the model name stands for Ethernet. Your computer should have this port for connecting the Modem.
Navini Networks, Inc. Ripwave-MX Modem User Guide Red Hat Linux 8.0 or higher. Mac users must have the Snuffit extraction software. This manual will guide you through the simple process of installing the LMX Modem and software, which has been developed to optimize the ease and convenience for you, our valued customer. If you experience any difficulties with your unit, please contact your Service Provider or the vendor from whom you obtained your LMX Modem.
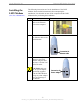
Navini Networks, Inc. Installing the LMX Modem (See, also, Addendum 1) Ripwave-MX Modem User Guide The following instructions are for the installation of the LMX Modem. Please read all instructions before attempting the installation. It is advisable to turn off the computer and the LMX Modem before performing the installation. Step Action 1. Connect the Ethernet cable to the Ethernet port on the computer. 2. Illustration Connect the other end of the Ethernet cable to the LMX Modem.
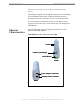
Navini Networks, Inc. Installing the LMX Modem, continued Ripwave-MX Modem User Guide Step Action 4. Rotate the antenna on the LMX Modem clockwise 180 degrees to the UP position. This reveals the LMX Modem liquid crystal display (LCD). 5. Illustration Antenna Liquid Crystal Display CAUTION! Rotation or movement of the antenna in any other direction may cause damage to the LMX Modem. Turn the Modem ON by pushing the On/Off button in. On/Off Button 6. If the LCD turns on, proceed to Step 7.
Navini Networks, Inc. Ripwave-MX Modem User Guide Installing the LMX Modem, continued Step Action Turn your computer on 7. and log in. 8. Proceed to the “Troubleshooting” section of this manual. Accessing the Internet With your Modem now installed, and both the Modem and computer power on, you should be able to surf the Internet! To access the Internet, open the web browser that is installed on your computer.
Navini Networks, Inc. LCD Display, continued Ripwave-MX Modem User Guide The following table provides definitions for the LCD indications.
Navini Networks, Inc. Installing Navini Diagnostics (NavDiag) Ripwave-MX Modem User Guide Note: The screenshots shown in these instructions were taken from a laptop with Windows 2000. If you have a Windows 98, XP, or ME operating system, the screens you see may vary from the screens shown in the instructions. Step Action Illustration 1. Shut down all programs, including anti-virus software programs, before installing the Navini Diagnostics software. 2.
Navini Networks, Inc. Installing Navini Diagnostics (NavDiag), continued Ripwave-MX Modem User Guide Step Action 6. The Navini Diagnostics Language screen appears*. Select a language and click OK to continue. 7. The progress bar indicates the files being installed. Illustration Windows 2000 Screen Windows 2000 Screen 8. The Navini Diagnostics Introduction screen appears. Click Next to continue. Windows 2000 Screen 9. The License Agreement screen appears. Read the Licensing Agreement.
Navini Networks, Inc. Installing Navini Diagnostics (NavDiag), continued Ripwave-MX Modem User Guide Step Action Illustration 10. The Choose Install Windows 2000 Screen Folder screen appears. Enter the name of the folder where you wish to install the software. Click Next to continue. NOTE: The default installation folder provided by the software is shown in the illustration. 11. The Choose Shortcut Folder screen appears. Select the default, In a new Program Group, and click Next to continue. 12.
Navini Networks, Inc. Ripwave-MX Modem User Guide Installing Navini Diagnostics (NavDiag), continued Step Action 14. At the Install Complete screen, click Done to close the window. Troubleshooting Using Navini Diagnostics (NavDiag) To open the Navini Diagnostics software application, double-click on the Navini Diagnostics icon on your desktop. Illustration Windows 2000 Screen Navini Diagnostics.lnk The Connection Status screen will open and display data if the Modem is in session.
Navini Networks, Inc. Troubleshooting Using Navini Diagnostics (NavDiag), continued Ripwave-MX Modem User Guide The icons represent the PC, the connection between the PC and the Modem, the Modem, the connection between the Modem and the Base Station, and the Base Station to which the Modem is communicating. Check marks over the connections indicate working connections.
Navini Networks, Inc. Troubleshooting Using Navini Diganostics (NavDiag), continued Ripwave-MX Modem User Guide The Signal Quality bar area graphically represents the Signal-toNoise Ratio (SNR) of the downlink access code channel (ACC) received by the Modem. Again, the quality of the signal is represented by a group of colored bars. The higher the pile of bars goes, the better the SNR of the signal. The color of the bars also gives an indication of the quality of the signal.
Navini Networks, Inc. Ripwave-MX Modem User Guide currently loaded in the “active side” and “standby side” of the Modem’s flash memory. 20 051123_pv1.3_Ripwave-MX Modem User Guide_40-00382-00b(prelim4.4.
Navini Networks, Inc. Troubleshooting Using Navini Diganostics (NavDiag), continued Ripwave-MX Modem User Guide The two letters in parenthesis following the release number indicate the type of software load. JD indicates Joint Detection, while EN indicates Enhanced Nulling. On the left-hand side of the screen, there are five screen options: Connection Status, Configuration, Trend Analysis, Statistics, and About. The following screen will appear when you press the Configuration button.
Navini Networks, Inc. Ripwave-MX Modem User Guide Troubleshooting Using Navini Diganostics (NavDiag), continued By pressing the Plot Graph button, the following screen will appear. This screen displays the value of the selected parameters over the last five minutes, updated once every second. The graphic scrolls from right to left. To view the Statistics screen, press the Statistics button. The statistics screen enables you to view the current value of selected parameters.
Navini Networks, Inc. Ripwave-MX Modem User Guide Troubleshooting Using Navini Diganostics (NavDiag), continued The About screen provides vital information such as the version of the Navini Diagnostics software currently installed in your computer. It also provides a website address and telephone number where you can contact your Service Provider. To view the About screen, press the About button. An example of the About screen follows.
Navini Networks, Inc. Uninstalling Navini Diagnostics (NavDiag) Ripwave-MX Modem User Guide If for some reason you need to uninstall the Navini Diagnostics software, e.g., to upgrade your Operating System software, follow the procedure below. Note: The screen shots shown in these instructions were taken from a laptop with Windows 2000. If you have a Windows 98, XP, or ME operating system, the screens you see may vary from the screens shown in the instructions. Step Action 1.
Navini Networks, Inc. Uninstalling Navini Diagnostics (NavDiag), continued Ripwave-MX Modem User Guide Step Action 4. The Uninstall Complete screen appears when finished. Click on Quit to close the Uninstall screen. 5. Optional Batteries Illustration Windows 2000 Screen Restart the PC to complete the uninstall process. This will ensure the uninstall process completes successfully. The LMX Modems have two optional external battery packs associated with them.
Navini Networks, Inc. Optional External Battery Packs, continued Ripwave-MX Modem User Guide The amount of time the S-EBP and HD-EBP can operate before recharging varies. This time is dependent of the usage run on the LMX Modem. The following table shows example approximations for how long the batteries can run before a recharge is required. Usage Approximate hours of Usage Before Recharge Required S-EBP HD-EBP Up to 2.5 Up to 8 1.
Navini Networks, Inc. Ripwave-MX Modem User Guide The Indicator Light on the Standard External Battery Pack (S-EBP) The S-EBP has one indicator light that resides on top of the unit. This light has four states associated with it. The states are described below.
Navini Networks, Inc. Connecting and Disconnecting the Heavy Duty External Battery Pack (HD-EBP) Ripwave-MX Modem User Guide If you have a HD-EBP, the battery pack is installed in the bottom of the LMX Modem. To install and or remove the battery pack, follow the steps based on your model of Modem. Step Action 1. Depress the front button on the HD-EBP so that the front prong moves in towards the center of the HD-EBP. 2.
Navini Networks, Inc. Connecting and Disconnecting the HDEBP, continued Ripwave-MX Modem User Guide Step Action 6. Plug the HD-EBP’s pigtail cord into the power slot on the Modem. 7. The Indicator Light on the Heavy Duty External Battery Pack (HD-EBP) Illustration To remove the battery pack from the Modem, unplug the pig-tail cord. Depress the front button on the HD-EBP. Lift the Modem off of the battery pack.
Navini Networks, Inc. Charging the Heavy Duty External Battery Pack (HD-EBP) Ripwave-MX Modem User Guide The HD-EBP will need to be recharged when the battery is connected to a Modem and the Modem is turned on but the LED on the back of the battery remains off (indicating the battery has no power) or is red (indicating the battery level is low). To recharge the HD-EBP, use only the 12V charger that came with the HD-EBP. Using any other charger may damage the battery.
Navini Networks, Inc. Care & Maintenance, continued Ripwave-MX Modem User Guide Use only a mild detergent and a soft, damp cloth to clean the Modem. Do not use any chemicals or abrasives to clean the plastic shell. If there is a problem with the Modem, do not attempt to repair it yourself. Report the problem to your Service Provider.
Navini Networks, Inc. Ripwave-MX Modem User Guide must already have an IP address. If your computer does not have an IP address, contact your Service Provider. If you attempt to upgrade your Modem software through the Navini Diagnostics Tool and the computer does not have an assigned IP address, you may see one of the following error messages: 32 051123_pv1.3_Ripwave-MX Modem User Guide_40-00382-00b(prelim4.4.
Navini Networks, Inc. Ripwave-MX Modem User Guide ADDENDUM 1: Ripwave™-MX Modem - PC Troubleshooting - For Use With All Ripwave-MX LMX Modems and Navini Diagnostics Software PC Operating Systems Prior to installing the Navini Diagnostics software, please check to insure that the PC Operating System meets the criteria given in the table below. If these criteria are not met, unpredictable problems may occur as a result of installation.
Navini Networks, Inc. Ripwave-MX Modem User Guide Routers Neither the Navini LMX Monitor nor the Navini Diagnostics software will work if it goes through a router.
Navini Networks, Inc. Ripwave-MX Modem User Guide Action Notes: None. Install Log Detail: Check Disk Space: C:\Program Files\NavDiag Status: SUCCESSFUL Additional Notes: NOTE - Required Disk Space: 29,363,315; Free Disk Space: 30,806,179,840 Install Directory: C:\Program Files\NavDiag\ Status: SUCCESSFUL Get Registry Entry: Key: HKEY_LOCAL_MACHINE\SOFTWARE\Navini Networks\NavDiag, ValueName: InstallDirectory Status: WARNING Additional Notes: WARNING - Win32Exception Make Registry Entry: Key: HKEY_LOCAL_MA
Navini Networks, Inc. Ripwave-MX Modem User Guide Make Registry Entry: Key: HKEY_LOCAL_MACHINE\SOFTWARE\Microsoft\Windows\CurrentVersion\Uninstall\Navini Diagnostics, Value Name: DisplayName, Value Data: Navini Diagnostics Status: SUCCESSFUL Make Registry Entry: Key: HKEY_LOCAL_MACHINE\SOFTWARE\Microsoft\Windows\CurrentVersion\Uninstall\Navini Diagnostics, Value Name: UninstallString, Value Data: "C:\Program Files\NavDiag\Uninstall\Uninstall NavDiag.
Navini Networks, Inc. Ripwave-MX Modem User Guide Install Directory: C:\Program Files\NavDiag\data\lib\ Status: SUCCESSFUL Install File: C:\Program Files\NavDiag\data\lib\ctl.jar Status: SUCCESSFUL Install File: C:\Program Files\NavDiag\data\lib\navDiag.jar Status: SUCCESSFUL Install File: C:\Program Files\NavDiag\data\lib\jfreechart-0.9.13.jar Status: SUCCESSFUL Install File: C:\Program Files\NavDiag\data\lib\jcommon-0.8.8.jar Status: SUCCESSFUL Install File: C:\Program Files\NavDiag\data\lib\lo
Navini Networks, Inc. Ripwave-MX Modem User Guide ADDENDUM 2: End User Software License Agreement between Navini Networks, Inc. and Buyer ARTICLE 1 IMPORTANT MESSAGE 1.1 Act of Assent. Installing the Software indicates that you have read, understand and accept this License Agreement. ARTICLE 2 LICENSES 2.1 2.2 2.3 2.4 Grant of License. The Software and related Documentation, are the intellectual property of Navini Networks, Inc. and are protected by law. Navini Networks, Inc.
Navini Networks, Inc. Ripwave-MX Modem User Guide 2.5 Suitability. a. Buyer alone is responsible for determining which software best suits Buyer’s needs, for installing and operating the Software, and for the results obtained. Accordingly, each Buyer should determine its needs, and evaluate the Software’s capabilities before making a final decision about licensing the software. b. Navini Networks, Inc. makes no representation that the Software conforms to or satisfies any federal, state, or local laws.
Navini Networks, Inc. Ripwave-MX Modem User Guide ARTICLE 4 INDEMNIFICATIONS AND WARRANTY 4.1 4.2 Intellectual Property Indemnification; Entire Liability. ARTICLE 15 OF THE SUPPLY AGREEMENT TO WHICH THIS AGREEMENT IS ATTACHED STATES THE ENTIRE LIABILITY OF NAVINI NETWORKS, INC. WITH RESPECT TO INFRINGEMENT OF COPYRIGHTS, TRADE SECRETS, TRADEMARKS, PATENTS, AND OTHER INTELLECTUAL PROPERTY RIGHTS BY THE LICENSED SOFTWARE, DOCUMENTATION, OR ANY PARTS THEREOF, AND NAVINI NETWORKS, INC.
Navini Networks, Inc. Ripwave-MX Modem User Guide ARTICLE 6 OBJECT CODE ONLY-NO MODIFICATIONS 6.1 6.2 6.3 Modifications. In order to maintain the “trade secret” status of the information contained in the Licensed Software, Navini Networks, Inc. provides the Software in object-code form only. Buyer shall not modify, enhance, adapt, disassemble, translate, decompile or otherwise decode any portion of the object code of the Software module.