
User Guide
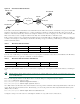

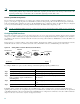
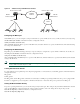
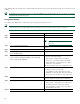
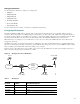
Table Of Contents
- Cisco 1760 Modular Access Router Cabling and Installation
- 1 Cisco One-Year Limited Hardware Warranty Terms
- 2 Overview
- 3 Parts List
- 4 Mounting the Router in a Rack
- 5 Installing WIC/VIC Cards
- 6 Connecting the Router to Your Local Network
- 7 Connect Power and Verify Installation
- 8 Connect a PC to the Router Console Port
- 9 Perform Initial Configuration
- 10 Use the CLI to Configure VoIP
- 11 Obtaining Documentation
- 12 Documentation Feedback
- 13 Cisco Product Security Overview
- 14 Obtaining Technical Assistance
- 15 Obtaining Additional Publications and Information

28
where high enables the external clock, and low enables the internal clock to drive the VIC. By default, the clock priority is set
to high.
Note If the VIC loses its external clock source, as when the ISDN line is down, the internal clock source takes over until the
external clock is functioning again.
Configuration Example
To configure each BRI interface, follow these steps, starting in privileged user mode.
Note Before you configure each port on the VIC, verify that the BRI interface has shut down and that the cable to the
connected device is properly installed for the operating mode of the interface that you plan to configure.
Command Description
Step 1
router# configure terminal Enter the global configuration mode.
Step 2
router(config)# isdn switch-type basic-net3 Specify the ISDN switch type.
Note The only switch type supported is the
basic-net3.
Step 3
router(config)# interface bri 0/0 Change to interface configuration mode for port 0
in slot 0.
Step 4
router(config-if)# no ip address Specify that there is no IP address for this interface.
Step 5
router(config-if)# isdn incoming-voice
{voice | modem | data}
Configure this port for incoming calls.
Step 6
router(config-if)# shutdown
router(config-if)# isdn layer1-emulate {user | network}
router(config-if)# no shutdown
Shut down the interface. Then configure the Layer
1 port mode and clock settings:
• Enter user to configure the port as TE, to
function as a clock slave. This is the default.
• Enter network to configure the port as NT, to
function as a clock master.
Activate the interface after you configure the port.
Step 7
router(config-if)# network-clock-priority {low | high} (Optional only for TE-configured ports.) To change
the setting for clock source priority:
• Set to high to use the external clock on the
ISDN line to drive the VIC. This is the default.
• Set to low to use the internal clock on the VIC.
Step 8
router(config-if)# line-power (Optional only for NT-configured ports). Turn on
the power supplied from the port to a TE device.
Step 9
router(config-if)# isdn protocol-emulate {user | network} Configure the Layer 2 port protocol emulation:
• Enter user to configure the port as TE so that
the PBX is the master. This is the default.
• Enter network to configure the port as NT so
that the PBX is the slave.
Step 10
router(config-if)# end Exit configuration mode.