
Network Router User Manual


3-9
Cisco 2600 Series Routers Hardware Installation Guide
OL-2171-06
Chapter 3 Installing the Router
Setting Up the Chassis
Attaching the Brackets to a Router of 2-RU Height
To install the chassis in a rack, attach the brackets in one of the following ways:
• With the front panel forward (see Figure 3-12)
• With the rear panel forward (see Figure 3-13)
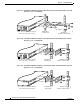
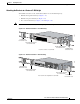
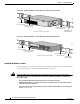
• In a center-mount rack (see Figure 3-14 and Figure 3-15)
Note Use the screws that came with your router package for attaching the brackets.
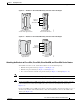
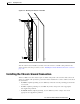
Figure 3-12 Bracket Installation—Front Mounting
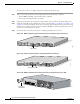
Figure 3-13 Bracket Installation—Rear Mounting
Left (narrow) bracket
for 19-inch rack
Left bracket
for 23-inch rack
LEFT
23" ETSI, NEBS
LEFT
82691
SERIES
SERIES
Right (wide) bracket
for 19-inch rack
RIGHT
23" ETSI, NEBS
RIGHT
Right bracket
for 23-inch rack
Use two screws on each side.
23" ETSI, NEBS
RIGHT
RIGHT
Right (wide) bracket
for 19-inch rack
Right bracket
for 23-inch rack
82692
SEE
M
AN
U
AL B
E
FO
R
E IN
STA
LLAT
IO
N
AL
CD
LP
RD
TD
S
EE
M
A
NUA
L BE
FOR
E
IN
S
TAL
LA
TIO
N
D
S
U
5
6
K
AL
CD
LP
RD
TD
SE
E M
ANU
AL B
E
FO
R
E IN
STA
LLAT
IO
N
D
S
U
5
6
K
EN
V0
BANK 4
BANK 3
BANK 2
BANK 1
BANK 0
N
M
-H
D
V
V
W
IC
2
M
F
T
-
E
1
S
E
E
M
A
NU
A
L
B
E
FO
R
E
IN
S
TA
L
LA
T
IO
N
C
T
R
L
R
E
2
C
T
R
L
R
E
1
A
L
L
P
C
D
Left (narrow) bracket
for 19-inch rack
Left bracket
for 23-inch rack
LEFT
23" ETSI, NEBS
LEFT
Four screws are required on each side.