
User's Manual


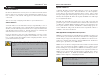

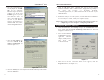
Table Of Contents
- Table of Contents
- Chapter 1: Introduction
- Chapter 2: Connecting the Router
- Chapter 3: Configuring the PCs
- Chapter 4: Configuring the Router
- Chapter 5: Using the Router’s Web-Based Utility
- Appendix A: Troubleshooting
- Appendix B: How to Ping Your ISP’s E-mail and Web Addresses
- Appendix C: Configuring Wireless Security
- Appendix D: Finding the MAC Address and IP Address for Your Ethernet Adapter
- Appendix F: Glossary
- Appendix G: Specifications
- Appendix H: Warranty Information
- Appendix I: Contact Information

5. Click the OK button again. Windows may ask you for the original
Windows installation disk or additional files. Supply them by pointing to
the correct file location, e.g., D:\win98, D:\win9x,
c:\windows\options\cabs, etc. (This assumes that “D” is the letter of your
CD-ROM drive).
6. If Windows asks you to restart your PC, click the Ye s button. If Windows
does not ask you to restart, restart your computer anyway.
Repeat steps 1-6 for each PC on your network. When all of your PCs are
configured, proceed to Chapter 4: Configuring the Router.
1. Click the Start button, click Settings and open the Control Panel. From
there, double-click the Network and Dial-up Connections icon. This will
display the Network screen.
2. Select the Local Area
Connection icon for the
applicable Ethernet
adapter (usually it is the
first Local Area
Connection listed).
3. When the Local Area Connection Status screen appears, click the
Properties button. (See Figure 3-3.)
Configuring Windows 2000 PCs
Figure 3-3
Wireless-B Broadband Router
11
2. Select the Configuration tab
and highlight the TCP/IP
line for the applicable
Ethernet adapter (as shown
in Figure 3-1). If the word
TCP/IP appears by itself,
select that line. (Note: If
there is no TCP/IP line list-
ed, refer to your Ethernet
adapter’s documentation to
install TCP/IP now.) Then,
click the Properties button.
3. Click the IP Address tab
and select Obtain an IP
address automatically (as
shown in figure 3-2).
4. Click the Gateway tab and verify that the Installed Gateway field is blank.
Click the OK button.
12
Figure 3-1
Figure 3-2
Instant Wireless
®
Series