
User's Manual


tion can be used to access the Router. See the “For Wireless Connections”
section that follows these connection instructions.
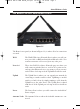
3. Connect another Ethernet cable from your
cable or DSL modem to the Router’s WA N
port (as shown in Figure 2-2).
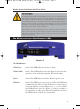
4. Connect the Power Adapter (included) to
the Router’s Power port (as shown in
Figure 2-3) and plug the other end into a
power outlet.
• The Power LED will illuminate green
as soon as the power adapter is con-
nected.
• The Diag LED will illuminate red for a
few seconds while the Router goes
through its internal diagnostic test. The
LED will turn off when the self-test is
complete.
5. Power on the cable or DSL modem. Verify
that the power is on by checking the Link LED in the WAN column on the
front of the Router. The Link LED will be illuminated if the power is on and
the modem is ready.
6. Press the Reset button on the back of the Router. Hold the button in for three
seconds, or until the Diag LED illuminates red. This restores the Router’s
default settings.
7. Power on your PC.
The Router is now connected. Continue to the next chapter to configure
your PCs.
Figure 2-2
Figure 2-3
Instant Wireless
TM
Series
9
BEFW11S4 VER 3 USER GUIDE_2nd.qxd 10/15/02 10:33 AM Page 8