
User's Manual


Chapter 2: Connecting the Router
Before plugging everything together, it’s always a good idea to have everything
you’ll need to get the Router up and running. Depending upon how you config-
ure the Router in Chapter 4: Configuring the Router, you may need some of the
following values from your ISP:
When connecting through a Static IP connection, be sure to have 1) Your
broadband-configured PC’s fixed Internet IP Address, 2) Your broadband-
configured PC’s Computer Name and Workgroup Name, 3) Your Subnet
Mask, 4) Your Default Gateway, and 5) Your Primary DNS IP address.
When connecting through a PPPoE connection, be sure to have 1) Your
PPPoE User Name and 2) Your PPPoE Password.
The installation technician from your ISP should have left this information with
you after installing your broadband connection. If not, you can call your ISP to
request the data.
Once you have the above values, you can begin the Router’s installation and
setup.
Once you are sure that you have the above values on hand, you can begin the
Installation and Setup of the Router.
1. Power everything down, including your PCs, your cable or DSL modem and
the Router.
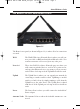
2. Connect an Ethernet cable from one of
your PC’s Ethernet ports to one of the
Router’s LAN ports (as shown in Figure 2-
1). Do the same with all the PCs you wish
to connect to the Router. (LAN Port 4 will
become inactive if you use the Uplink
port.)
In addition to accessing the Router through
an Ethernet connection, a wireless connec-
Before You Start
Connecting Your Hardware Together and Booting Up
Figure 2-1
Wireless Access Point Router with 4-Port Switch
8
BEFW11S4 VER 3 USER GUIDE_2nd.qxd 10/15/02 10:33 AM Page 7