__ Speed Stream Series ADS Inferential Modem Installation Guide Efficient Networks, lnc. Part No.
© Copyright 1999, Efficient Networks, Inc. All rights reserved. Printed In the U.S.A. Product names mentioned herein may be trademarks and/or registered trademarks of their respective companies. Efficient Networks, Inc. shall not be liable for technical or editorial errors or omissions in this document; nor for incidental or consequential damages resulting from the famishing, performance, or nse of this material. Efficient Networks, Inc.
8. Li sensibility And Indemnification, The End User understands and acknowledges that it is solely responsible for the use it makes of the Software. Accordingly, the Bnd User agrees to indemnify and hold ENT harmless from any demands, claims or suits by a third party for loss, damages or expenses (including attorney's fees) arising out of or related 10 use of the Software by the End User. 9.
Introduction Product Overview The Speed Stream driver software provides high-speed connectivity using Asynchronous Transfer Mode (ATM) over an Asymmetric Digital Subscriber Line (ADSORB. This software is designed to be installed on a 3000 series ADS Internal Modem. Once it is installed, 2 modem icon is added to the taskbar and the status of the internal modem can be seen by clicking on the modem icon.
Table 1 System Requirements Windows 98 + Minimum of 32 Bytes recommended « Pentium-class processor required « The PCI bus must support bus mastering. «+ At least one Virtual Private Networking (VPN) Adapter must be installed. Windows NT « Minimum of 32 Bytes recommended « Pentium-class processor required « The PCI bus must support bus mastering. « Service Pack 3 or greater must be installed. NOTE: You may need the Windows (95, 98 or NT) operating system CD during installation.
Hardware Installation Unpacking and Inspection The Speed Stream internal modem should arrive in good condition. Before unpacking the modem, check for any obvious damage to the packaging and notify your carrier immediately upon receipt. system, use an anti-static grounding device when handling the WARNING! To avoid possible damage to modem components or your 4) modem.
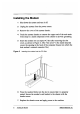
Installing the Modem 1 2 Figure 2 Shut down the system and turn it off. Unplug the system from the power source. Remove the cover of the system chassis. Touch the system chassis or connect the copper end of the anti-static wrist strap to a metal component of the chassis to provide grounding. Insert the modem into an empty PCI slot after removing the slot cover, as shown in Figure 2.
Modem LED The modem is equipped with an LED that indicates proper cable connection. This LED is helpful when connecting cabling because it indicates when the cables have been hooked up correctly. The LED is illuminated when the modem is trained and is passing ATM data properly. NOTE: The LED will be lit or will flash when the modem is in diagnostic loop back mode regardless of what is connected to it.
Software Installation Software Installation Overview Two types of software drivers are provided on the installation CD: PPP and CIP/1483. Your service provider will tell you which of these two types of drivers you need to install. Furthermore, the first chapter provides a procedure for determining which Windows operating system is installed on your computer to know which version of these drivers to install.
Installing PPP Software The PPP driver uses Microsoft’s Dial-Up Networking to create a connection. You must have Dial-Up Networking v1.2 or greater installed to properly install the PPP driver. Refer to the Introduction section of this manual for more detail. Installation Requirements for PPP in Windows 95/98 Dial-Up Networking (DUN) If you will be installing in Windows 95 or Windows 98, you will need the Microsoft Dial-Up Networking application installed.
installation, If it has not been installed or was removed, it must be re-installed. To check whether VPN is installed: 1 Select My Computer > Control Panel > Network. 2 On the Configuration list, there should be a Microsoft Virtual Private Networking Adapter listed. 3 If not, select the Add button and double-click on Adapter. 4 Scroll down in the Manufacturers list and select Microsoft. 5 Under Network Adapters, double-click on Microsoft Virtual Private Networking Adapter.
3 Next, the Install From Disk dialog box will appear. Click Browse and select the CD-ROM drive from the Drives list. 4 Double-click W95-98 and Ppp then click OK. 5 Click OK or Next on the Install From Disk dialog box. Em i 6 Windows will then begin copying the driver files. After the files are copied, the installation is complete and Windows will be restarted. During this process yon may be prompted for the Windows 95 OS installation CD-ROM. If so, insert the CD and enter the path to the requested files.
Installation in Windows 95B 1 After installing the modem hardware, power on the system. When Windows comes up, insert the software installation CD in the CD-ROM drive. 2 The Update Device Driver Wizard dialog (shown on the next page) will appear. Click Next. 12 Installing PPP Software Efficient Networks, Inc.
3 On the next dialog box, click the Other Locations button. Update [IN y E11 click Finish: To ian. the Select Other Locations dialog, select Browse. 3-b Click on the CD-ROM drive in the list, select W95-98 and Ppp then click OK. On the Select Other Location dialog, click OK. Efficient Networks, Inc.
4 On the Update Device Driver Wizard, click Finish. insert Hi Q ~ ‘Windows will then begin copying the driver files. During this process you may be prompted for the Windows 95 OS installation CD-ROM. If so, insert the CD and enter the path to the requested files. Click OK. 6 At this point, if Dial-Up Networking (DUN) is required (for PPP drivers only) but it is not installed, a message is presented saying: An incorrect version of Dial-Up Networking is installed.
7 When the system comes back up, one or more configuration dialog boxes may or may not be presented, depending on your service provider. Configure the settings as directed by your network service provider. When configuration is complete, if prompted to restart Windows, click Yes. 8 When the system comes back up, you will need to set up your PPP dial-up connection as described on page 22.
1 Click Start > Settings > Control Panel > Network and click the Adapters tab (if not already selected). Select the Efficient client and click the Properties button. 2 Click Update. 3 Find the profile (.acf file) on the Speed Stream installation CD using the standard Open dialog box provided. 4 Speed Stream configuration dialog boxes will be presented and the necessary address book entries will be created. Restart Windows.
4 On the next dialog, the first option Search for the best driver for your device (Recommended) should be selected. 5 On the next dialog, select only the checkbox labeled Specify a location. Then click the Browse button. Efficient Networks, Inc.
5.a In the browse list, locate your CD-ROM drive letter and highlight it, then select the W95-98 folder and Ppp then click OK. 5-b Click Next on the Add New Hardware Wizard dialog box. 6 The Add New Hardware Wizard states that “Windows Is now ready to install the best driver for this device.” Click Next. Windows will then copy the driver files from your CD-ROM. As the files are being copied, you may be prompted for the Windows insert the CD and click OK. 7 Next you may see the Insert Disk dialog box.
Installation in Windows NT 4.0 NOTE: The user must have Administrator rights on the system in which the modem is being installed. 1 After installing the modem hardware, power on the system. When Windows NT comes up, log in and insert the Speed Stream installation CD in a CD-ROM drive. 2 Click the Start button and point to Settings; click Control Panel. Double-click the Network icon.
4 On the Select Network Adapter dialog box, click the button labeled Have Disk. BI Acton EN16Bx MP Pn BY Adapter ATM LAN Emulation Adapter E9 Advanced Micro Devices AM2TI0/AMIB00T Adapter HY Allied Telesales AT1700 Ethernet Adapter 2 Allied Telesales AT-2560 Series PCI/100 Ethernet Adapter E32 AMD TENET Family Ethernet Adapter i JER Andrew ing Adapt 5 In the Insert Disk dialog box, you must specify the CD file path. (If you do not know the CD-ROM drive letter, then look on the My Computer dialog box.
selecting Settings; click on Control Panel. Double-click on the Network icon and then click Services and Add. Select Remote Access Services from the list and click OK. 8 Next, the Remote Access Services configuration dialog box is presented, and then the Add RAS Device dialog box appears. Select the entry labeled ISDN_n Envelop and click OK. Click the Configure button. On the Configure Port Usage dialog box, select Dial Out Only and click OK. Click Network and make sure TCP/IP is checked. Click OK.
10 Click the Finish button to complete the configuration. Setting up a PPP Connection After installing the PPP software, you may be required by your service provider to configure the IP address before you connect using Dial-Up Networking, If so, following your service provider’s instructions to configure your IP address, then follow the procedure below to create a connection. Creating a PPP Connection 1 Double-click the My Computer icon on your desktop; then double-click the Dial-Up Networking icon.
CIP/1483 Driver Installation The Classical IP/RFC 1483 Driver differs from the PPP driver because it provides an “always-on” network connection. The CIP/1483 driver does not use Dial-Up Networking. Installation in Windows 95 or 95A 1 After installing the modem hardware, power on the system. When Windows comes up, insert the software installation CD in the CD-ROM drive. 2 Windows will bring up the New Hardware Found dialog box. Be sure that Driver from disk is selected before you click OK.
§ Click OK on the Install From Disk dialog box. install From Disk 6 One or more configuration dialog boxes will be presented, depending on your service provider. Configure the settings as directed by your network service provider. When you click Finish, Windows will then begin copying the driver files. During this process you may be prompted for the Windows 95 installation CD-ROM. If so, insert the Windows 95 CD-ROM and click OK.
“updated diver. To da this, 3 On the next dialog box, click the Other Locations button. 3-a On the Select Other Locations dialog, select Browse. Efficient Networks, Inc.
3.b Click on the CD drive in the list, double-click on W95-98 then PIC-1483 and click OK. On the Select Other Location dialog, click OK. 4 On the Update Device Driver Wizard, click Finish. 5 Next, the Insert Disk dialog may appear. Click OK. 6 On the Copying files dialog box, click Browse and then select W95-98 and Ci-1483. Click OK. Windows will then begin copying the driver files. 7 One or more configuration dialog boxes will be presented, depending on your service provider.
Troubleshooting Windows 95 Installation Recovery from Canceling Installation An incomplete installation may occur if: « In Windows 95 or 95A, if you select Do not install a driver on the New Hardware Found dialog box « In Windows 95B, if you click Finish on the Update Device Driver Wizard dialog box without inserting the Speed Stream installation CD Use the following procedure to clear the partial install from the system. 1 Click Start and point to Settings; click Control Panel and double-click System.
Installation in Windows 98 1 After installing the modem hardware, power on the system. 2 When the system comes up, the Add New Hardware Wizard will appear indicating that the modem was discovered. 3 Insert the installation CD-ROM and click Next. 28 CIP/1483 Driver Installation Efficient Networks, Inc.
4 On the next dialog, the first option Search for the best driver for your device (Recommended) should be selected. Click Next. 5 On the next dialog, select only the checkbox labeled Specify a location. Then click the Browse button. Efficient Networks, Inc.
5-a In the browse list, double-click on the CD-ROM drive letter, then select the W95-98 folder and Ci-1483 and click OK. 5.b Click Next on the Add New Hardware Wizard dialog box. 6 The Add New Hardware Wizard states that “Windows is now ready to install the best driver for this device.” Click Next. Windows will then copy the driver files from your CD-ROM. 7 Next you may see the Insert Disk dialog box. Click OK.
1 Double-click the My Computer icon on your desktop and then double-click Control Panel followed by Network. 2 Select the TC PAP entry for the Speed Stream device and click then Properties button. 3 Follow your service provider’s instructions to configure the IP address of your system. 4 When configuration is complete, click OK. You may be prompted to reboot the computer. If so, select Yes. Installation in Windows NT 4.0 1 After installing the modem hardware, power on the system.
4 On the Select Network Adapter dialog box, click the button labeled Have Disk. Network Adapter BY Acton Entente MP PrP Ethernet Ada pier HR Adapter ATM LAN Emulation Adapter BR Advanced Micro Devices AM2100/AM1500T Adapter HP Allied Telesales AT1700 Theme Adapter EF Allied Katelyn AT-2560 Series PCI/100 Hemstitch Adapter E5 AMD PUNNET Family Ethernet Adapter AEA 5 On the Insert Disk dialog box, you must specify the CD file path.
Speed Stream Status After the modem and driver are properly installed, you will see the following icons on the taskbar: Indicates that the modem has an active connection. The lights will blink when the modem is transmitting, x Indicates that the modem is not connected or configured ks properly. Right-clicking on the taskbar icon provides a menu of detailed status and on-line help. The taskbar icon can be turned off by going to the Control Panel and double-clicking the Speed Stream Status icon.
Software Removal Removing the Driver Software Windows 95/98 1 2 Select Start then Settings and open the Control Panel. From the Control Panel, select Network. Select the Configuration tab and select the Speed Stream product from the list. Click on the Remove button and select OK to close the Network dialog. When prompted to restart the system, select No. Shut down Windows and turn off the machine. Remove the adapter from the machine and turn the system back on.
Technical Reference Speed Stream 3010 Adapter Specifications Size {6.3 cm x 12.7 cm) Weight 3 oz. {85.04 grams) Power Max 1.5 amps Max 0.2 amps @ £12V + 5% Temperature Operating: Non-Operating, storage: Humidity 10% to 90% non condensing PCI Frequency 0 to 33MHz Bus Master 32 bit, 33 Mhz PCI bus version 2.
Temperature Operating: Non-Operating, storage: Humidity 10% to 90% non condensing PCI Frequency 0 to 33MHz Bus Master 32 bit, 33 Mhz PCI bus version 2.1 Bus Master capability with DMA bursting Cabling Shielded Twisted Pair Connector RII Operating distance up to 15 Kft AWG 26, 18 Kft AWG 24 Line code DMT. FDM, ADS Line rate Up to 640 Bps upstream, up to 6.1 Bps downstream Bit Error Rate 10-7 using a 6 dB margin Transmitter type Transformer-coupled differential line driver Line Power PSALM per T1E1.