CDB5480U CDB5480U Engineering Board and GUI Software Features General Description • • • • • • • • The CDB5480U is an extensive tool designed to evaluate the functionality and performance of the Cirrus Logic CS5480 power/energy measurement device.
CDB5480U IMPORTANT SAFETY INSTRUCTIONS Read and follow all safety instructions prior to using this demonstration board. This Engineering Evaluation Unit or Demonstration Board must only be used for assessing IC performance in a laboratory setting. This product is not intended for any other use or incorporation into products for sale. This product must only be used by qualified technicians or professionals who are trained in the safety procedures associated with the use of demonstration boards.
CDB5480U TABLE OF CONTENTS 1. HARDWARE .............................................................................................................................................. 4 1.1 Introduction ........................................................................................................................................ 4 1.2 Evaluation Board Overview ................................................................................................................ 4 1.3 Analog Section ........
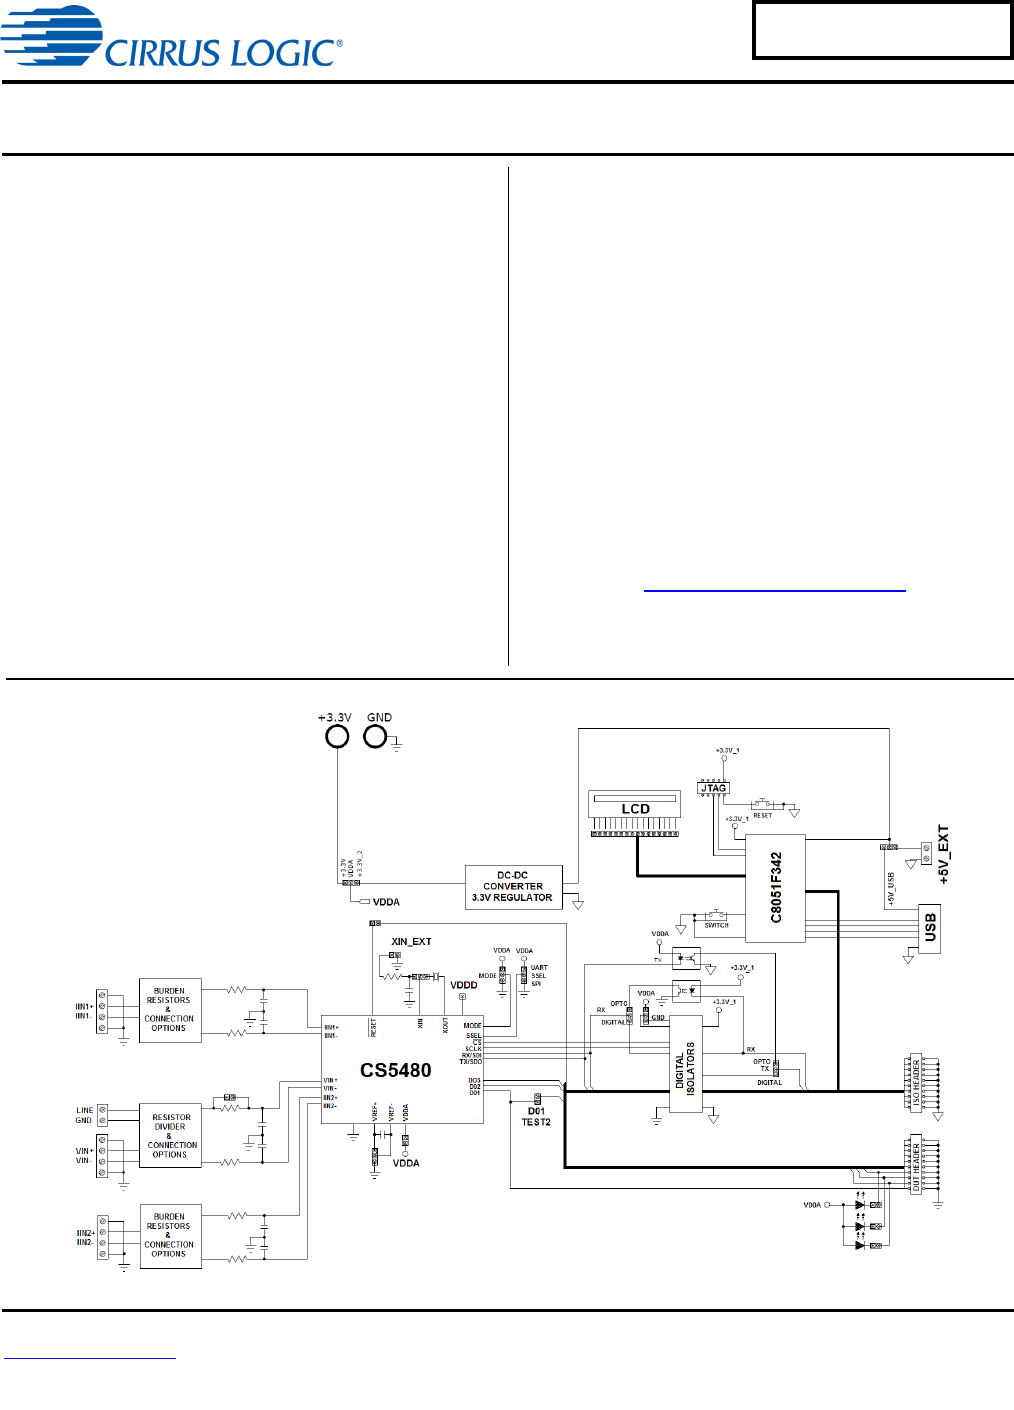
CDB5480U 1. HARDWARE 1.1 Introduction The CDB5480U evaluation board provides a convenient means of evaluating the CS5480 energy measurement IC. The CDB5480U evaluation board operates from a single USB or 5V power supply. An optional 3.3V power supply input is available for powering the CS5480 directly. The evaluation board interfaces the CS5480 to a PC via a USB cable. To accomplish this, the board comes equipped with a C8051F342 microcontroller and a USB interface.
CDB5480U 1.3 Analog Section The analog section of the CDB5480U is highly configurable. Onboard signal conditioning options for the voltage and current channels enable most applications to interface directly to the sensors. The following two sections define the voltage and current channels configurations. 1.3.
CDB5480U J6 R15 422K R14 422K J4 R12 422K CDB5480U R8 422K LINE NEUTRAL The CDB5480U evaluation board provides screw-type terminal (J4) to connect to the high-voltage line input. By installing jumpers on J6 to position LINE and J11 to position GND, the input voltage signal is supplied from the high-voltage input. Extreme care should be used when connecting high-voltage signals to the CDB5480U evaluation board (see Figure 3). J45 LINE VIN+ R5 1K R6 1K GND 0.027UF C4 0.
CDB5480U 1.3.2 Current Sensor Connection Current input options include an external signal (via screw terminals or XLR connectors) or GND. Table 2 shows the options available. Table 2.
CDB5480U 1.4 Digital Section The digital section contains the microcontroller, USB interface, LCD, optical isolation, JTAG header, reset circuitry, and external interface headers (J17 and J19). The microcontroller interfaces the UART or SPI of the CS5480 with the USB connection to the PC, enabling the GUI software to access all of the CS5480 registers and functions. 1.4.1 Serial Port Selection Communication to the CS5480 is provided through two serial port options — UART or SPI.
CDB5480U 1.4.2 Interface to Microcontroller Interface headers J17 and J19 are provided to allow the CDB5480U to be connected to an external energy registration device or an external microcontroller. Interface header J17 provides direct access to the CS5480 pins while interface header J19 provides an isolated connection. It is imperative to use the isolated connection (J19) when high-voltage signals are used. Failure to use isolation can result in damage to components or electrical shock.
CDB5480U 1.5 Power Supply Selection Table 4 illustrates the power supply connections on the evaluation board. The positive analog (VDDA) for the CS5480 can be supplied using the +3.3V binding post (J36 and J37) or the onboard +3.3V regulator. Jumper J38 allows the VDDA supply to be sourced from the +3.3V binding post (J37) or the regulated +3.3V supply. The DC-DC converter (U8) powers the onboard +3.3V regulator.
CDB5480U 1.6 Typical Sensor Connections The CDB5480U evaluation board provides connections directly to several types of sensors. Flexible onboard filter networks provide a convenient configuration for three common transducers, including current shunt, current transformer (CT), or Rogowski coil. 1.6.1 Shunt Power Meter Example A low-cost current shunt configuration is easily achievable with the CDB5480U evaluation board.
CDB5480U 1.6.2 Current Transformer Power Meter Example A slightly more expensive option is to use a current transformer (CT) to connect the AC current to the CDB5480U evaluation board. Figure 7 depicts the voltage and current connections for a CT sensor and its associated filter configurations. NEVER “open circuit” a CT. Make sure that all signals are well connected before the power source is turned on. Extreme care should be taken when connecting high-voltage signals to the CDB5480U evaluation board.
CDB5480U 1.6.3 Rogowski Coil Power Meter Example CDB5480U PHASE J46/J52 J1/J12 GND IIN1+/IIN2+ NO POP R13/R24 J54/J55 NO POP R11/R22 IIN1-/IIN2GND R2/R22 100 J7/J13 J53/J56 R50/R53 1K 0.033UF 0.033UF C6/C12 C35/C2 0.033UF 0.
CDB5480U 1.7 Standalone Meter Application The CDB5480U evaluation board provides a standalone power meter using the CS5480, MCU, and LCD. The user can enable the power meter by connecting the sensors to the analog inputs, providing power to the board, and resetting the MCU by pressing the RESET switch. Refer to “Typical Sensor Connections” on page 11 for details on the sensor connections and “Power Supply Selection” on page 10 the details on supply options.
CDB5480U 2. SOFTWARE The evaluation board comes with software and a USB cable to link the evaluation board to the PC. The evaluation software was developed with LabWindows®/CVI®, a software development package from National Instruments. The evaluation software is designed to run with Windows XP™ and Windows 7™. The following procedure is based on Windows XP. 2.1 Installation Procedure Follow the steps below to install the GUI: 1. Access the following web site: http://www.cirrus.com/en/support. 2.
CDB5480U 2.3 Start-up Window When the software is launched, the start-up window will appear. This window contains information concerning the software's title, revision number, and copyright date (see Figure 10). Figure 10. GUI Start-up Window A menu bar at the top displays four items: System, Cirrus Test, Connect, and Quit. Initially System and Cirrus Test are disabled. After establishing a link to a data source, the System and Cirrus Test items will become available. 2.
CDB5480U recognize the MCU (typically 3 seconds), and then select "OK." Figure 11. Connect to the CDB board Window At this point, the USB menu item is checked, indicating that the PC has successfully communicated with the CDB5480U evaluation board. The micro-code version information is read from the board and displayed on the screen. See Figure 12. Due to improvements to the software or new features being added, the version displayed may be different than the image shown here. Figure 12.
CDB5480U 2.4.2 CS5480 Serial Port Config Item In the Connect menu, the CS5480 Serial Port Config item allows the user to select different types of serial communication — UART or SPI. See Figure 14. Figure 14. Connect Menu Showing Serial Connection Options Before the software is configured, it is necessary to set J16 on the CDB5464U board to either UART or SPI communication. To select UART communication install jumper J16 in the SSEL to UART position.
CDB5480U To select SPI communications, position jumper J16 to the SSEL to SPI position and select SPI in the Serial Port Selection window. See Figure 16. Figure 16. SPI Serial Port Selection Window, SPI Selected After the serial port has been selected, press the OK button. The MCU will try to read the chip ID from the CS5480. The chip revision number will be displayed in "Device:" in the Start-up window.
CDB5480U 2.5 System Menu The System pull-down provides three options: Setup CS5480, Calibration, and Conversion. Each window provides a means to evaluate the different functions and performance of the CS5480. See Figure 18. Figure 18.
CDB5480U 2.5.1 Setup Window The evaluation software provides access to the common CS5480's internal registers through the Setup window. See Figure 19. Enter the Setup window by selecting the Setup CS5480 item from the System menu. Figure 19. Setup Window The Setup window displays all of the common CS5480 registers in hexadecimal notation and are decoded to provide easier readability. Refer to the CS5480 data sheet for information on register functionality and definitions.
CDB5480U 2.5.1.1 Refresh Screen Button The Refresh Screen button will update the contents of the screen by reading all the register values from the CS5480. It is a good idea to press the Refresh Screen button when entering the Setup window, or after modifying any registers, to reflect the current status of the CS5480. 2.5.1.2 Reset DUT Button The Reset DUT button will software reset the CS5480. The CS5480 will perform a software reset as discussed in the CS5480 data sheet.
CDB5480U 2.5.1.8 Phase Compensation The Phase Comp Register section is used to make changes to and display the contents of the CS5480's PC (Phase Compensation Control) register. The PC register allows coarse and fine phase adjustment on each channel of the CS5480 data path. Refer to the CS5480 data sheet for descriptions of the PC register bits. 2.5.1.9 Integrator Gain, System Gain The Integrator Gain and System Gain sections display the signal path gain in both hexadecimal and decimal format.
CDB5480U 2.5.1.16 V1/V2 Sag, V1/ V2 Swell, and I1/I2 Overcurrent Registers The registers for voltage sag, voltage swell, and overcurrent are displayed in the V1 Sag, V2 Sag, V1 Swell, V2 Swell, I1 Overcurrent, and I2 Overcurrent Register sections. These sections display the level and duration values of the corresponding registers in both hexadecimal and decimal format. Each register can be modified by typing a value in the corresponding decimal or HEX: field.
CDB5480U Figure 20. Calibration Window The Refresh Screen button will update the contents of the screen by reading all the register values from the part. It is a good idea to press the Refresh Screen button when entering the Calibration window, or after modifying any registers to reflect the current status of the CS5480. 2.6.1 Save Cal and Load Cal Buttons Clicking the Save Cal button will save the calibration widow's configuration to a .txt file.
CDB5480U 2.6.3 Performing Calibrations AC/DC offset and gain calibrations can be performed on both the voltage and current channels of the CS5480. It is generally a good idea to software-reset the CS5480 before running calibrations, because the initial values in the calibration registers will affect the results of the calibration. A software reset will reset these registers back to the default values of zero offset and unity gain.
CDB5480U 2.7 Conversion Window The Conversion window allows the user to see the results of single and continuous conversions and the CS5480 status, perform data averaging, and utilize the power-saving modes of the CS5480. The Conversion window can be accessed from the System menu pull-down, Conversion menu item. The Conversion window provides the active, apparent, and reactive energy calculations register results for each channel.
CDB5480U number in the Samples to Average field. The user should stop continuous conversion before leaving this window. The Continuous Conversion button should not be used with BAUD rates less than 1200 Hz in UART mode. Using lower BAUD rates (including the default 600 baud) will result in overflowing the communication buffer and cause other window errors and/or communication failure. Data logging can be enabled using the DATALOG On/Off check box and Filename field. 2.7.
CDB5480U 2.8 Cirrus Test Window The Cirrus Test window provides three options: Test and Debug, ADC Data Collection, and ADC Data Collection to File. Each window provides a means to evaluate the different functions and performance of the CS5480. See Figure 22. Figure 22. Cirrus Test Pull-down Options 2.8.1 Data Collection Window The Data Collection window allows the user to collect sample sets of data from the CS5480 and analyze them using time domain, FFT, and histogram plots.
CDB5480U The Data Collection window can only be accessed when operating in SPI mode. When UART serial communication is enabled, an error window will be displayed. See Figure 24. To enable SPI refer to “Serial Port Selection” on page 8. Figure 24. Data Collection UART Error Message 2.8.1.1 Time Domain / FFT/ Histogram Selector The Time Domain/FFT/Histogram selector selects the type of data processing to perform on the collected data and displays the results in the plot area.
CDB5480U 2.8.1.8 Configuration Window The Configuration window allows the user to set up the data collection and analysis parameters. See Figure 26. Figure 26. Data Collection Configuration Window 2.8.1.8.1 Number of Samples The Number of Samples field allows the user to select the number of samples to collect, between 16 and 524288. 2.8.1.8.2 Average When performing FFT analyses, the Average field determines the number of FFTs to average.
CDB5480U 2.8.1.9 Collecting Data Sets To collect a sample data set: 1. In the Data Collection window, press the Config button to bring up the Configuration window and view the current settings. 2. Select the appropriate settings from the available options (see “Configuration Window” on page 31) and press the Accept button. 3. The Data Collection window should still be visible. Press the Collect button to begin collecting data. 4.
CDB5480U • MINIMUM: indicates the minimum value of the collected data set. Figure 27. Histogram Analysis 2.8.1.12 Frequency Domain Information The following describe the indicators associated with FFT (Fast-Fourier Transform) analysis. FFT data can be plotted in the Data Collection window by setting the analysis type selector to FFT. See Figure 28. The FFT information includes: • • • • • • FREQUENCY: displays the x-axis value of the cursor on the FFT display.
CDB5480U • FS-PdB: indicates the full-scale to signal Ratio (decibels). Figure 28.
CDB5480U 2.8.1.13 Time Domain Information The following controls and indicators are associated with time domain analysis. Time domain data can be plotted in the Data Collection window by setting the analysis type selector to Time Domain. See Figure 29. The time domain plot includes: • • • • COUNT: displays current x-position of the cursor on the time domain display. MAGNITUDE: displays current y-position of the cursor on the time domain display.
CDB5480U 2.8.2 Data Collection to File Window The Data Collection to File window allows the user to collect instantaneous voltage and current register data over an extended period of time to a data file. See Figure 30. The following steps are necessary for data collection to a file: 1. Provide the Time to Collect in seconds. 2. If a delay before data collection is needed, enter the time in seconds for the Delay. 3. Select the voltage and current channel 1 (V1,I1) or voltage and current channel2 (V2,I2).
CDB5480U 2.8.3 Setup and Test Window The Setup and Test window allows the user a way to access CS5480 registers and send commands to the CS5480 directly. See Figure 31. Figure 31. Setup and Test Window There are three types of transactions: Write, Read, and Send. The CS5480 memory is organized by pages. In order to properly write a register it is necessary to set the Page, Address, and Value to Write field and then press the Write button.
APPENDIX A. BILL OF MATERIALS CIRRUS LOGIC CDB5480U_REV_D.PL BILL OF MATERIAL Item 1 2 3 4 5 6 7 8 9 10 11 12 13 14 15 16 Cirrus P/N 001-04187-Z1 001-10064-Z1 001-04523-Z1 001-02194-Z1 001-04345-Z1 001-01994-Z1 001-02194-Z1 001-10226-Z1 001-02189-Z1 012-00010-Z1 001-10127-Z1 001-10233-Z1 012-00013-Z1 165-00004-Z2 070-00055-Z1 110-00055-Z1 Rev A A A A A A A A A A A A A A A A Description CAP 0.027uF ±5% 50V X7R NPb 0805 CAP 15pF ±5% 50V C0G NPb 0603 CAP 1uF ±10% 16V X7R NPb 0805 CAP 0.
DS893DB5 CIRRUS LOGIC CDB5480U_REV_D.PL BILL OF MATERIAL Item 36 37 38 39 40 41 42 43 44 45 46 47 48 49 50 51 Cirrus P/N 020-01816-Z1 021-00347-Z1 021-00407-Z1 021-00238-Z1 021-00259-Z1 021-00266-Z1 020-00673-Z1 021-00242-Z1 020-01473-Z1 020-00914-Z1 020-00673-Z1 021-00718-Z1 120-00002-Z1 110-00045-Z1 065-00333-Z4 060-00569-Z1 Rev A A A A A A A A A A A A A A B2 A Description RES 1k OHM 1/8W ±1% NPb 0805 FILM RES 2.
APPENDIX B. SCHEMATICS CDB5480U DS893DB5 Figure 32.
DS893DB5 ECO# REV DESCRIPTION INC BY/DATE CHK BY/DATE +3.3V_1 J57 130 R55 XIN_EXT SPI J15 VDDA J16 4 C13 X7R 0.01UF CRYSTAL C 4 3 E 2 CS5480-INZ GND VDDA C20 1uF VDDA PAD THERM J41 7 8 9 10 11 12 VDDA J40 VDDA 2 Z1 GND 1 J36 P6KE6.8 6.8V J38 C30 ELEC 47uF C31 X7R 0.1uF C10 X7R 0.1uF 2 DO3 D3 2 DO2 8 GND2 GND1 7 EN2 EN1 6 B4 A4 5 A3 B3 4 B2 A2 3 B1 A1 2 GND2 GND1 1 VDD2 VDD1 RESET CS SCLK SDI +3.
REV DESCRIPTION +5V_EXT +3.3V_1 GND GND1 3 RESET R45 C27 X7R 0.1uF 1K JTAG/C2 GND1 C28 X7R 1UF GND 1K R46 6 0 R48 680 C8051F342-GQ USB_+5V R35 R36 R37 R38 R40 R41 R42 R43 SCLK SDI RESET GND1 JP1 JP5 JP2 JP6 JP3 JP7 JP4 JP8 +3.3V_1 DESCRIPTION: SHEET TITLE: GND1 DO3 DO2 DO1 RESET S2 3 PART # GND1 SDO R47 5.1K SWITCH C29 X7R 0.1uF GND1 R56 0 NO POP CS +3.3V_1 C26 22pF GND1 R34 0 26 25 24 23 22 21 20 19 GND1 USB GND1 GND P1.0 P1.1 P1.2 P1.3 P1.4 P1.5 P1.
DS893DB5 APPENDIX C. LAYER PLOTS 43 CDB5480U Figure 35.
CDB5480U DS893DB5 Figure 36.
DS893DB5 45 CDB5480U Figure 37.
CDB5480U DS893DB5 Figure 38.
CDB5480U REVISION HISTORY Revision DB1 DB2 DB3 DB4 DB5 DS893DB5 Date APR 2011 DEC 2011 JAN 2012 MAR 2012 APR 2012 Changes Initial Release. Updated screen shots and circuit diagrams to align with B0 silicon. Corrected typographical errors. Updated content. Updated screen shots and circuit diagrams to align with B2 silicon.