Commercial Upright Vacuum C-CPU4T Save These Instructions
Getting Started Important Safety Instructions Grounding Instructions Parts Identification How to Assemble and Operate the Vacuum 2 3 4 5 Maintenance and Care How to Change the Vacuum Bag How to Change the Filters Handle Adjustments Edge Cleaning Feature Automatic Self-Adjusting Nozzle On-Board Tool Cleaning How to Replace the Vacuum Belt How to Clean the Nozzle Hose Thermal Fuse Protection 6 6 7 7 7 8 9 10 11 Problem Solving Guide Troubleshooting For Best Performance Warranty 12 12 13 1
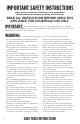
IMPORTANT SAFETY INSTRUCTIONS When using an electrical appliance, basic precautions should always be followed, including the following: READ ALL INSTRUCTIONS BEFORE USING THIS APPLIANCE. FOR HOUSEHOLD USE ONLY. IMPORTANT: The manufacturer cannot accept responsibility for damage caused when the appliance is not used according to the instructions, or for uses other than those for which it was intended.
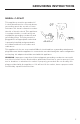
GROUNDING INSTRUCTIONS MODEL: C-CPU4T This appliance must be grounded. If it should malfunction or break down, grounding provides a path of least resistance for electric current to reduce the risk of electric shock. This appliance is equipped with a cord having an equipment-grounding conductor and grounding plug. The plug must be plugged into an appropriate outlet that is properly installed and grounded in accordance with all local codes and ordinances.
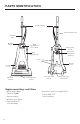
PARTS IDENTIFICATION Cord retainer Cord storage hook Handle tube On/Off switch Bag compartment cover latch Easy-carry handle Accessory attachment opening Bag compartment Tools Nozzle hose Nozzle hose Furniture guard Self-adjusting nozzle Thermal reset button Thermal reset instructions Replacement Bags and Filters • HEPA Media Bags Part # C-14007 6 per package • Genuine Post Filter Part # CMPS-PF 1 per package 4 • Genuine Foam Secondary Filter Part # CMPS-SF 1 per package
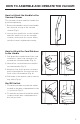
HOW TO ASSEMBLE AND OPERATE THE VACUUM How to Attach the Handle to the Vacuum Cleaner The vacuum cleaner and the handle are packed separately. 1. Remove the handle screw, insert handle into the hole on top of the vacuum cleaner (Fig. 1). 2. Line up the small hole on the handle with the small hole on the vacuum cleaner, and insert the screw. Make sure the screw is tightened securely. Fig. 1 How to Attach the Cord Retainer to the Handle 1.
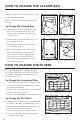
HOW TO CHANGE THE VACUUM BAG Always operate the vacuum cleaner with a vacuum bag installed. Bags should be changed when they are 2/3 full. To Change the Vacuum Bag 1. Unplug the vacuum cleaner. Remove the bag compartment cover, and remove the used bag from the bag holder (Fig. 1). Fig. 1 Fig. 2 Fig. 3 Fig. 4 2. Attach the new vacuum bag onto the bag holder (Fig. 2). 3. Pull the bottom corners of the new vacuum bag (Fig. 3). 4.
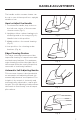
HANDLE ADJUSTMENTS The handle on this vacuum cleaner can be set to one of three positions – upright, middle or low. How to Adjust the Handle 1. To release the handle, step on the on the left rear corner of the vacuum cleaner nozzle (Fig. 1). 2. Upright position – when cleaning tools are being used or for storage (Fig. 2). Handle locks in this position. Fig. 1 3. Middle position – for normal cleaning (Fig. 3). 4. Low position – for cleaning under furniture (Fig. 4).
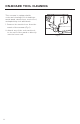
ON-BOARD TOOL CLEANING This vacuum is equipped with on-board cleaning tools including a metal wand, stretch hose, crevice tool, and upholstery tool with brush. 1. Remove the stretch hose from the nozzle of the vacuum (Fig. 1). 2. Attach any of the on-board tools to the end of the wand or directly onto the house cuff. 8 Fig.
HOW TO REPLACE THE VACUUM BELT CAUTION: Unplug the vacuum cleaner before performing any of these steps. How to Remove the Bottom Plate 1. Place the vacuum cleaner in the low position by pressing the foot pedal release twice while reclining the handle. Turn the vacuum over. 2. Remove the two screws holding the bottom plate in place (Fig. 1). Fig. 1 3. Remove the bottom plate. How to Replace the Belt 1. Turn the vacuum cleaner over and remove the bottom plate as described in the above section. 2.
HOW TO CLEAN THE NOZZLE HOSE CAUTION: Unplug the vacuum cleaner before performing any of these steps. The nozzle hose carries the dirt from the nozzle to the vacuum bag. If the hose should become clogged: 1. Pull out and turn the lid of the accessory attachment opening. Remove the clog or blockage (Fig. 1). 2. If the above step is not enough, remove hose cuff from the attachment port inlet (Fig. 2). If you haven’t located the clog, turn the vacuum cleaner over and remove the bottom plate.
THERMAL FUSE PROTECTION This vacuum cleaner comes equipped with a Manual Reset Thermal Fuse Protector. The thermal protector is designed to protect the vacuum cleaner from overheating due to a cutoff in airflow (i.e. clogged hose, operating the vacuum without a bag). Should this situation occur, the thermal fuse protector will safely shut off the vacuum cleaner to avoid any potential damage. To Reset the Thermal Fuse 1. Unplug the vacuum cleaner. 2.
PROBLEM SOLVING GUIDE Troubleshooting WARNING! To reduce the risk of electrical shock or injury from moving parts, unplug vacuum before servicing or cleaning. CAUTION! To reduce the risk of electric shock, do not handle plug or appliance with wet hands. PROBLEM CHECK POINT POSSIBLE SOLUTION Vacuum won’t turn on Power Cord Plug unit in firmly. House Fuse or Breaker Replace fuse/reset breaker. Vacuum Bag Install new bag. Filter Install new filter. Hose Remove obstacle.
WARRANTY How Long Coverage Lasts: Warranty coverage for the vacuum lasts two years. What Cirrus Will Do: The manufacturer will, at its option, repair or replace a defective vacuum or vacuum cleaner part that is covered by this limited warranty. As a matter of warranty policy, Cirrus Vacuum will not refund the consumer’s purchase price. Warranty Registration: To register for warranty please visit our website at www.CirrusVacuum.com and fill out a registration form located under Warranty Registration.